
The Pinterest pin showed a sunlit bed, a perfect pile of pillows, and a gallery wall that matched the duvet exactly. Real life gave me a sagging rug, a crooked frame, and three pillows that refused to look intentional. After I stopped copying styled photos and started using small rules, the room finally felt like mine instead of someone else’s mood board.
These ideas aim for practical, renter-friendly bedroom updates that look editorial without breaking the bank. Most projects are under two afternoons, many require only basic tools, and each one works in small apartments or larger rooms. If you want a warm, lived-in look that reads intentional rather than staged, these are the moves I relied on after trying this in three rentals.
1. Layered Rug Pairing for Depth
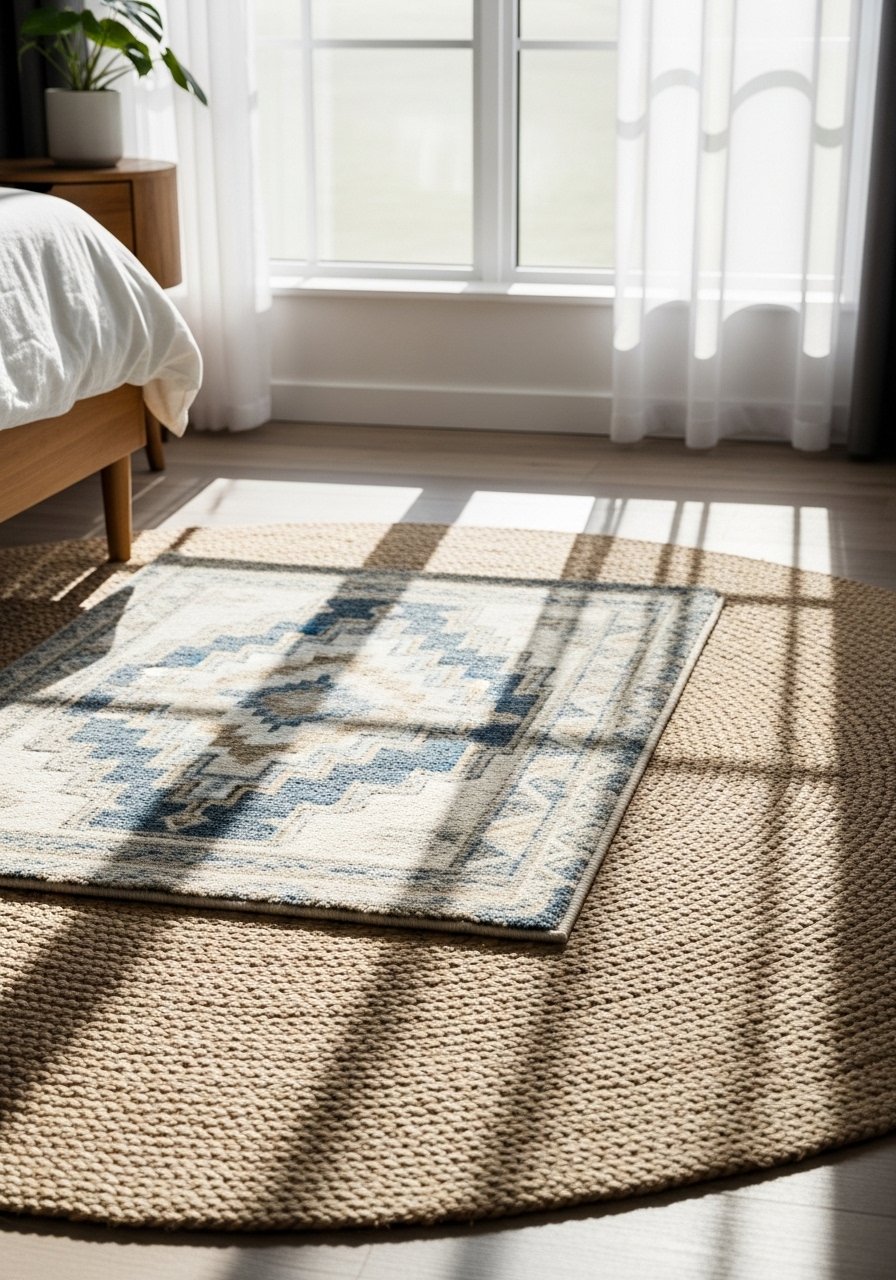
Rugs make a room feel grounded, but most people pick one that is too small. The trick is a larger base rug that extends under the bed plus a smaller patterned runner layered perpendicular at the foot. Visually it creates a framed zone and keeps the bed feeling anchored. This works for small rooms and rentals because you can swap the top rug seasonally. Try a neutral base rug with a 6 to 12 inch floor reveal around the edges and a patterned rug on top. I bought a flatweave base and a wool accent rug to avoid slipping, like the natural jute rug and a small wool area rug.
Mistake to Avoid: Picking one rug that is too small so it floats in the room instead of anchoring furniture.
2. Low-Commitment Peel-and-Stick Accent Wall
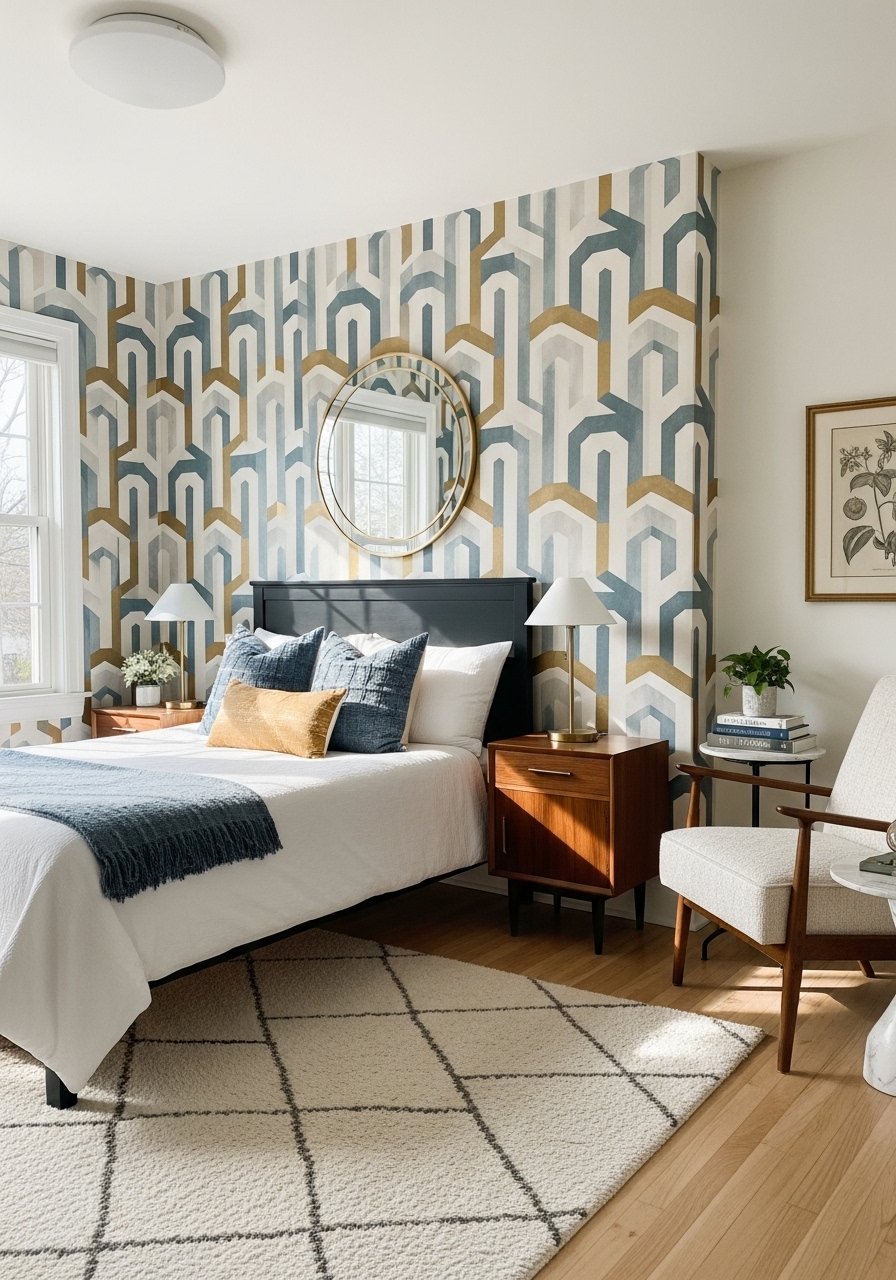
Full-wall wallpaper feels permanent and intimidating. Peel-and-stick allows a renter-friendly statement behind the headboard only, two-thirds of the wall height. Use a level and measure twice, cut panels 1 inch larger to butt them tightly, then trim. I used high-adhesion peel-and-stick in a subtle geometric that reads layered rather than loud. It takes about three hours for a queen wall and costs far less than wallpapering an entire room. Pair it with a simple wooden headboard and a peel-and-stick wallpaper sample pack before committing.
Mistake to Avoid: Applying a full sheet without planning seams, which causes bubbling and crooked repeats.
3. DIY Upholstered Headboard That Hides Flaws
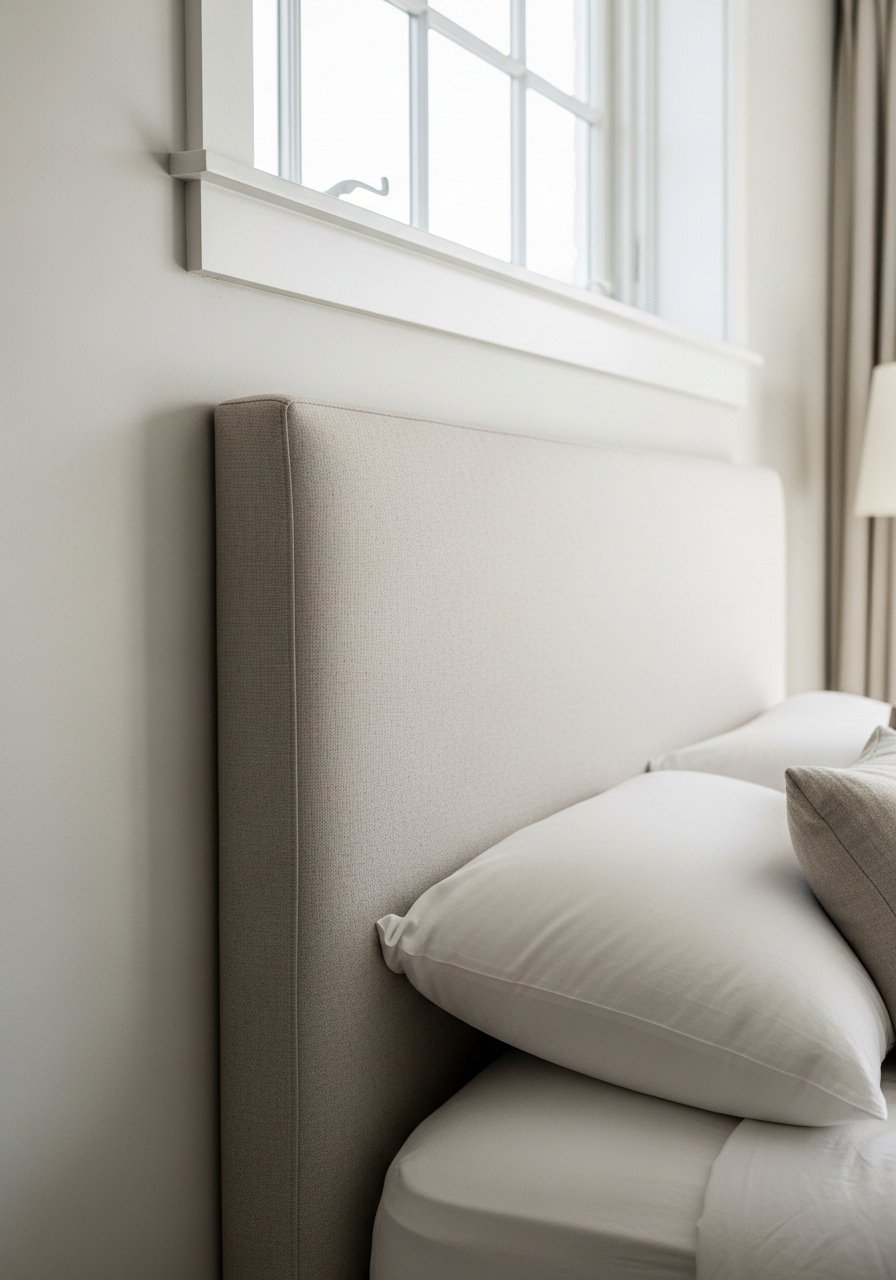
An upholstered headboard upgrades a thrifted bed for under $100 and hides wall nail marks. Use 1-inch plywood, high-density foam, and a linen or cotton blend fabric. Staple the fabric to the back, mount the headboard so its center sits 57 inches from the floor for standard eye line, and leave a 2 to 4 inch gap above the mattress for easy bedding changes. After trying this in three rentals I found half the impact comes from fabric choice. For tools and materials try a 1-inch foam sheet and a linen blend upholstery fabric.
Mistake to Avoid: Choosing foam that is too thin, which makes the headboard look flat and cheap.
4. Bedside Lighting That Frees the Nightstand
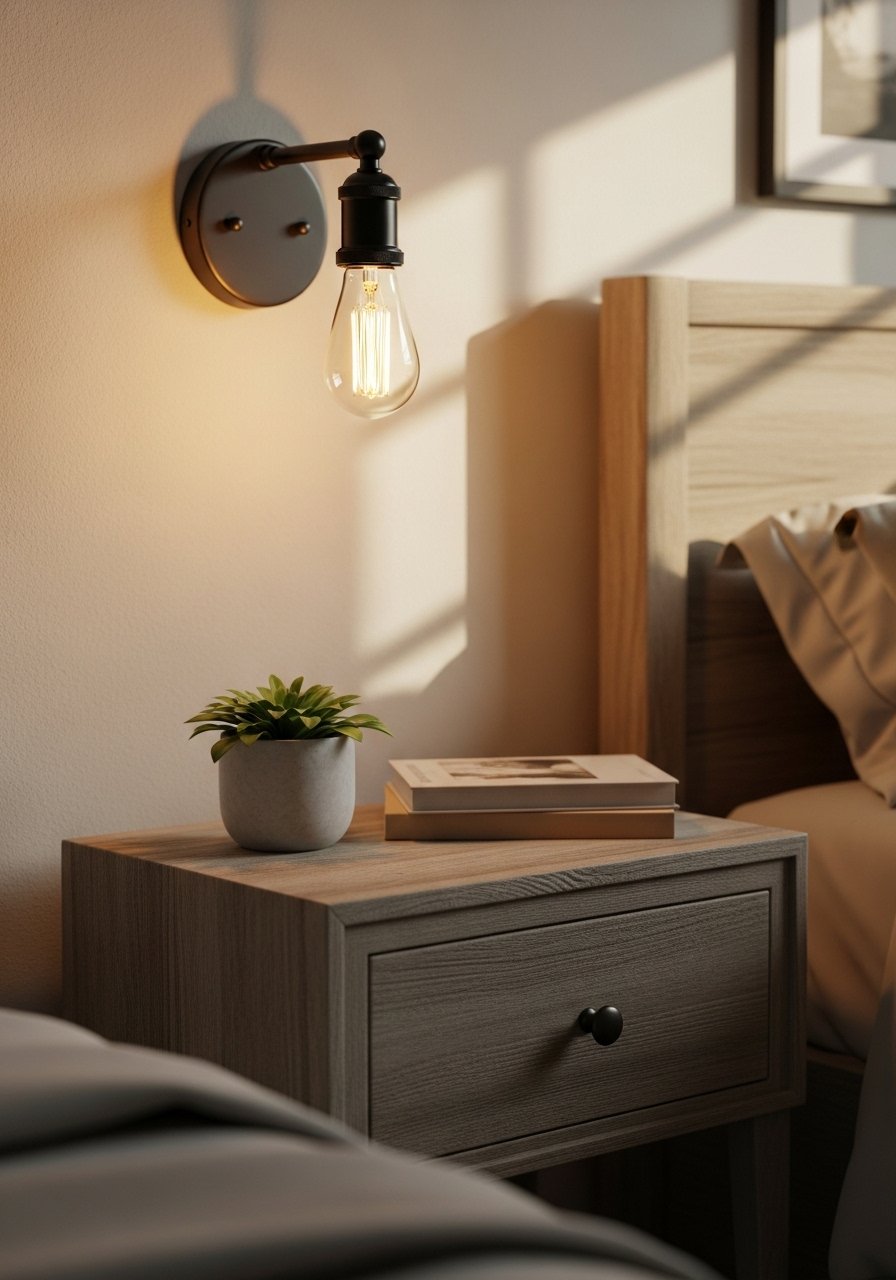
Clunky lamps eat surface area and make nightstands look cluttered. Choose plug-in wall sconces with an adjustable arm to free the top for a book and a cup. Place the sconce so the bottom of the shade sits roughly 60 inches from the floor for reading height. A warm LED bulb around 2700K keeps the light cozy. For renters, look for plug-in versions that do not require hardwiring, like this plug-in wall sconce. Swap in a small clamp light for a temporary fix.
Mistake to Avoid: Installing a hardwired fixture without checking landlord rules, then paying to remove it later.
5. Nightstand Styling With Trays and Vertical Layers
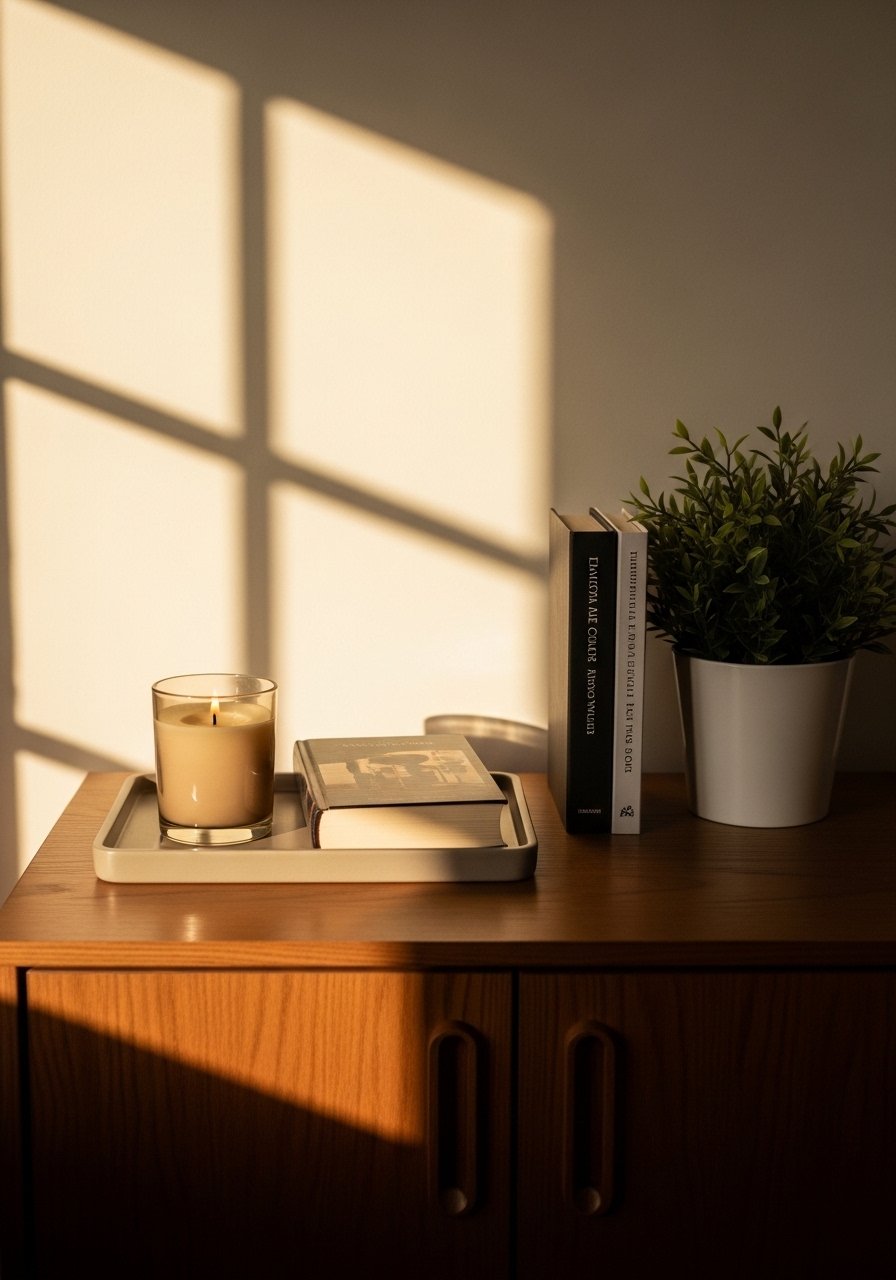
Nightstands look messy because everything sits flat. Use a small tray to corral daily items, add a vertical stack of two books for height, and finish with a small plant or candle. Choose one metallic accent and one ceramic piece to avoid visual noise. This method takes ten minutes and makes a cheap nightstand look edited. For trays and small accents try a small decorative tray and a mini ceramic planter.
Mistake to Avoid: Piling too many small objects with no containment, which reads cluttered not curated.
6. Floating Shelves for a Built-In Look
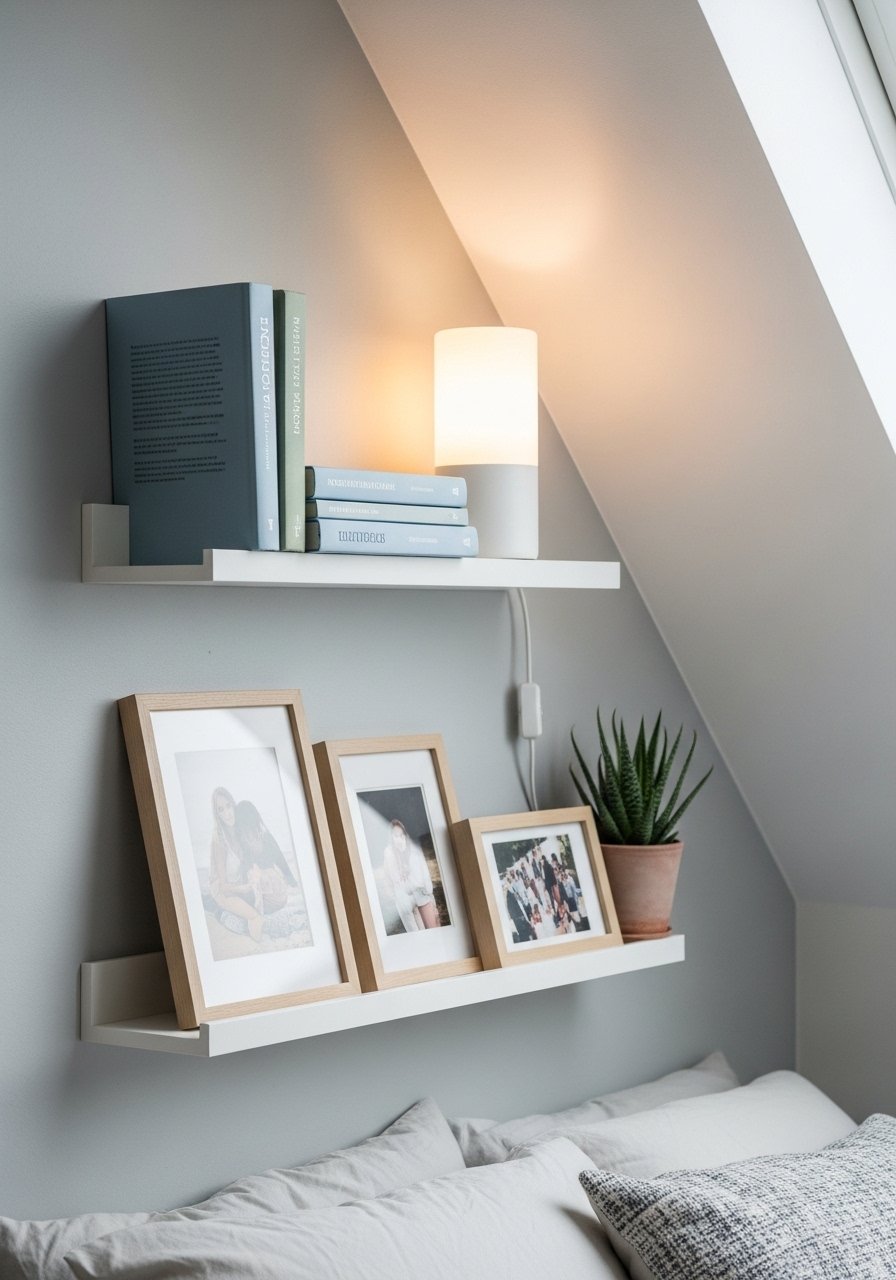
Floating shelves create built-in scale without remodeling. Space shelves about 10 to 12 inches apart vertically for readable styling. Use three staggered shelves and center the middle shelf at eye level. Keep heavier items on the bottom shelf and mix in a framed print leaning against the wall to add depth. For small rooms, pick narrow shelves 8 to 10 inches deep. Installation takes one afternoon and basic anchors. I used a set similar to this floating shelf kit that comes with anchors for drywall.
Mistake to Avoid: Mounting shelves too close together so objects look cramped instead of layered.
7. Soft Window Layers That Actually Insulate
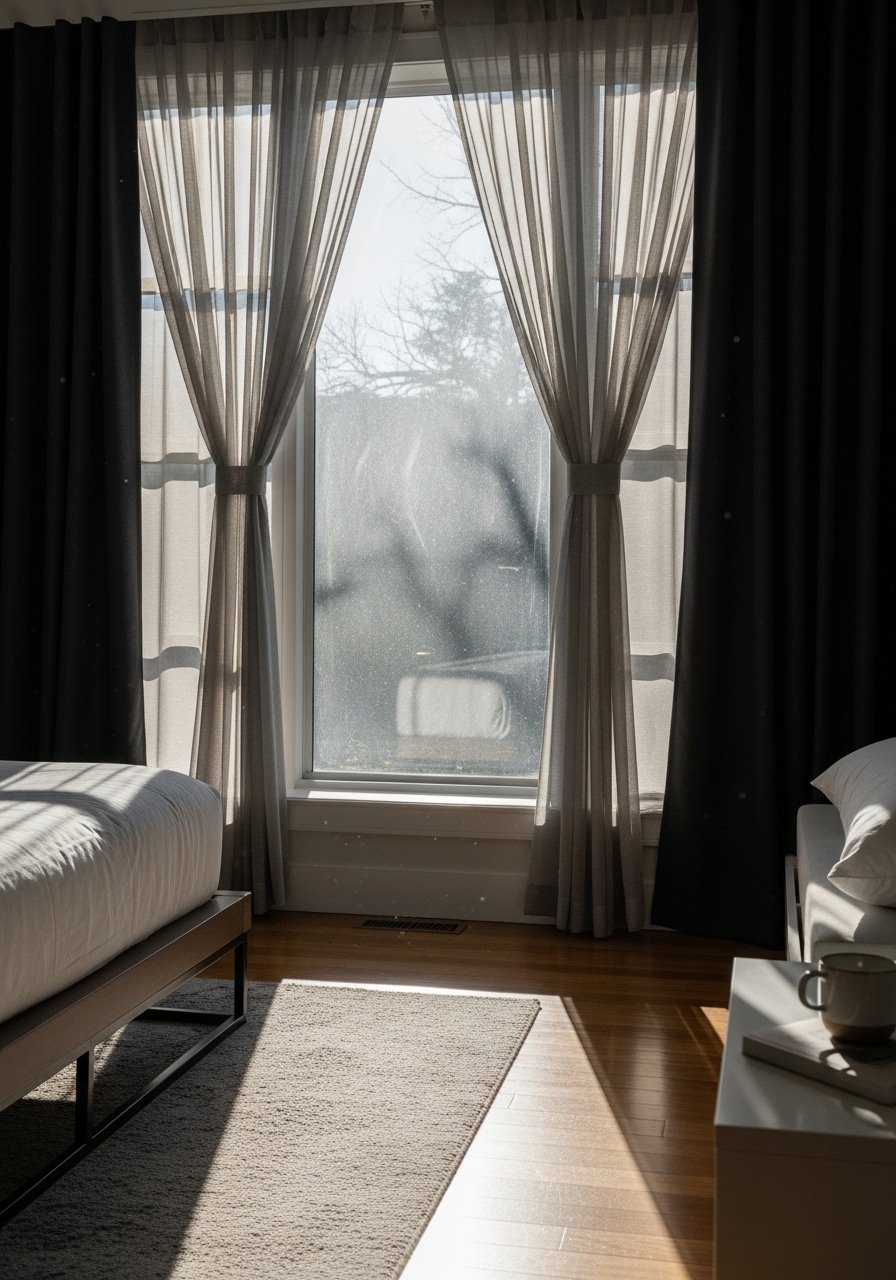
Sheers alone look pretty but do little for privacy or temperature. Layer a sheer panel closest to the glass, then a heavier blackout panel hung on a second rod. Hang the rod 4 to 6 inches above the window frame so curtains read floor-to-ceiling. That vertical length makes ceilings feel taller. Choose lined blackout curtains for energy savings and a lighter sheer for daytime softness. I replaced single panels with a pair and noticed noise and morning light improved. Pair with blackout curtain panels.
Mistake to Avoid: Hanging curtains at the window frame height which visually shrinks the room.
If any of these ideas have you ready to actually try something, here are the things I actually use across most projects.
Bedroom Layering And Lighting Picks
Textiles & Bedding:
- linen blend duvet cover (~$60-120), breathable and soft for everyday use
- velvet pillow covers (~$12 each), swap seasonally for texture
- blackout curtain panels (~$25-50), lined for insulation
Rugs & Floors:
- natural jute rug (~$70-150), good as a base layer
- small wool area rug (~$80-200), top layer texture
Lighting & Hardware:
- plug-in wall sconce (~$40-90), renter friendly
- adjustable clamp light (~$20), temporary bedside option
Decor & Small Storage:
- floating shelf kit (~$25-60), comes with anchors
- small decorative tray (~$15-30), fixes nightstand clutter
8. Gallery Wall With Mixed Frame Depths
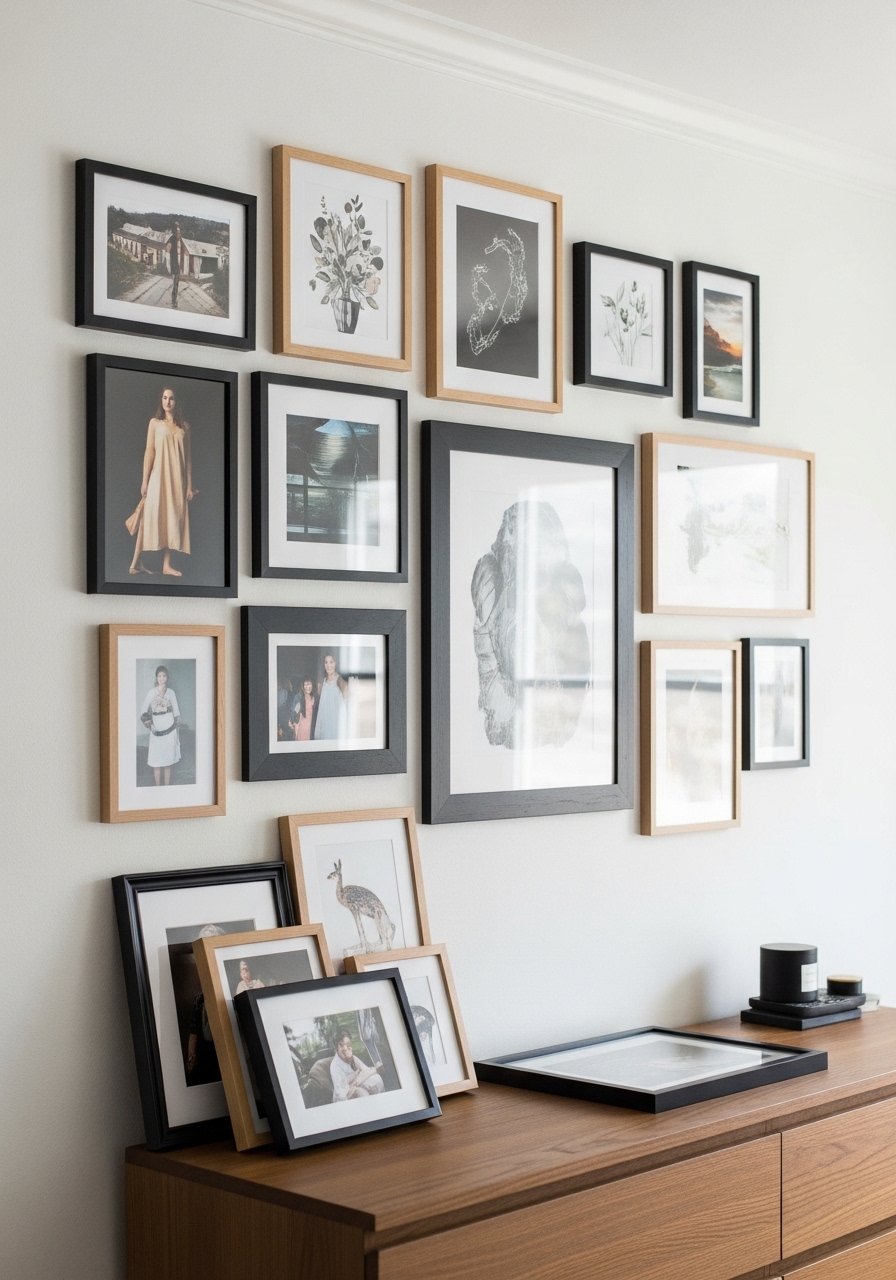
Gallery walls look busy because frames are the same size and height. Vary frame depth and include one shallow shelf for a 3D object like a small vase. Lay out the arrangement on the floor first using a 57 inch center point as a guide, then transfer to the wall. Mix matte finishes so the arrangement reads intentional. Budget-friendly frames in two finishes work better than six identical frames. I used a mix of thrifted frames and a new black picture frames pack for consistency.
Mistake to Avoid: Starting without a center reference so the entire gallery ends up off balance.
9. Statement Ceiling Fixture for Instant Character
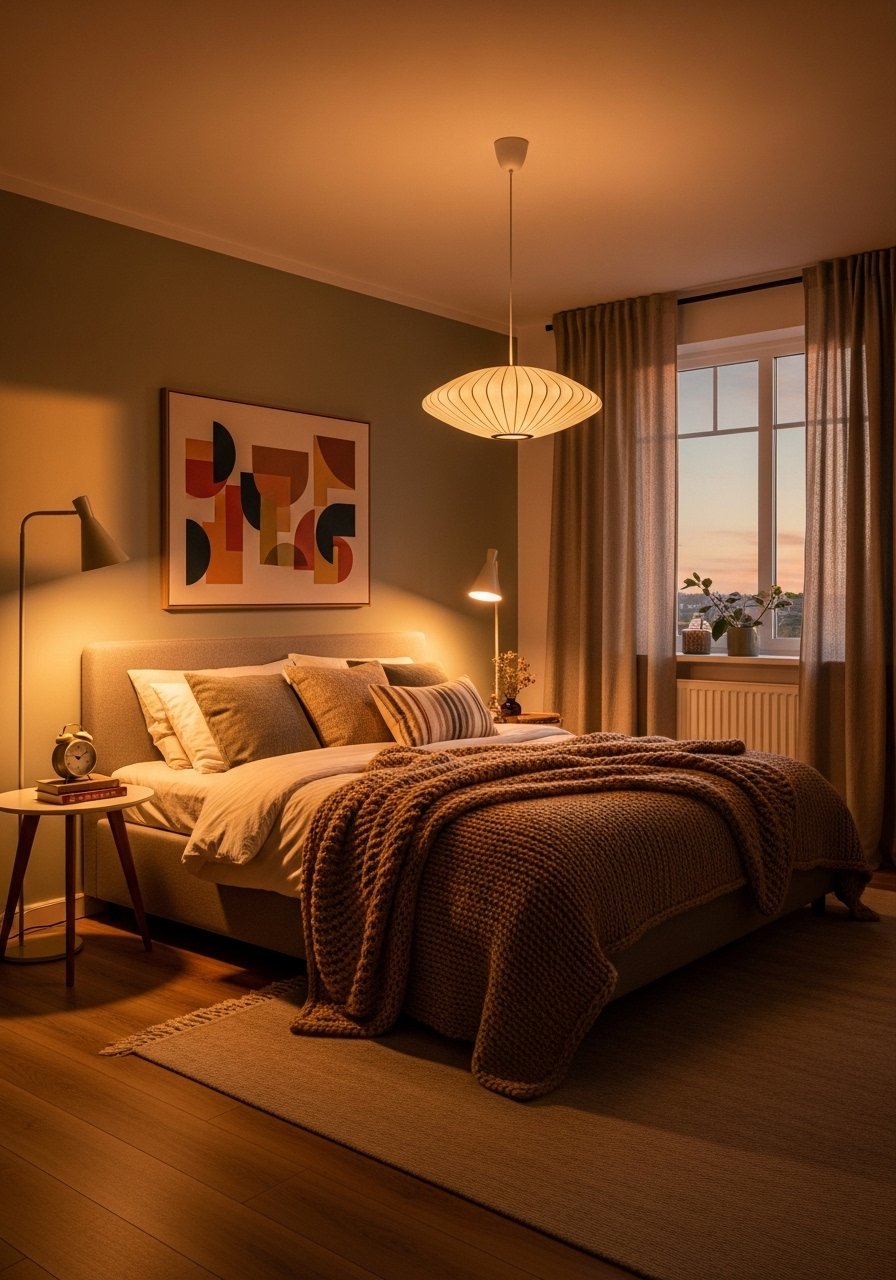
Most people ignore the ceiling. Swapping a basic flush mount for a pendant gives the room personality. Ensure the bottom of the fixture sits at least 7 feet above the floor for head clearance. For small bedrooms a semi-flush fixture keeps scale while adding character. Pick a warm bulb around 2700K and consider a dimmer for layered lighting. Hardwiring may need permission in rentals, so choose a low-profile pendant if you plan to move. A fixture like this mid-century pendant light reads modern without fuss.
Mistake to Avoid: Choosing an oversized chandelier that eats visual space and makes the ceiling feel lower.
10. Built-In-Look Window Seat With Storage
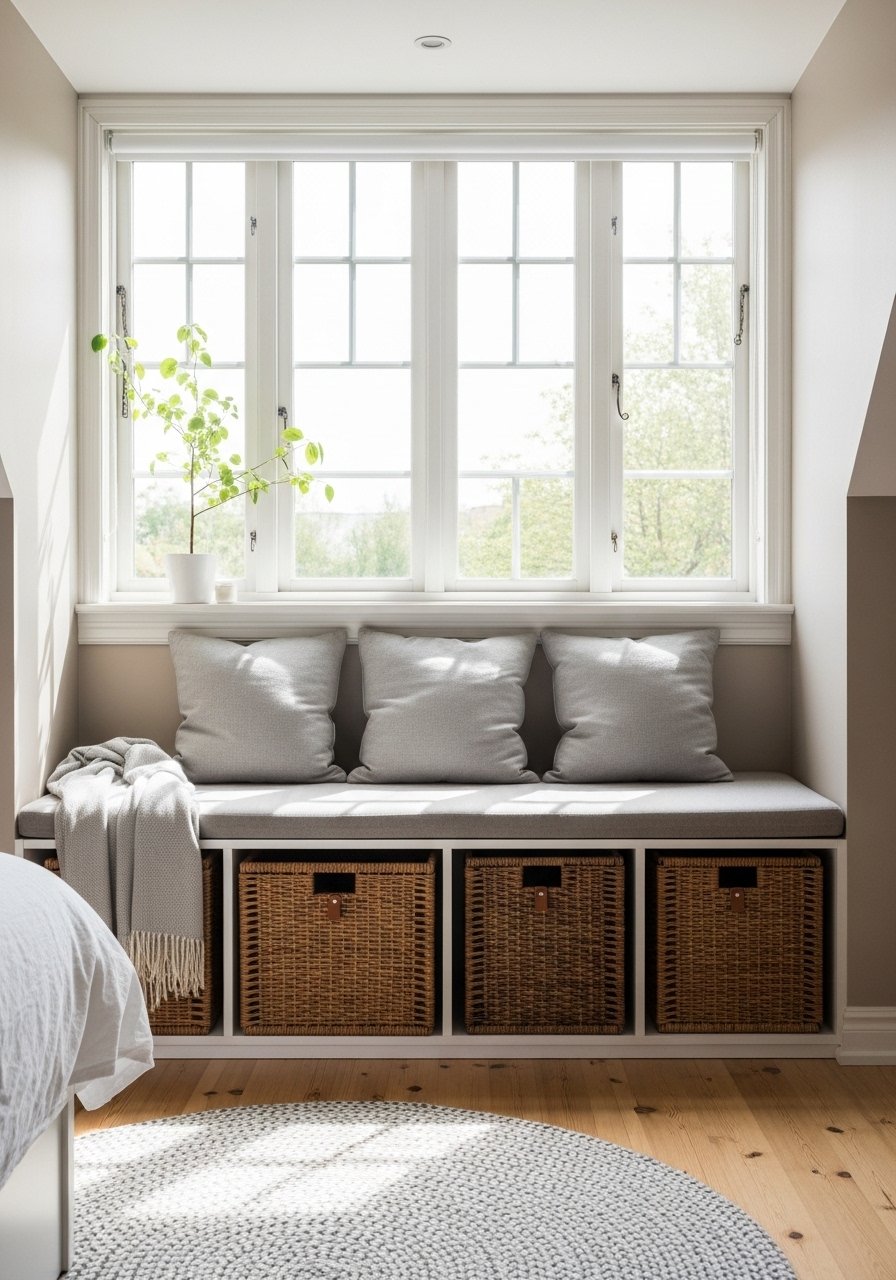
A window seat reads custom but can be built with a few simple plywood panels and a foam cushion. Keep the seat depth around 18 to 20 inches for comfortable sitting and make the top cushion removable for access to storage baskets. Use paint to match existing trim for a true built-in feel. This is a medium-skill weekend project that pays off in cozy mornings. For cushions, I used a bench foam cushion and a durable outdoor fabric cover that cleans easily.
Mistake to Avoid: Making the bench too deep so cushions compress and the seat feels floppy.
11. Monochrome Bedding With Texture Mix
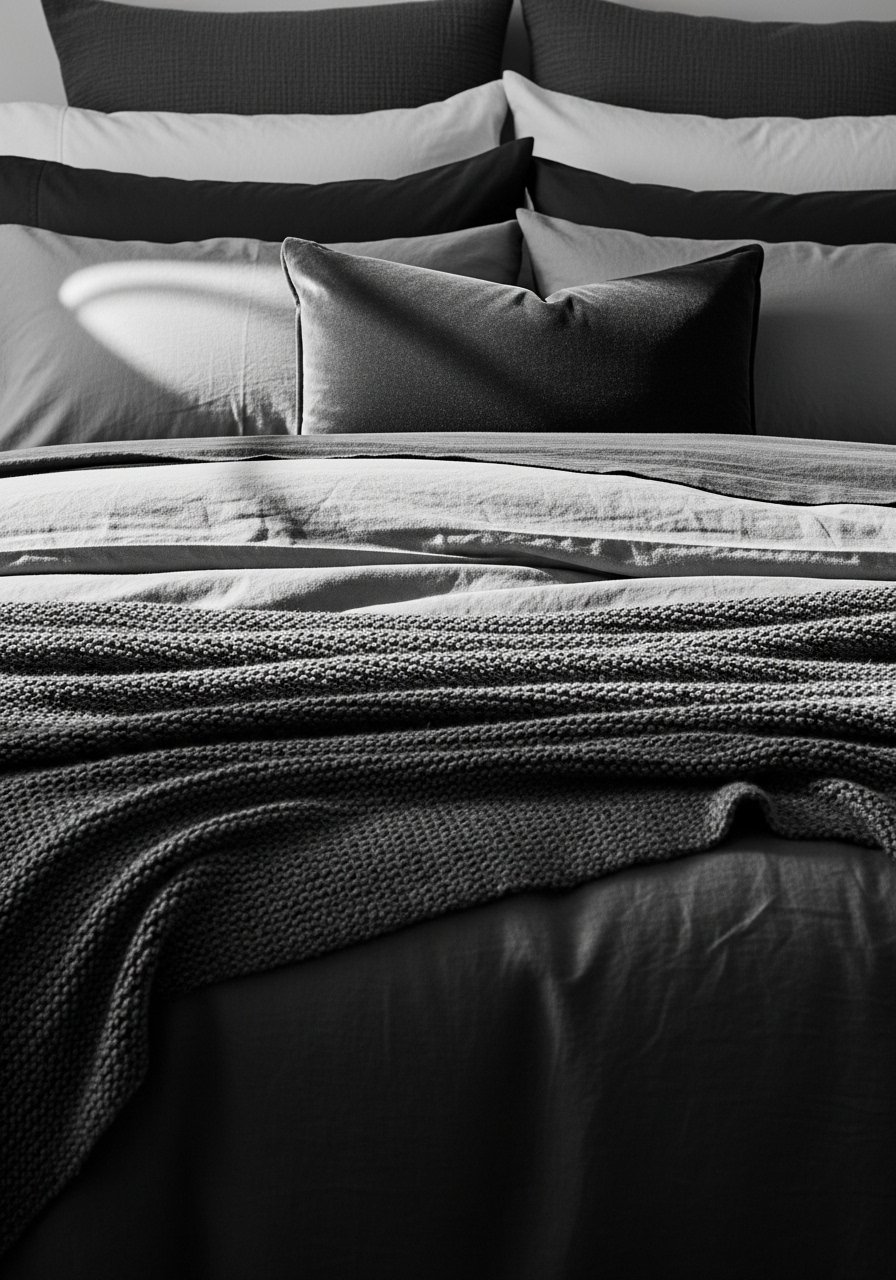
Pure white can feel cold. Pick a single color family and layer textures instead. Combine linen sheets, a percale duvet, a cable-knit throw, and two velvet pillows to create depth without pattern overload. Stick to three texture types so the bed looks cohesive. This works on any budget because swapping one pillow or a throw instantly changes the mood. Try a linen duvet cover and a knit throw blanket.
Mistake to Avoid: Using too many different textures so the bed reads messy instead of layered.
12. Hidden Charging Station Drawer
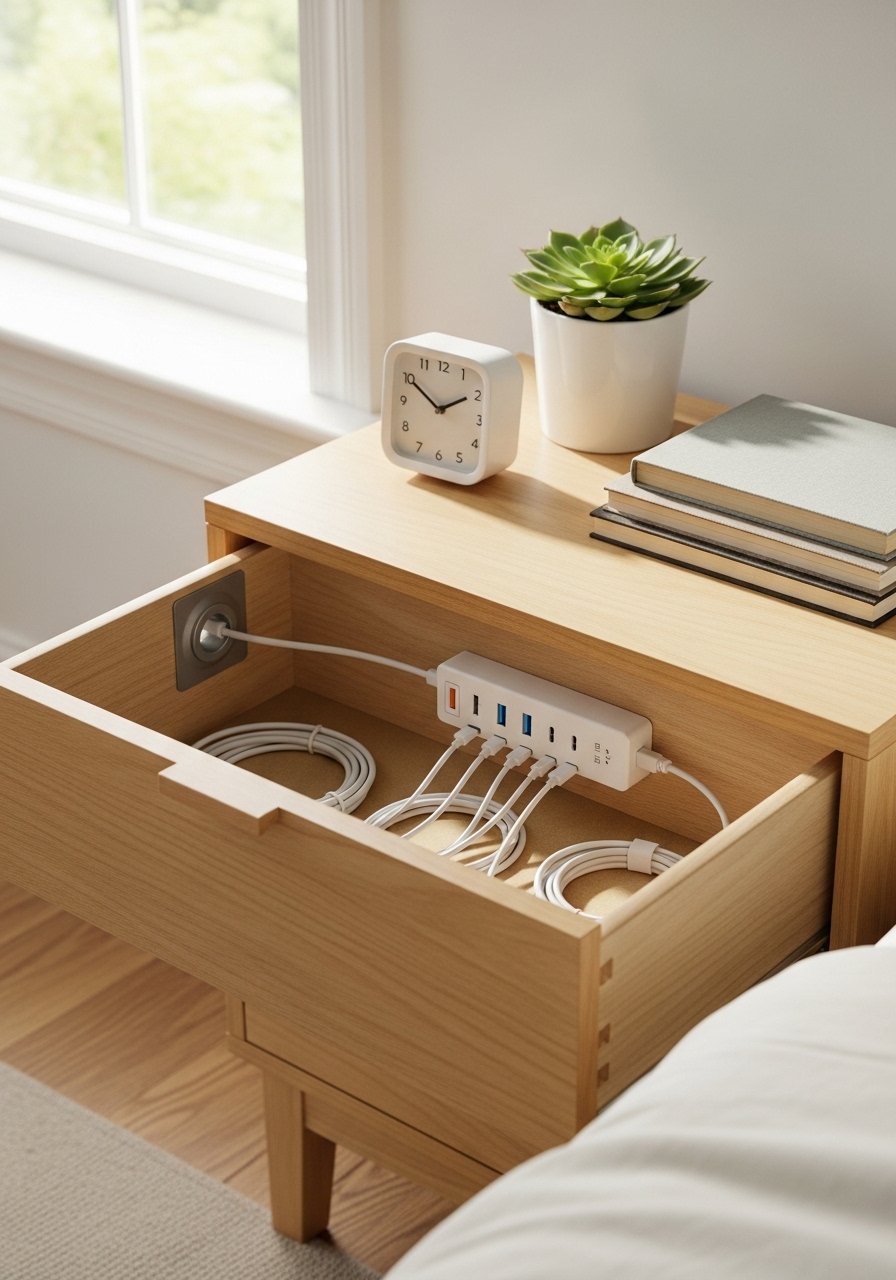
Cord clutter kills a clean bedside look. Create a hidden charging drawer by installing a power strip inside a nightstand and drilling a simple grommet for cables. Use short charging cables to avoid tangles and label one outlet per device. This takes about an hour and makes charging overnight invisible. It is renter-friendly because it is reversible and does not alter the wall. I used a slim surge protector like this compact power strip.
Mistake to Avoid: Leaving long cables draped across the nightstand which reads untidy even when devices are put away.
13. Plant Corner That Thrives Indoors
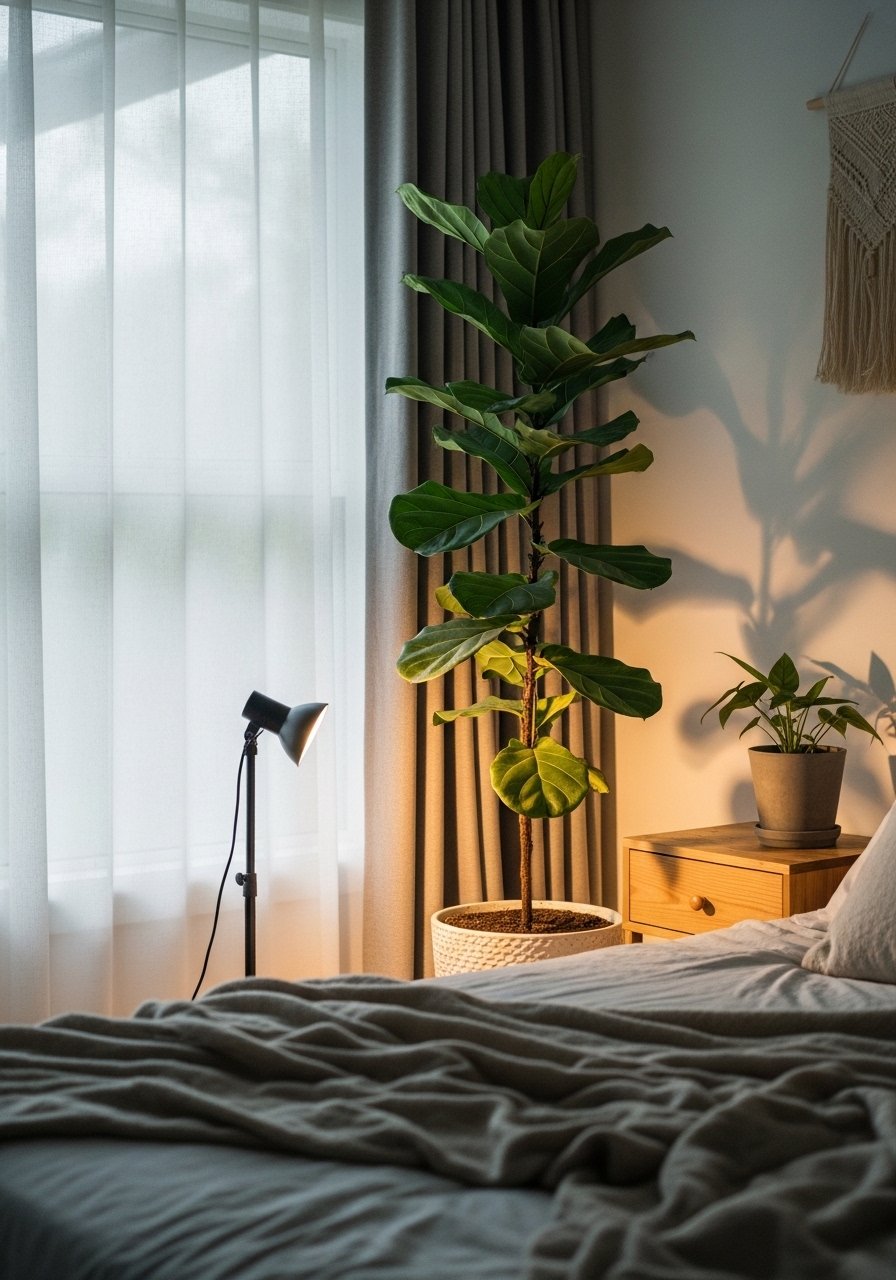
Plants add life but many die from poor light choice. Group plants by light needs and place a tall specimen at eye level next to a low table with smaller plants. Use a small grow light for north-facing rooms. Pick easy-care species like snake plant or pothos if you travel often. A tray under pots protects floors and the 2 to 3 inch gap between pot and tray helps drainage. I started with an affordable grow light lamp that lasted through winter.
Mistake to Avoid: Mixing high-light and low-light plants in one spot so half the collection struggles.
14. Leaning Full-Length Mirror With Trim
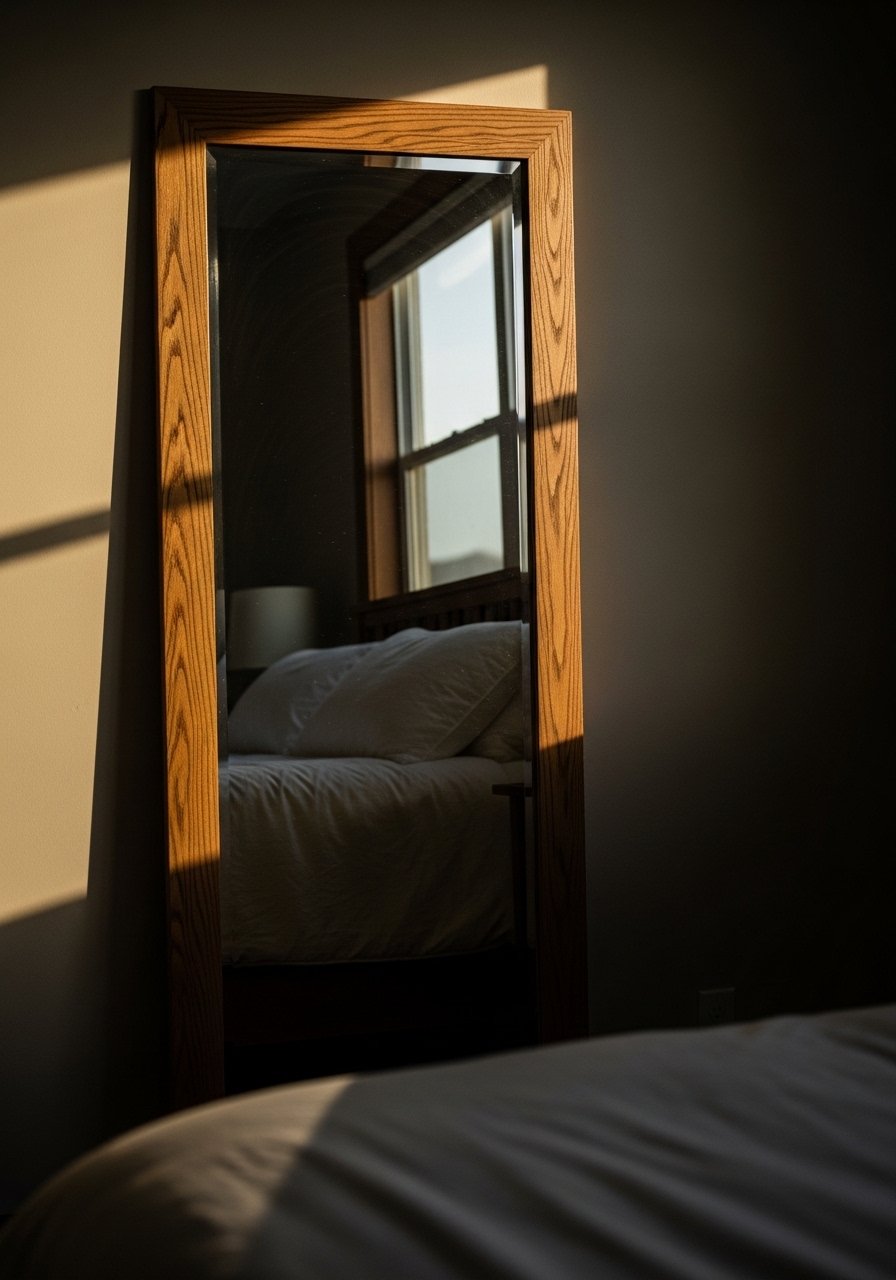
A leaning mirror opens a small room by reflecting light and creating a sense of depth. Add simple trim around a store-bought mirror to make it look custom. Angle the mirror slightly toward the natural light source to amplify brightness. For narrow rooms choose a mirror no wider than 28 inches so it does not dominate. A full-length mirror also doubles as a dressing check. I used an easy frame kit and a leaning full-length mirror that was lightweight for moving.
Mistake to Avoid: Placing the mirror facing a cluttered area which doubles the mess visually.
15. Nightstand Rotating System For Less Clutter

If your nightstand is a catch-all, set up a rotating caddy. One compartment for current reading, one for glasses and a phone slot, and one for nightly skincare. Rotate items weekly so the surface never accumulates junk. The caddy keeps visual rhythm and is easy to clear before bed. This works for tight spaces because a small footprint covers many functions. For a compact option try a rotating organizer caddy.
Mistake to Avoid: Leaving the caddy as an extra surface instead of a curated containment system.
Small Changes, Big Feel Tips
Thin curtains hung high read taller. Hanging curtain rods 4 to 6 inches above the window frame and letting panels graze the floor makes ceilings look higher and rooms feel brighter. Grab curtain rod brackets that extend the rod outward so layered curtains clear the window frame.
Grab velvet pillow covers for about $12 each. Use three sizes, not five small pillows, and swap one seasonally for a quick refresh.
Everyone piles small decor on nightstands. One shallow decorative tray contains the mess and lets you style with a single candle and a plant for a finished look.
Light bulbs matter. Replace mismatched bulbs with warm 2700K LEDs and add a dimmer. A pack of warm LED bulbs costs under $25 and makes layered lighting work.
Curate one corner as a sitting spot or plant nook, not a storage dump. A simple oversized floor cushion anchors a reading corner better than several small cushions.
