
A pinned bathroom wall promised a salon-ready look and zero water spots. My first attempt left a crooked print, warped paper at the grout line, and one sad eucalyptus branch. It took a few retries across rentals to learn what actually survives steam, small walls, and daily toothpaste splatter.
These ideas are not a full remodel, and they are not meant for someone with days of free time or a big budget. They are small scale, renter-friendly where possible, and tested in three rentals so the fixes work whether you have one square foot of wall or a whole vanity wall. Expect weekend installs, one or two basic tools, and options that survive humidity and kids or pets.
1. Narrow Gallery Wall With Spacing Rules
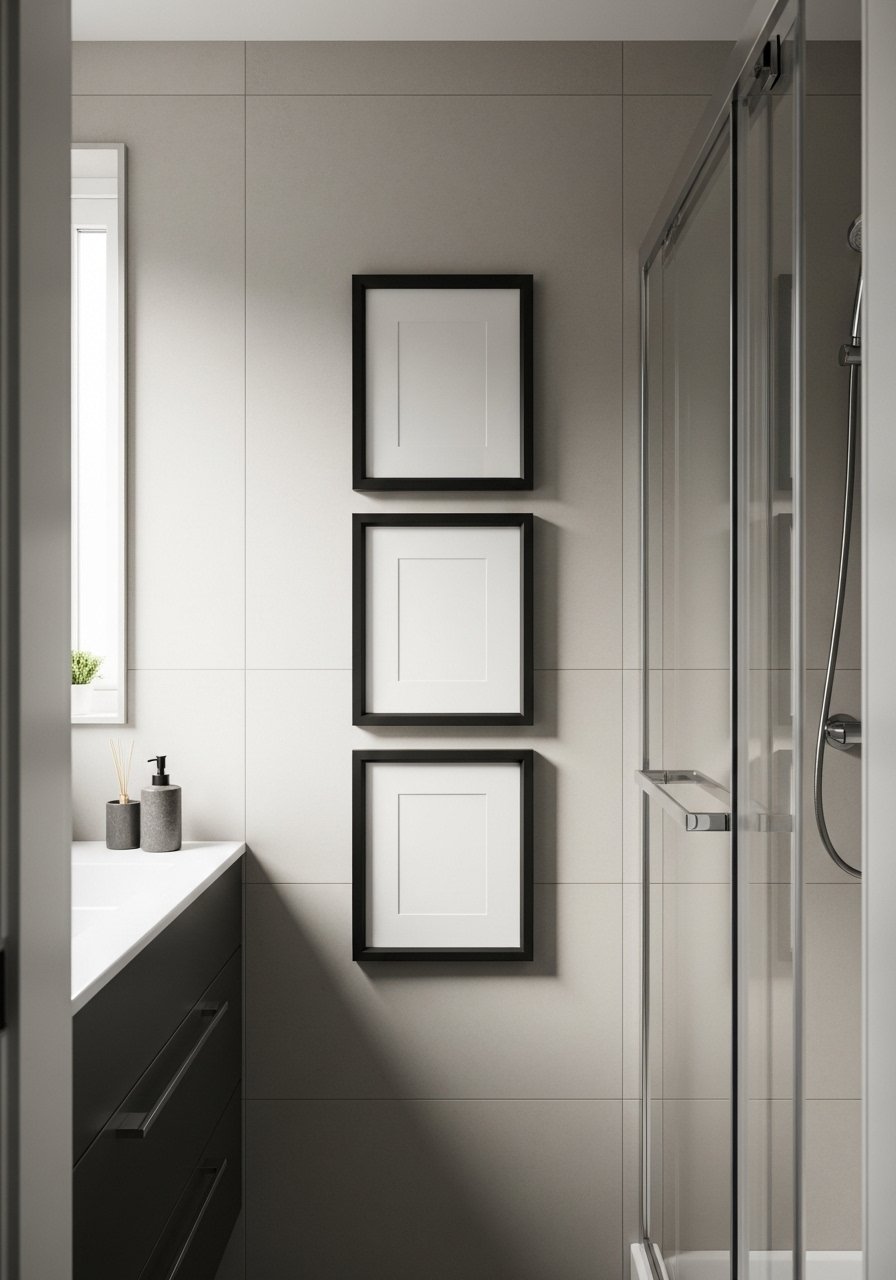
A gallery wall makes a tiny bathroom feel intentional instead of patched together. Keep frames narrow and stick to two or three frame sizes. I hang the center of the composition 60 inches from the floor or 4 inches above the mirror if space is tight, and I leave exactly 2.5 inches between frames so the eye reads them as one object. Use lightweight frames like black picture frames and picture-hanging strips for a renter-friendly install. This is a low-cost route that reads curated, not cluttered, and it fits modern and vintage prints alike.
Mistake to Avoid: Hanging frames too close together so the grouping looks like a jumbled pile instead of a single composition.
2. Leaning Mirror Over Slim Shelf
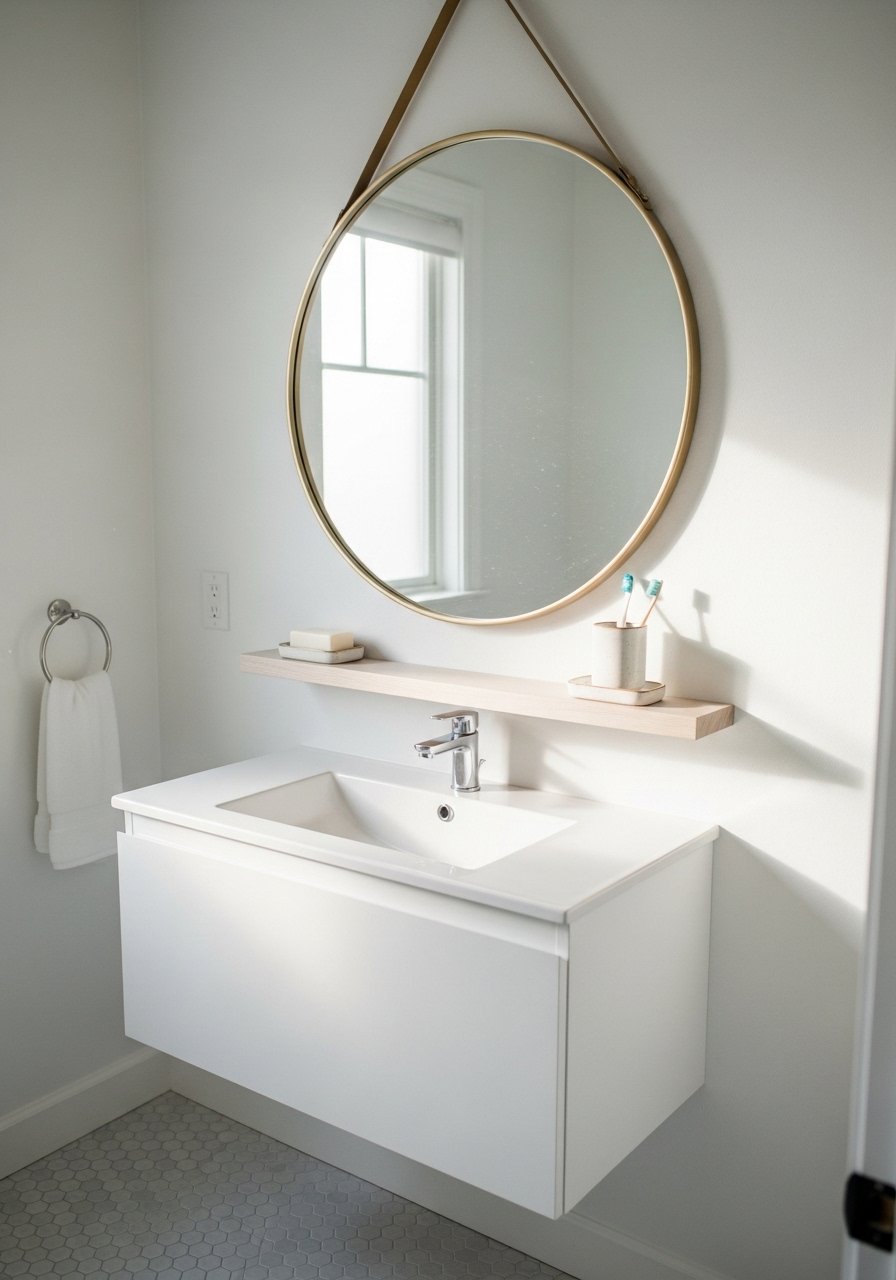
A mirror does double duty, reflecting light and making the room look larger. A leaning round mirror on a slim shelf reads more relaxed than a perfectly centered mounted mirror. Mount the shelf at least 4 inches above the sink backsplash so water does not collect on it. I pair a round leaning mirror with a slim floating shelf to hold everyday items and a small plant, which keeps counters clear. This setup is medium skill, renter-friendly if you use wall anchors in drywall, and it balances functionality with a lived-in look.
Mistake to Avoid: Setting the shelf too low so water splashes onto decor and ruins finishes.
3. Slim Brass Shelf for Curated Objects
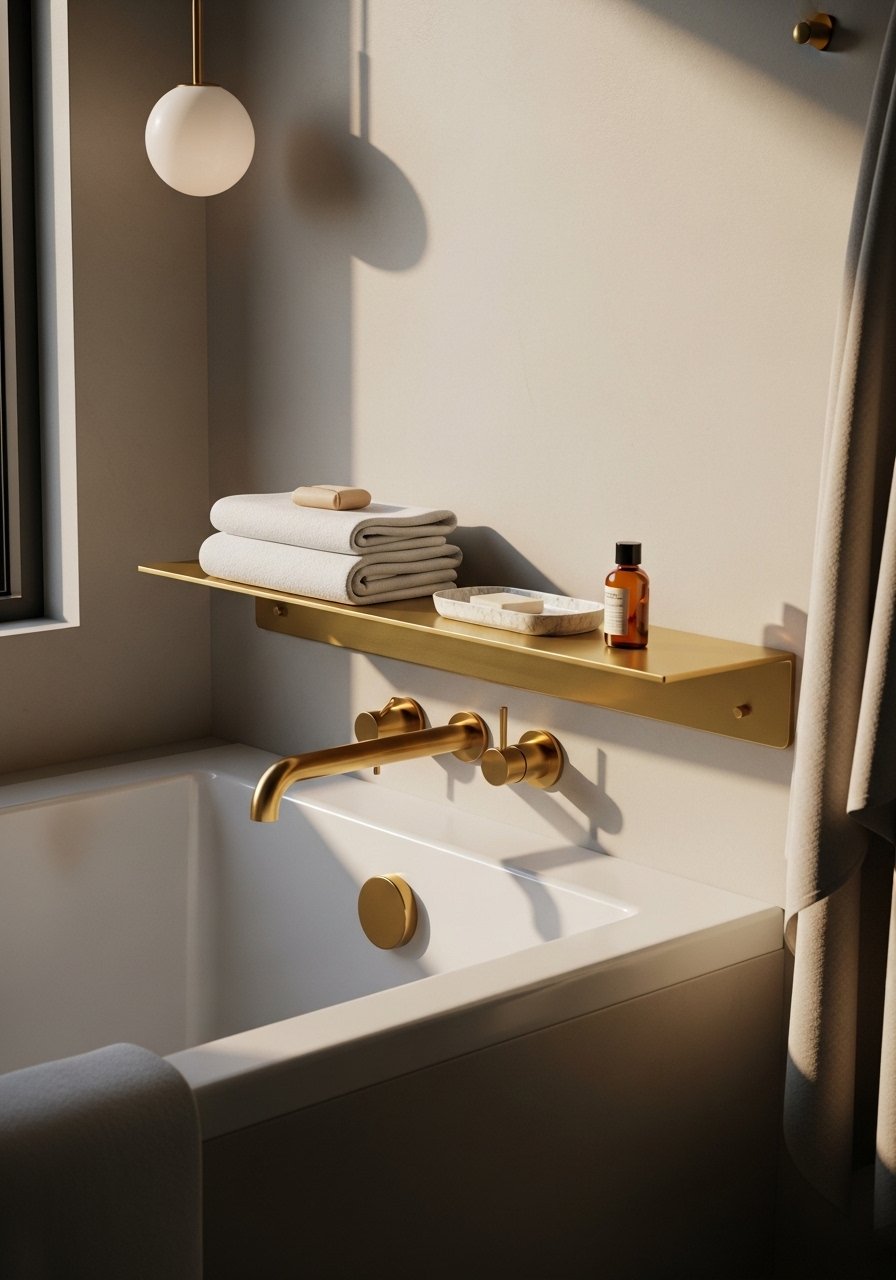
A slim metal shelf adds warmth and a bit of shine without overpowering small spaces. Brass tones work well with warm wood and white tile. Choose a shelf no deeper than 6 inches to avoid sticking into the walking path, and use it for one curated cluster rather than scattering small items. I like to anchor a ceramic tray and one art object, plus a practical bottle like amber glass pump bottle for hand soap. This idea reads elevated, and it is a quick install for a Saturday morning.
Mistake to Avoid: Treating the shelf as extra storage and overloading it until it looks cluttered.
4. Peel-and-Stick Wallpaper Accent Panel
Peel-and-stick wallpaper is the best shortcut for adding pattern without a permanent commitment. Cut a single vertical panel behind the sink instead of covering every wall. I measure twice and leave a 1/8 inch gap at tile seams to avoid bubbling. Choose a vinyl, water-resistant option for bathrooms and press with a plastic smoother to follow grout lines. I used a floral vinyl for texture and paired it with a simple peel-and-stick wallpaper to keep the cost down. This is renter-friendly and can be removed without damaging painted drywall when done carefully.
Mistake to Avoid: Applying wallpaper over uneven grout or unclean surfaces, which causes peeling and bubbles.
5. Vertical Plant Ladder for Humidity-Loving Greens
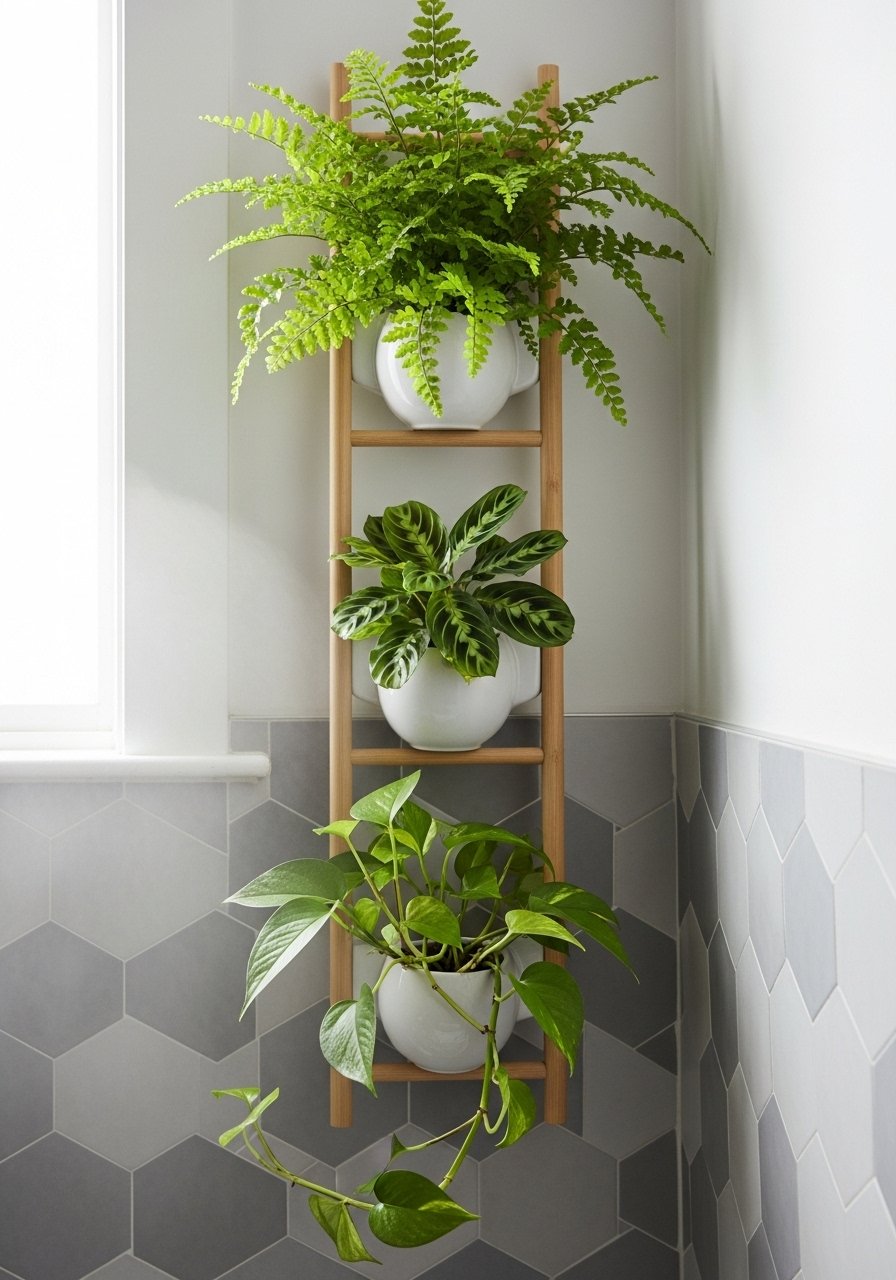
Humidity is an asset for some houseplants. Use a vertical plant ladder or staggered wall planters to add life without horizontal clutter. Pick plants that love humidity such as ferns or pothos, and use small saucers or faux options if you have pets. Space planters at least 6 inches apart so leaves do not touch tile grout and trap moisture. I alternate real and faux pots using a set like wall planters so I can rotate plants out for cleaning. This approach keeps the room feeling fresh and leverages bathroom microclimates.
Mistake to Avoid: Hanging plants directly over the toilet or in spots that drip when watered.
6. Towel Ladder As Functional Wall Sculpture
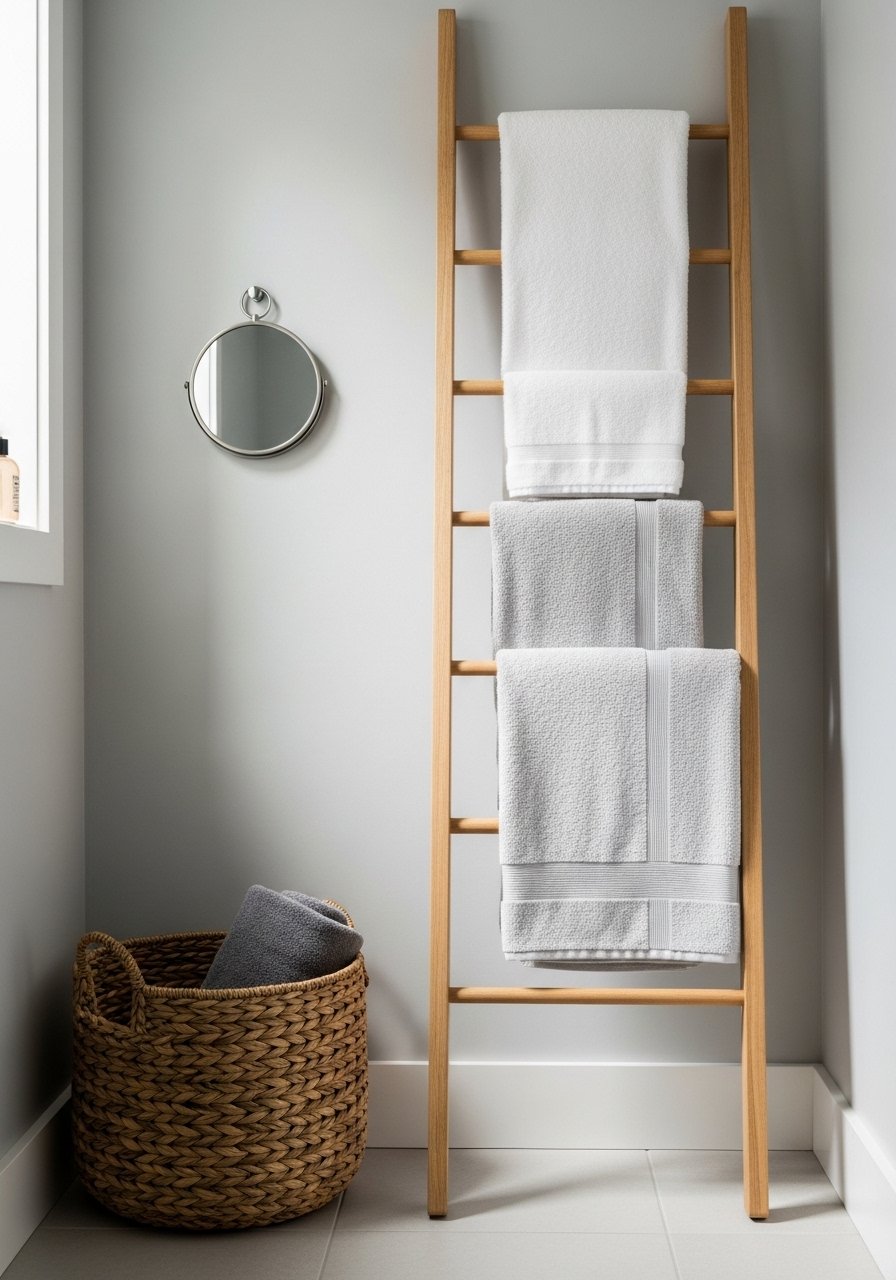
A towel ladder gives vertical interest and stows towels without drilling multiple holes. For small bathrooms, choose a ladder that leans at a shallow angle so it takes up less floor depth. I place mine where it does not block a cabinet or door swing, typically 10 inches from the vanity edge. Use thick rungs so towels fold cleanly and avoid metal finishes that show water spots. A simple wood towel ladder is an inexpensive way to add texture and function in one piece.
Mistake to Avoid: Leaning the ladder in a circulation path so it becomes a trip hazard or gets knocked over.
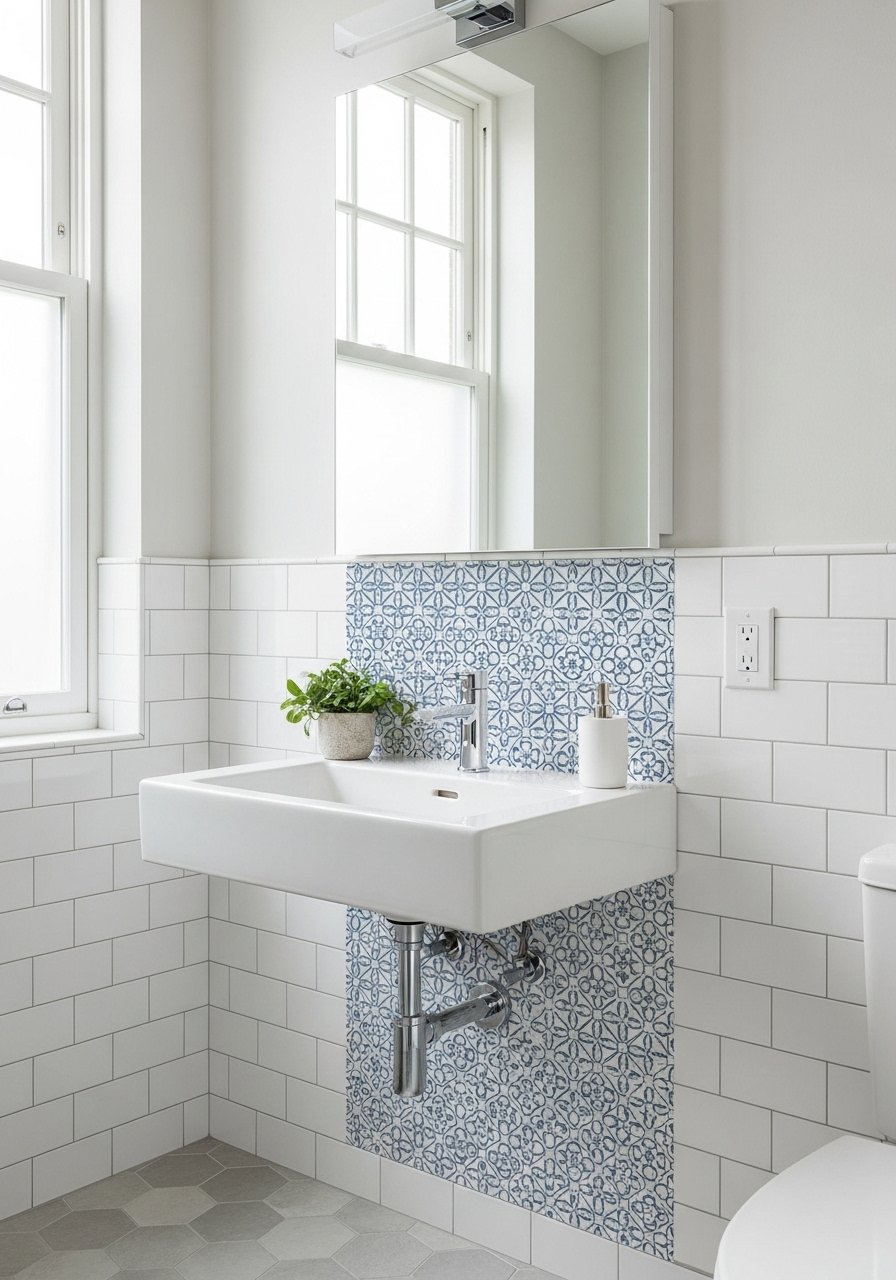
7. Faux Tile Decals for a Splash-Resistant Accent
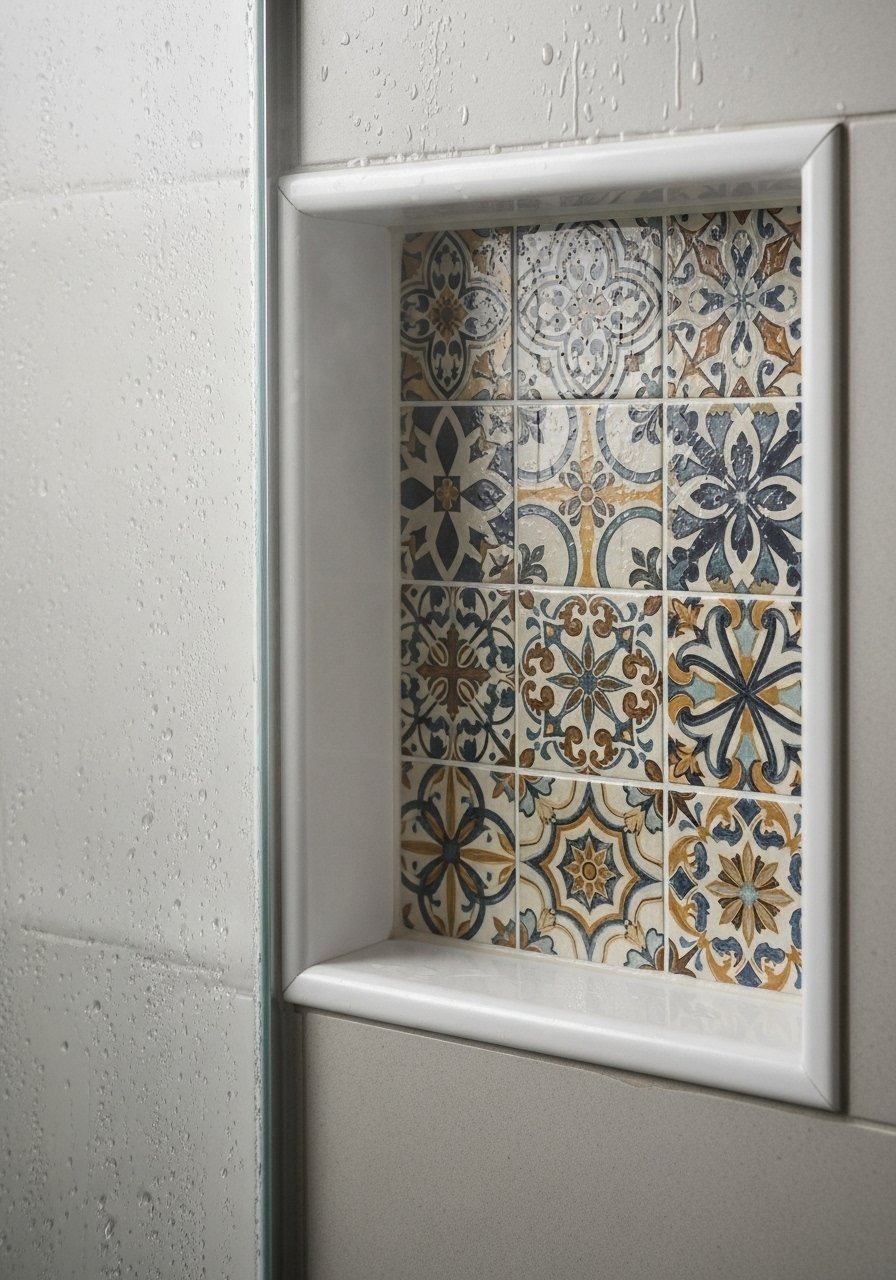
If you want the look of tile without the demo work, try waterproof tile decals in a small area like a shower niche or behind the sink. Match decal grout lines to existing grout width, usually 1/8 inch, so the pattern reads as intentional. Press decals firmly and seal the edges with bathroom caulk where needed for long-term moisture resistance. I keep a roll of waterproof tile decals on hand for quick touch-ups between renovations. This is budget-friendly and perfect for renters who want big visual payoff without construction.
Mistake to Avoid: Slapping decals over cracked grout or loose tiles, which hides problems without fixing them.
If any of these ideas have you ready to shop, here are the specific pieces I actually use across most of the projects.
Wall Styling Picks For Baths
Shelving & Storage:
- brass floating shelf (~$25-45). A slim shelf that reads decorative and holds small items.
- wood towel ladder (~$40-80). Leaning and simple for renter setups.
Art & Mirrors:
- black picture frames (~$20-40). Go lightweight and uniform for a cohesive gallery.
- round leaning mirror (~$60-120). Choose a shallow frame for small spaces.
Surface & Tile Fixes:
- peel-and-stick-wallpaper (~$20-50 per roll). Use one panel behind a vanity for big impact.
- waterproof-tile-decals (~$15-35). Best for niches and small backsplash areas.
Plants & Trays:
- wall-planters (~$12-30). Mix faux and real to simplify care.
Humidity-Safe Hanging Habits
Measure twice, hang once. Use a small level and mark drill points with painter's tape so your hardware goes in straight. I rely on a small torpedo level when spacing frames.
Grab adhesive picture-hanging strips for lightweight frames. They make swaps easy and spare renters from new holes.
Most people overhang wall art near the shower. Keep art at least 12 inches from heavy spray and choose water-resistant materials or framed prints behind glass.
Plant care is simplified with a spray bottle. A quick mist twice a week keeps humidity-loving plants happy without overwatering.
If you must install a sconce but cannot hardwire, try a plug-in wall sconce and hide the cord behind a towel ladder or along molding.
