
I kept sketching the same tiny swallow over and over, and every time it looked like a sticker instead of skin. The moment it clicked was when a tattooist at a shop I liked suggested soft single-needle lines and thinner negative space instead of a solid fill. That one change made the design age cleaner and read like a 90s flash piece, not a logo. I learned that across five shops I have visited, the same tiny adjustments keep a fine line piece readable for years.
These are small, saveable flash ideas for people who like minimal work with vintage 90s vibes, done cheaply or at a trusted shop. Expect low-session time for most pieces, basic aftercare, and designs that sit well on wrists, ankles, and behind the ear. Some are work-visible and some are easy to cover. Budgetwise these run from quick single-needle sessions to slightly longer two-hour spots. If you want consistency, bring a printed flash sheet and ask for a 1RL or light liner grouping so the tattooist can match thinness.
1. Tiny Sailor Swallow With Micro Stars
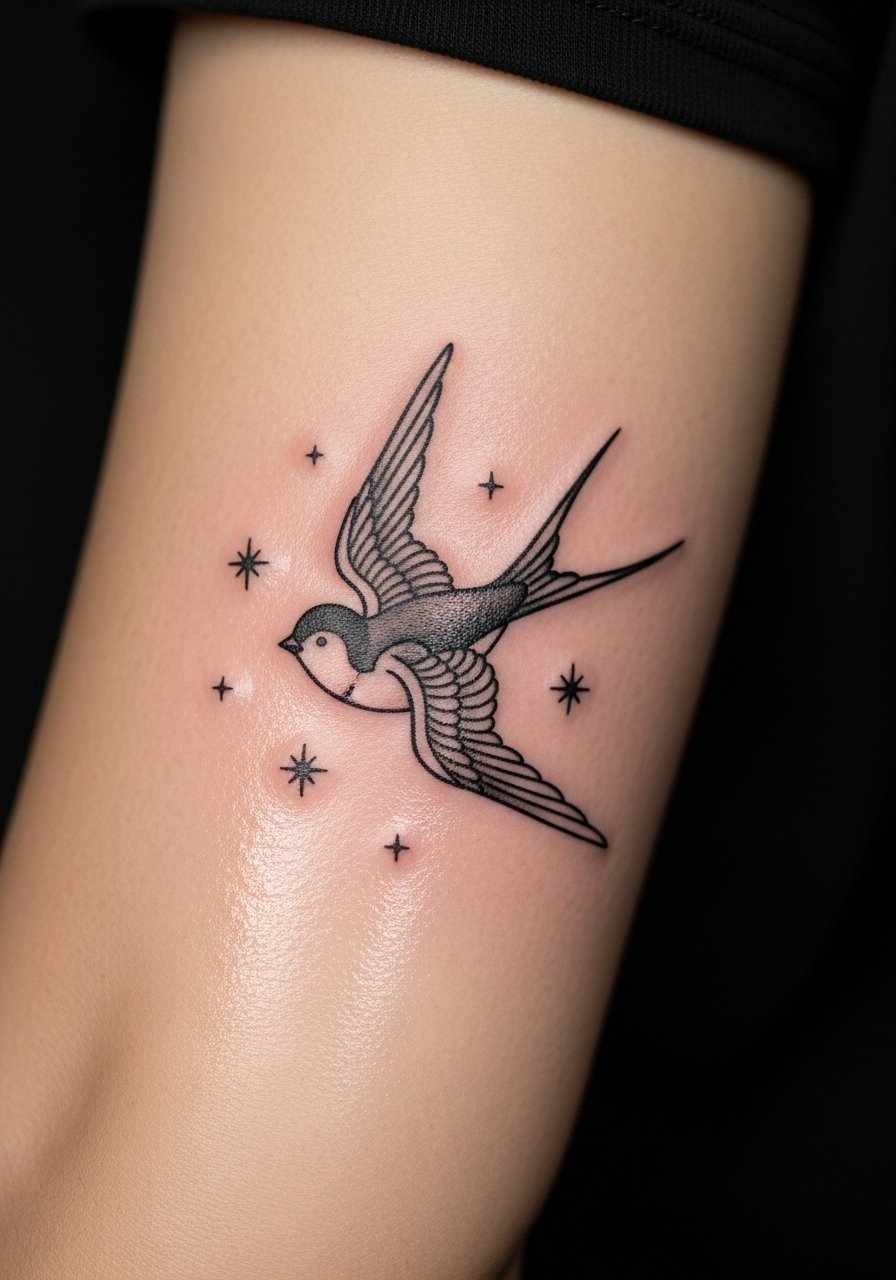
The swallow works because its silhouette is compact and the flight lines read even at small scale. With a 1RL line and 1.5 to 2 mm depth it keeps crisp while avoiding blowout. It feels nostalgic and youthful, fitting people who want something playful and coverable with sleeves. For at-home reference I bring a printed flash sheet and a small tracing copy. Pair this with a clear aftercare balm like fragrance-free healing balm when it scabs. This design is beginner friendly for short sessions and travels well on wrists or ankles.
Mistake to Avoid: Asking for thick outlines will flatten the swallow and make it look dated.
2. Mini Anchor With Tiny Dot Shading
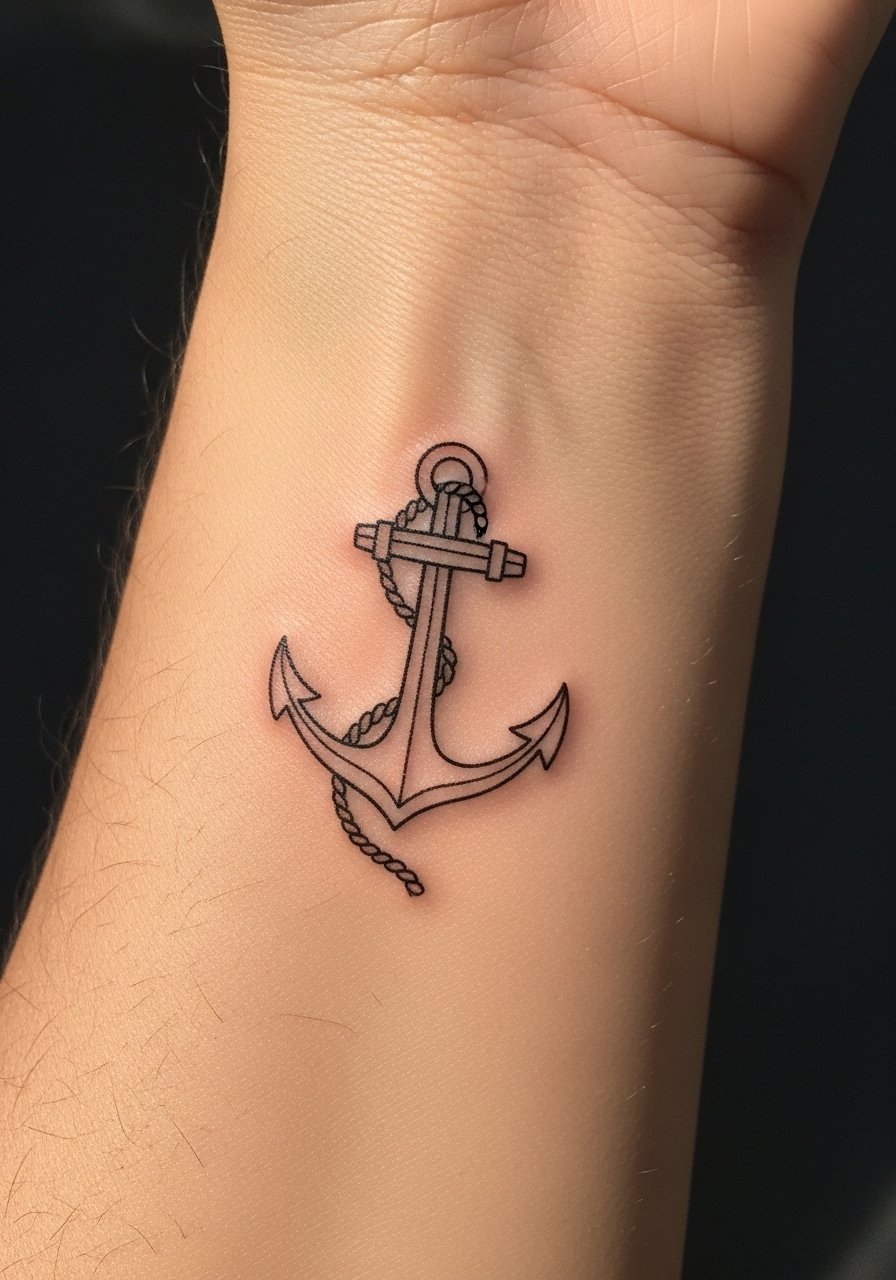
An anchor reads as a 90s flash staple but in fine line it stays delicate. The trick is a single hairline contour and two dot clusters for weight, not continuous fill. Visually it gives that vintage feel without overpowering small hands or slim wrists. It sits well on people who prefer subtle nautical nods and works for medium to long-term aging because dots soften before lines do. Bring a small antiseptic ointment suggestion and a low-fragrance lotion like aftercare lotion for gentle hydration post-peel.
Mistake to Avoid: Requesting solid black fill for the anchor, which can blur on thin skin over time.
3. Lightning Bolt With Fine Hatch Texture
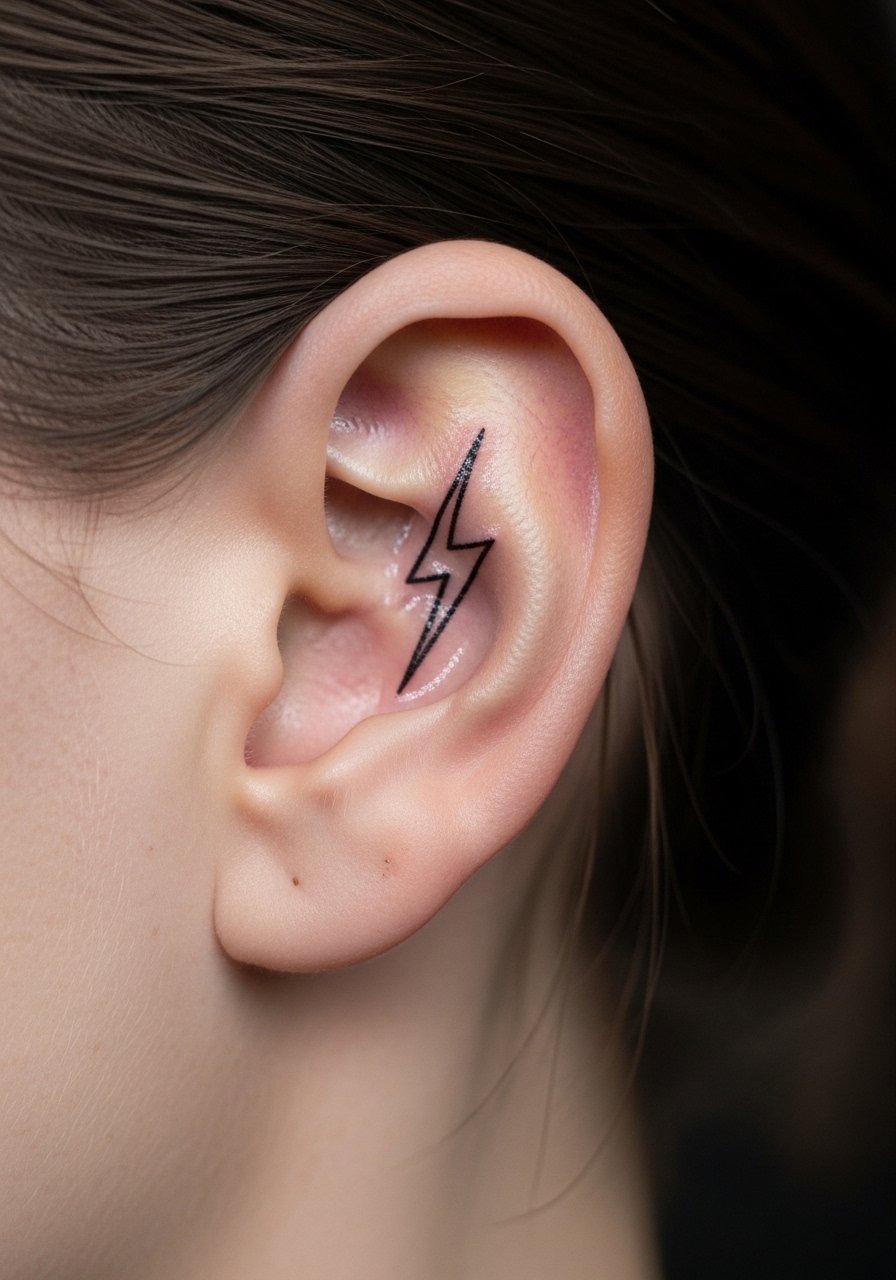
A little lightning bolt looks sharp when the line weight is matched to hair thickness. The hatch texture inside uses 1RL micro cross-hatching at 1 mm spacing to add dimension without heavy ink. It creates an edgy 90s flash nod while staying subtle on hairline or behind-the-ear placements. This suits people who want a discreet accent that still reads as deliberate. If you want a slightly darker edge, ask for tiny stipple spots instead of thick strokes. Pack a couple of breathable bandages for the first night and a small touch-up plan if lines settle in the first month.
Mistake to Avoid: Letting the artist use broad liners for interior texture, which will age into a dark block.
4. Smiley Face With Thin Halo Line
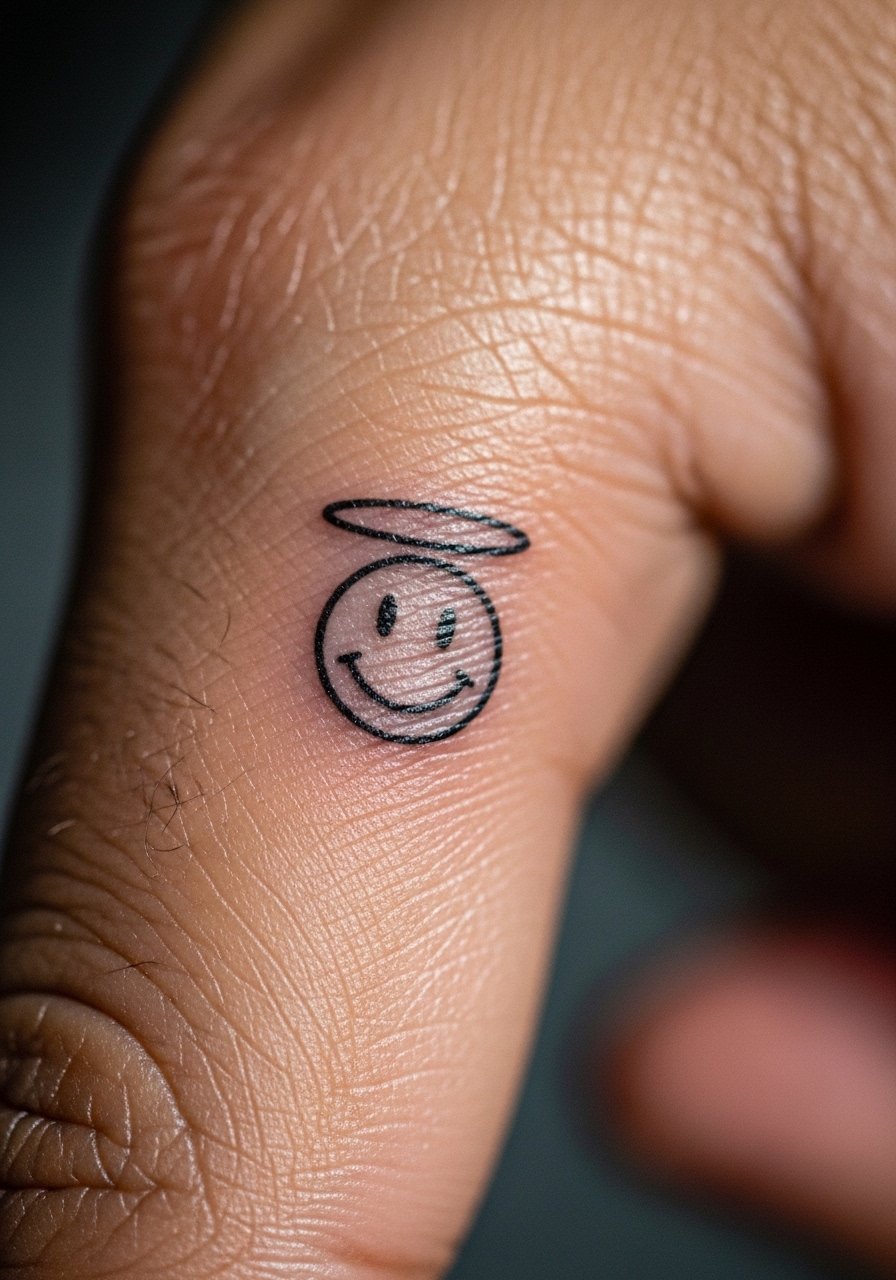
The smiley face is a throwback that reads friendly without taking up space. The halo line around the face should be no wider than 0.5 mm so it stays airy. It creates a playful feeling and is ideal for someone who likes thumb or finger placement. Fingers demand faster sessions and more touchups, so budget for a short follow-up. Use a simple white glove for photos and avoid heavy rings that press into the area while healing. I usually recommend a light petroleum-free balm like fragrance-free healing balm during the first week on finger pieces.
Mistake to Avoid: Asking for thick halo outlines that fill the negative space and make the face look crowded.
5. Tiny Dagger Outline With Minimal Drop Shadow
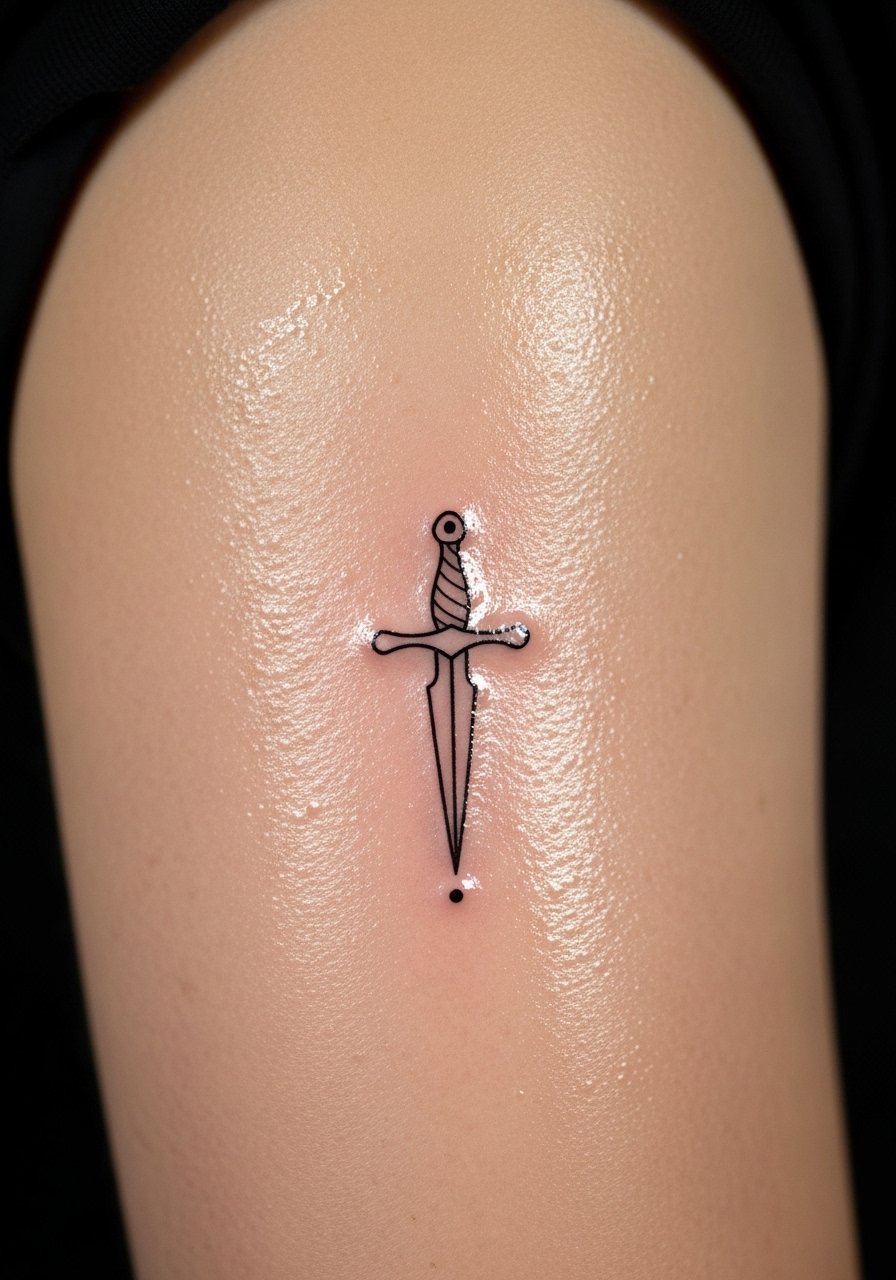
A dagger in thin outline reads tough without heavy ink when the tip line is tapered to a 0.7 mm end point. Add one single dot shadow placed consistently at 2 mm from the blade to imply depth. The result is sharp and slightly gritty in a retro way, fitting people who want an edge without large pieces. This design scales well across inner bicep or ankle. For aftercare bring a breathable non-stick pad and a gentle unscented soap. Consider a light second pass at four to six weeks if the tip softens too much.
Mistake to Avoid: Requesting multiple shaded fills inside the blade, which kills the fine line feel.
6. Crescent Moon With Constellation Dots
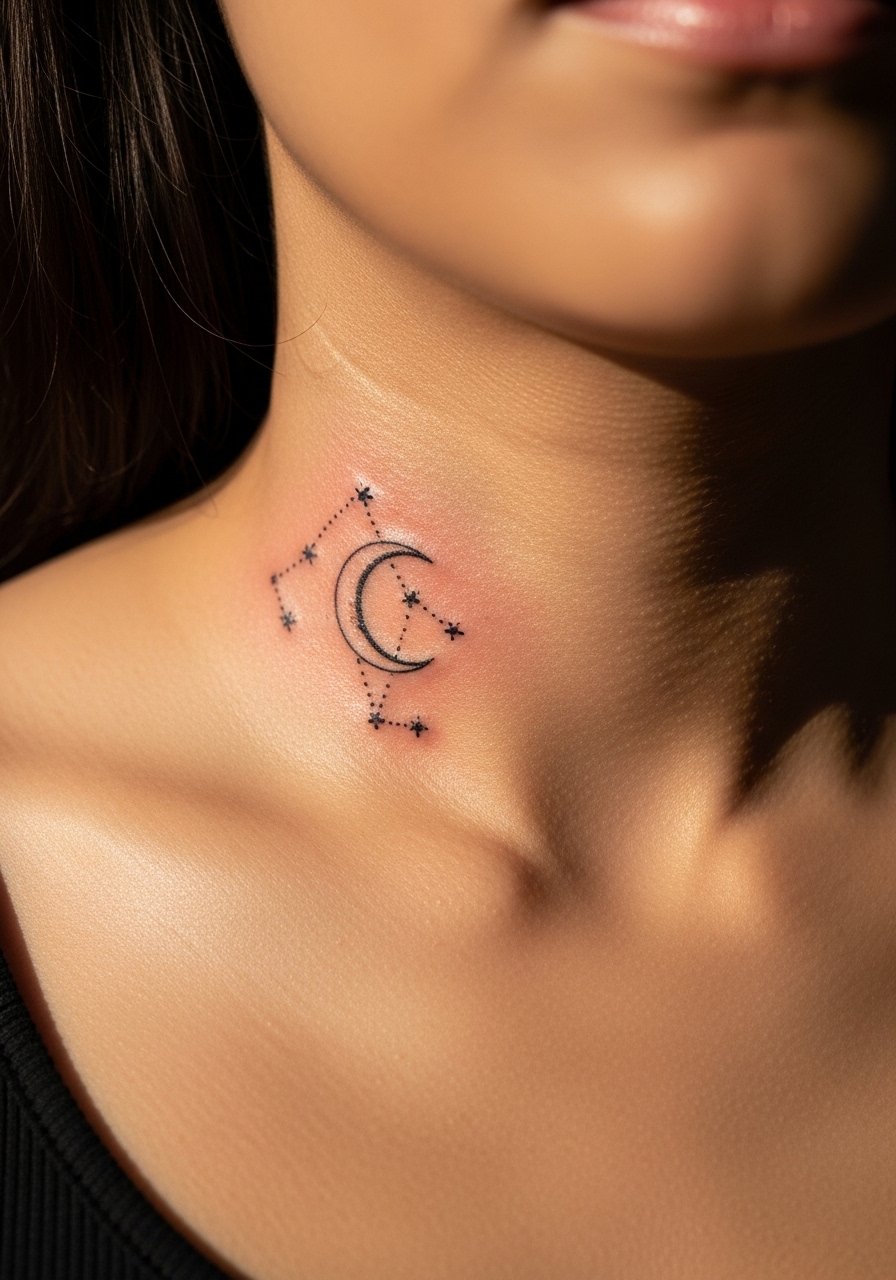
The moon works because negative space and tiny dot clusters form a recognizable shape without heavy filling. Use a light crescent curve at 1RL and connect the constellation with single-point dots spaced at 3 to 4 mm. It gives a dreamy 90s flash impression and suits chest, collarbone, or behind-the-ear placements. This is a low-pain, short session option for people who like symbolic pieces. Keep the area out of tight clothing while healing and avoid heavy necklaces for the first two weeks. A thin hydrocolloid patch can save scabs from rubbing.
Mistake to Avoid: Asking for thousands of tiny stars that merge into a gray patch after healing.
7. Scripted Love Word In Thin Cursive
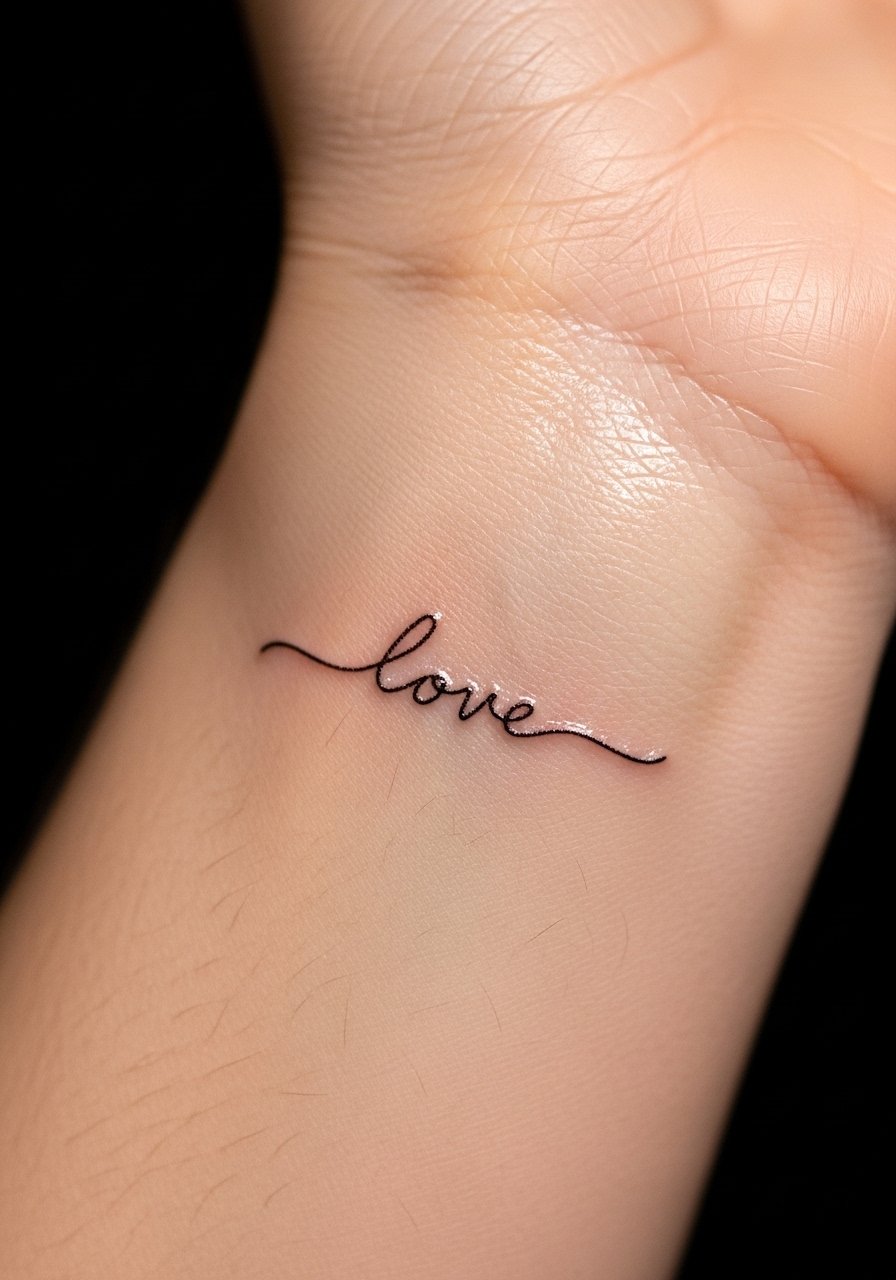
A micro script feels like a 90s flash love note when the spacing stays airy. The trick is adjusting letter height to 3 to 4 mm so it reads at arm length but does not densify. This fits anyone who wants a personal word that is coverable at work and quick to touch up. Bring your exact font printed at life-size and ask for a 1RL pass for the main strokes and a 3RL for any tiny swashes. For aftercare keep movement minimal for the first 48 hours to avoid line stretching and check for slight feathering at four weeks.
Mistake to Avoid: Requesting script at too-small a scale, which makes letters collapse into blotches.
If any of these ideas have you sketching in the margins, here are a few reliable things to pick up before you book.
Stencils, Ink, And Aftercare Picks For Fine Lines
Stencil & Prep:
- Stencil transfer paper (~$10-20), good for bringing exact flash sheets to your artist.
- Nitrile gloves (~$10-18), for hygiene when patching at home.
Aftercare Essentials:
- Fragrance-free healing balm (~$8-15), gentle hydration that does not clog lines.
- Antibacterial mild soap (~$6-12), for daily cleans during the first two weeks.
Support Tools:
- Non-stick breathable bandages (~$7-14), useful the first night.
- Silicone scar sheets (~$12-25), optional for smoothing after full healing.
8. Tiny Rose Outline With Single-Needle Stem
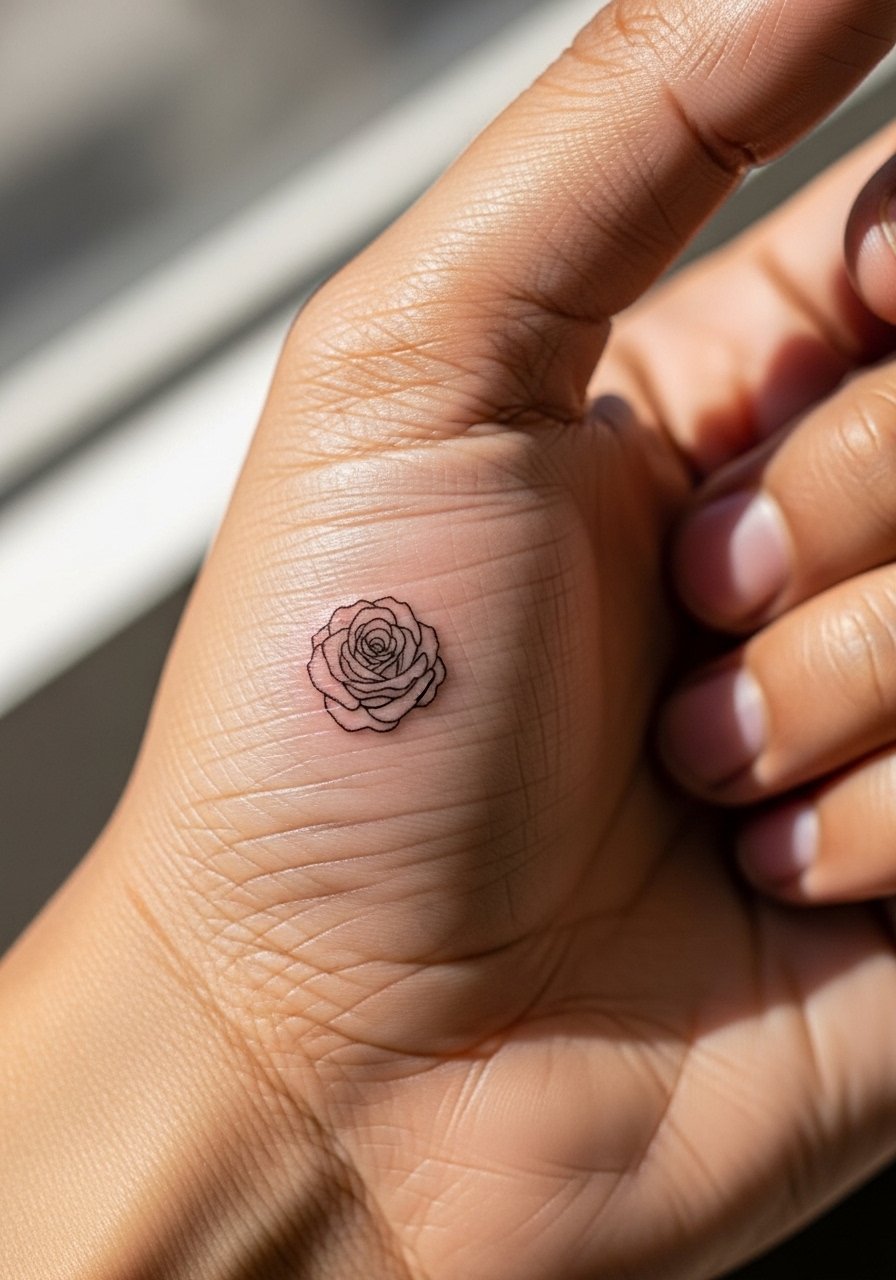
A rose in outline reads classic when the stem is a continuous thin stroke at 1RL and the petals are shaped with shallow curved hatch lines. It gives a soft romantic vibe that fits people who like vintage flash in a delicate package. Hands age differently, so this is a choice for someone ready to touch up after a year if needed. I like to recommend a light silicone sheet after full healing to keep edges smooth. For budget options, find an artist who does micro work and request a single-session appointment.
Mistake to Avoid: Asking for dense petal shading that turns the rose into one dark blotch.
9. Tiny Dots Band With Spaced Symbols
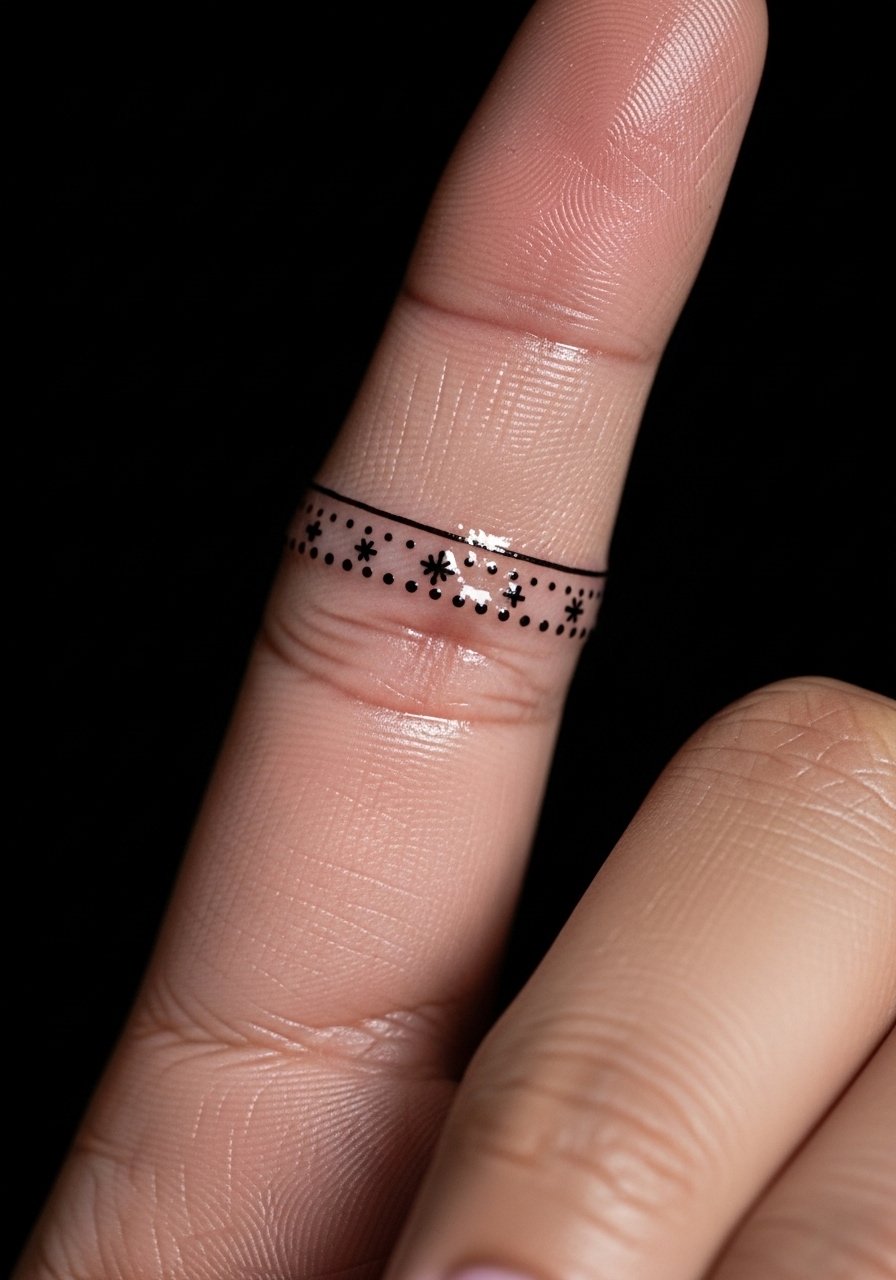
A dotted band with small symbols like stars or crosses looks intentional and delicate. Use 1 to 1.5 mm spacing between dots to keep rhythm without merging. It feels minimal and wearable, especially on fingers or wrists, and suits someone who wants a piece that repeats visually. Fingers may need a touch-up because skin there sheds faster. I keep a note to clients about wearing loose rings while it settles, and I recommend a quick follow-up at six weeks if any dot breaks up.
Mistake to Avoid: Packing dots too closely, which makes the band look like a gray line after healing.
10. Tiny Planet With Orbiting Dots
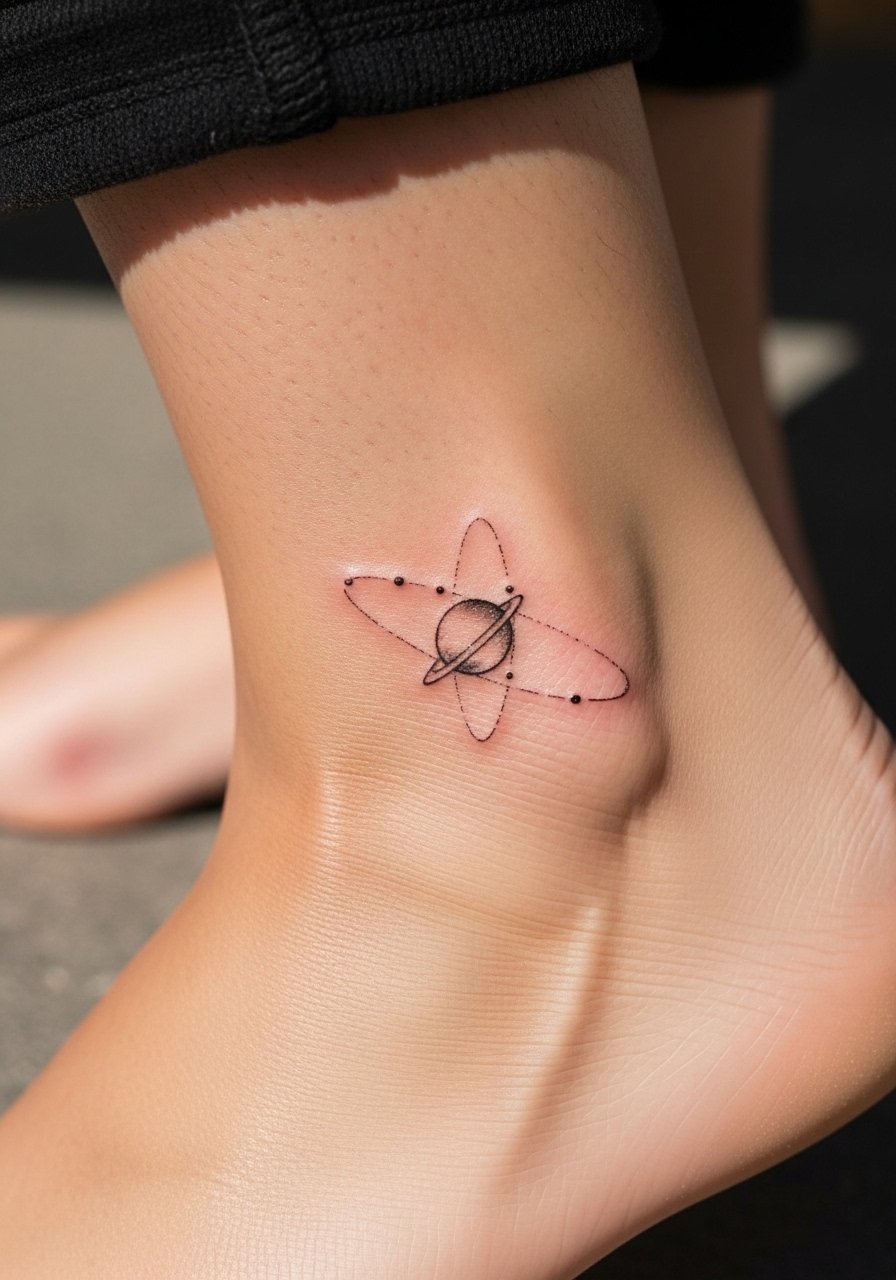
A small planet with orbit dots creates a compact graphic that reads both nostalgic and modern. Insert one micro-stipple shadow of 1 to 2 mm to ground the planet without heavy fill. This fits ankle or behind-the-knee placements and works for someone who wants a quiet, slightly cosmic accent. Keep footwear light while it heals and avoid long socks that rub. If the ring around the planet breaks, a single-needle touch-up usually restores the orbit without changing the original look.
Mistake to Avoid: Requesting a solid filled planet which will age into a blot rather than a crisp icon.
11. Tiny Heart With Crosshatch Accent
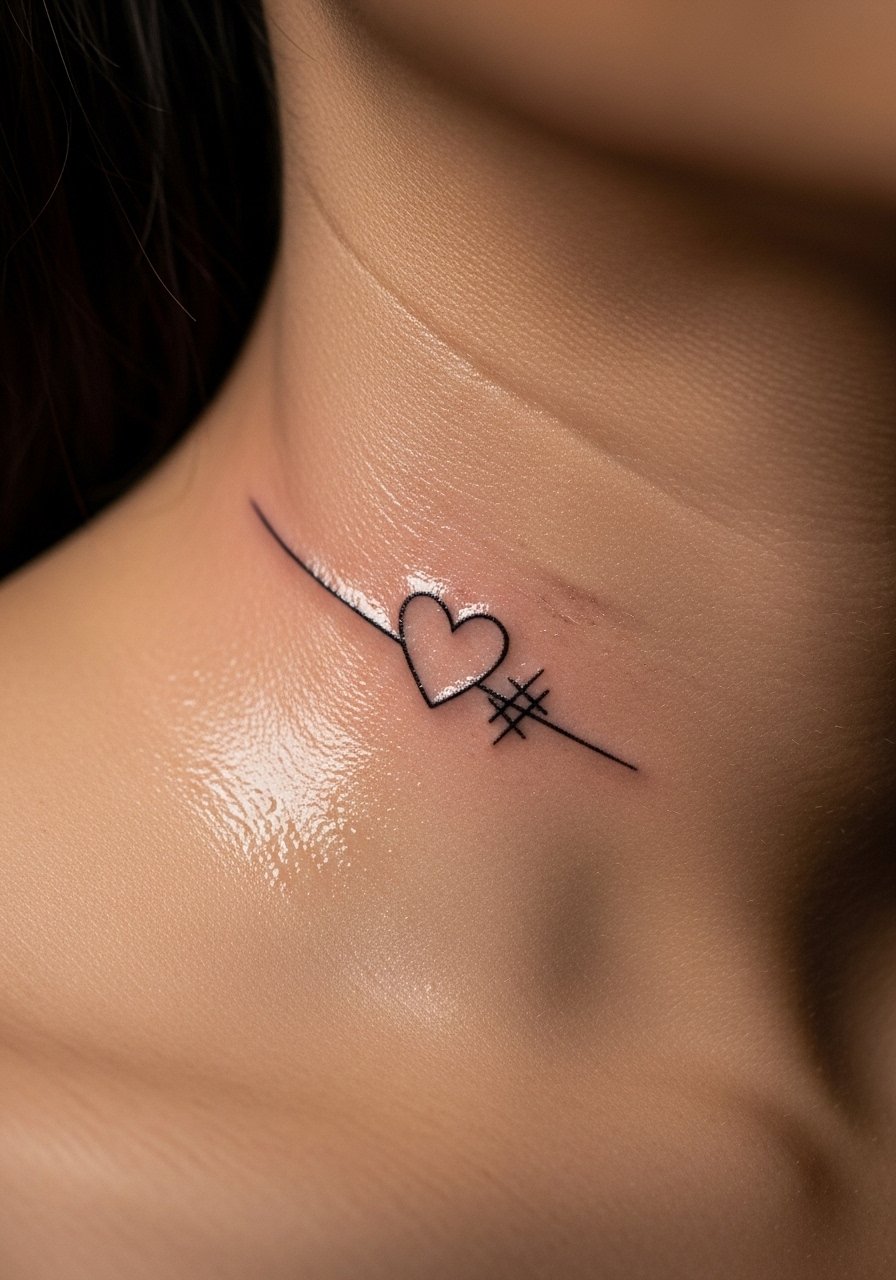
A simple heart with a tiny crosshatch accent conveys 90s flash charm when the hatch lines are at micro 0.8 to 1 mm intervals. It reads as handcrafted and small enough for collarbone or rib placements. This is good for someone who wants something romantic but unobtrusive. Protect it from tight clothing while scabbing and plan a quick check at the month mark. For slightly darker contrast ask for a denser single dot at the heart's base instead of heavy shading.
Mistake to Avoid: Requesting thick crosshatches that merge into a gray block instead of delicate texture.
Needle, Scale, And Heal Habits Worth Saving
Thin lines hold up best when you keep them dry and clean in the first 48 hours. A printed life-size flash sheet helps your artist match scale, so bring one to the consult. Grab non-stick breathable bandages for the first night. Keep sun off healed pieces for at least three months to avoid early fading. Avoid heavy exfoliation over fresh micro lines, and schedule a short touch-up window within six to eight weeks if any line softens.
