
I kept asking artists to "make it thin" and then leaving with a tattoo that blurred into a fuzzy spot after a year, until one artist told me to stop asking for thin and start asking for single-needle 0.35 mm work instead. That shifted everything. I stopped chasing tiny for tiny's sake, and started looking for clean geometry, crisp negative space, and placements that actually age well on skin that moves a lot.
These nine picks lean minimalist but demand precise line work, short sessions, and careful aftercare. They are best for someone who wants low-coverage, intentional ink, and who is okay with touch-ups down the road. I noticed these pieces across five shops I have visited, so the budget ranges from small single-session rates to a longer two-session sternum build. Expect basic aftercare and at least one touch-up within a couple of years for high-friction placements.
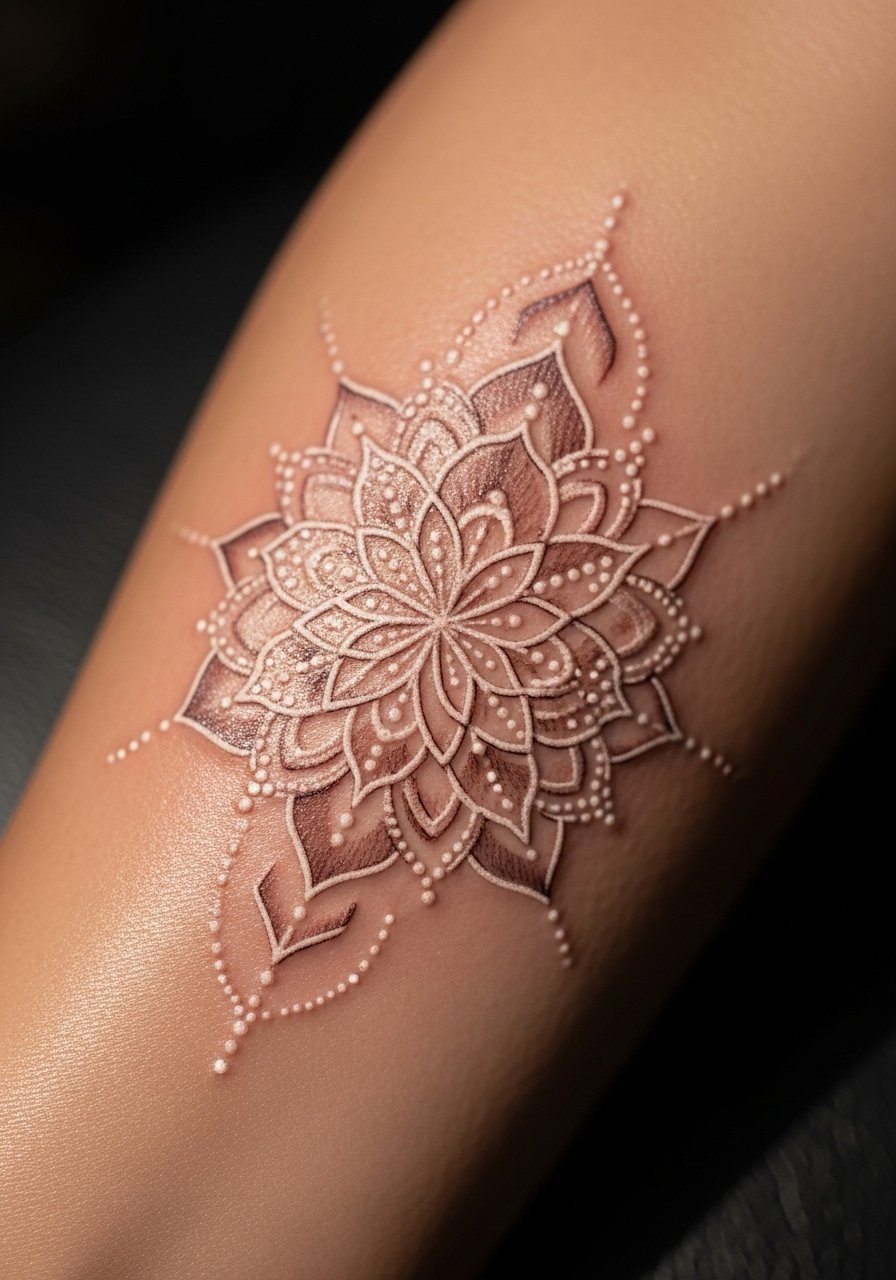
1. Tiny Microdot Mandala, Inner Wrist
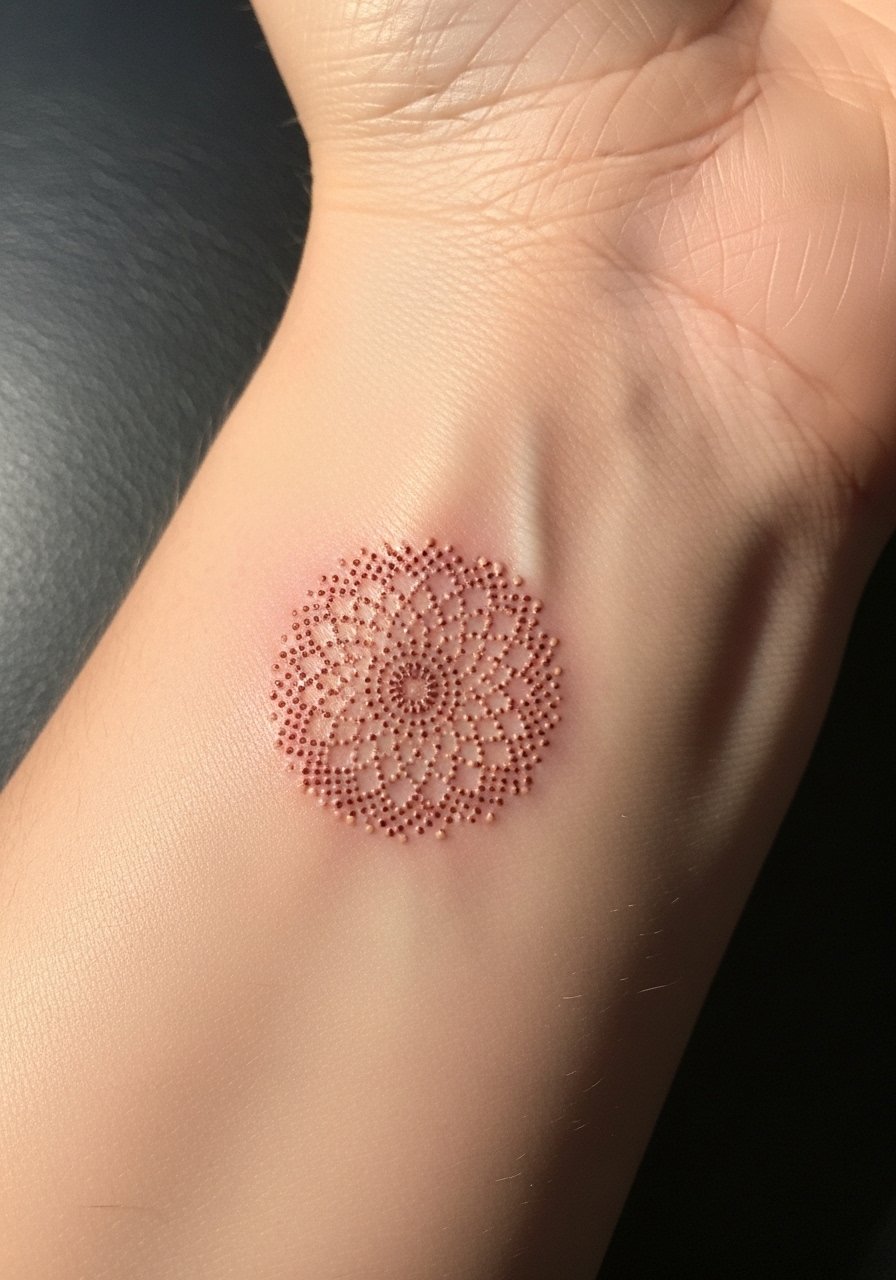
The geometry here is all in the dot density and spacing, not in thick strokes. When artists use a single-needle 0.35 mm configuration, the result reads crisp at arm's length and doesn't clog into a blob after healing. This style feels delicate and intentional, ideal for someone who wants something coverable at work but visible up close. Timewise it is a short session, often under an hour. I like to carry a gentle aftercare balm, like a gentle tattoo aftercare balm for nights when skin gets dry.
Style/Technique: Microdot geometry, single-needle
Pain Level: 3/10
Session Time: 30 minutes to 1 hour
Best For: Inner wrist, first-timers, anyone wanting coverable ink
Mistake to Avoid: Asking for "thinner" without specifying needle type, which often leads to inconsistent line depth.
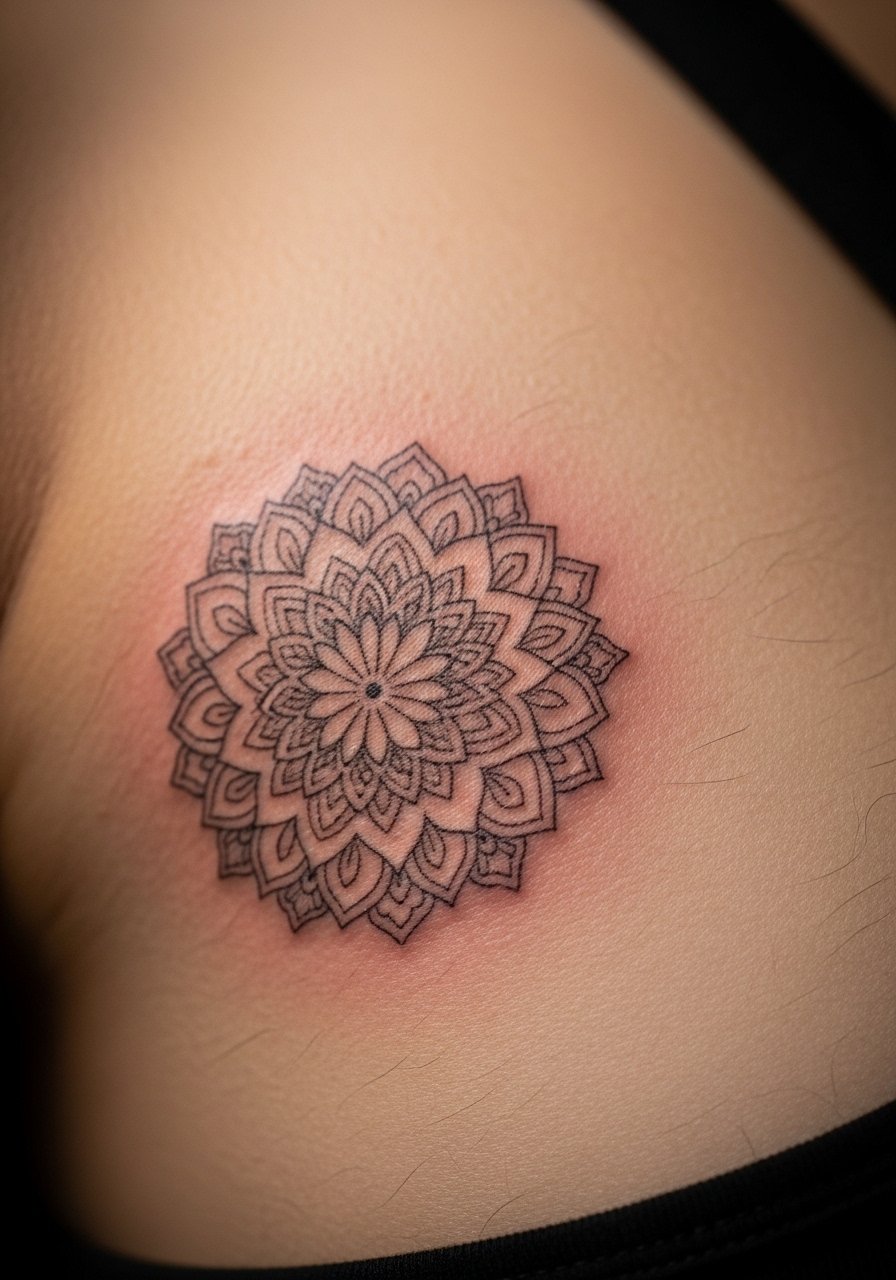
2. Concentric Disk Mandala, Upper Back
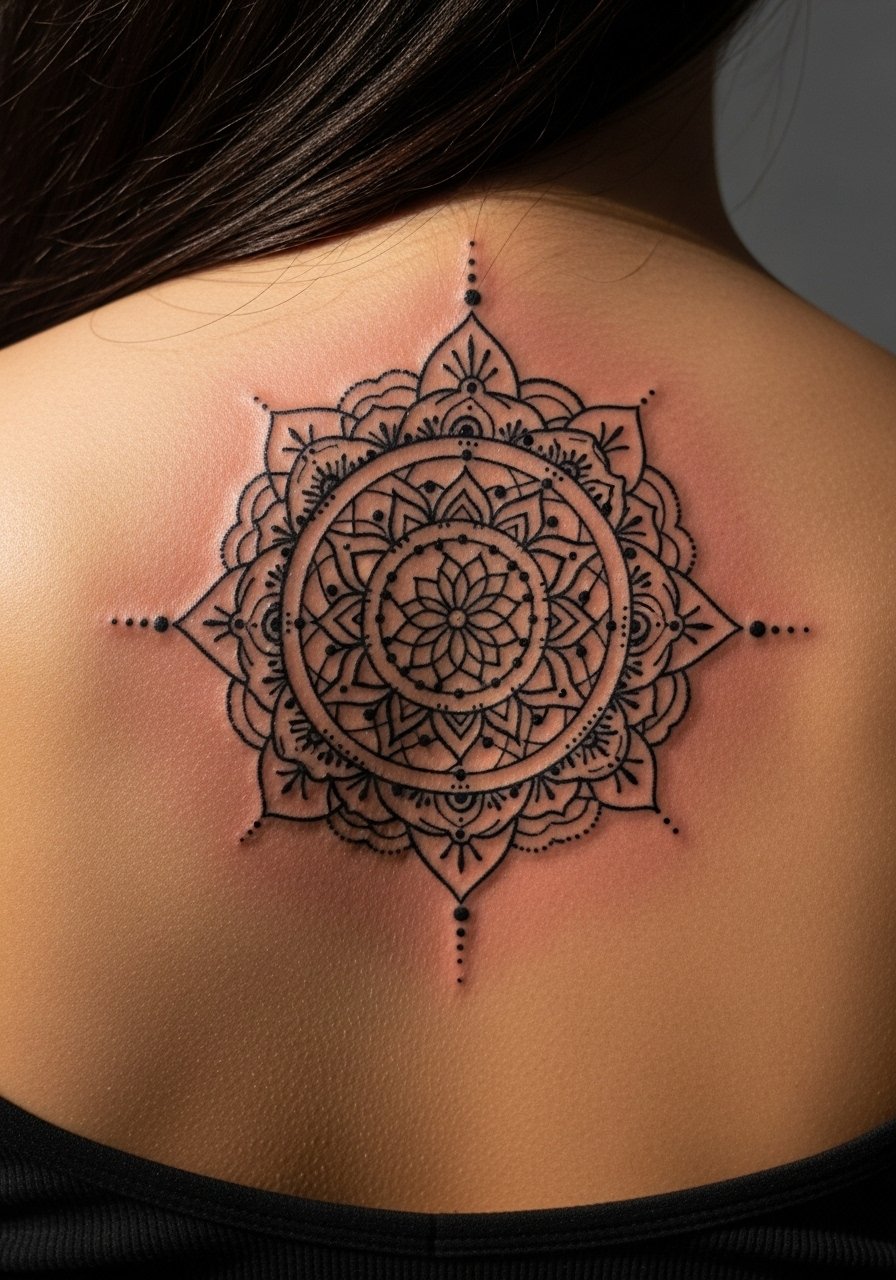
If you want presence without a sleeve, concentric disks sit well on the upper back and scale easily. The trick that makes this work is consistent radial spacing, roughly 4 to 6 millimeters between major rings, so the eye reads symmetry even from a distance. This is a medium skill piece that creates a balanced, calm feeling, good for someone who prefers a modest but structured statement. For stencil prep I trust a simple stencil transfer product, like stencil transfer paper, when artists work with clear guides.
Style/Technique: Concentric fine-line, radial symmetry
Pain Level: 4/10
Session Time: 1 to 2 hours
Best For: Upper back, people who wear open-back tops
Mistake to Avoid: Letting the stencil shift during placement, which breaks the radial symmetry once healed.
3. Finger Ring Mandala, Wrap Band
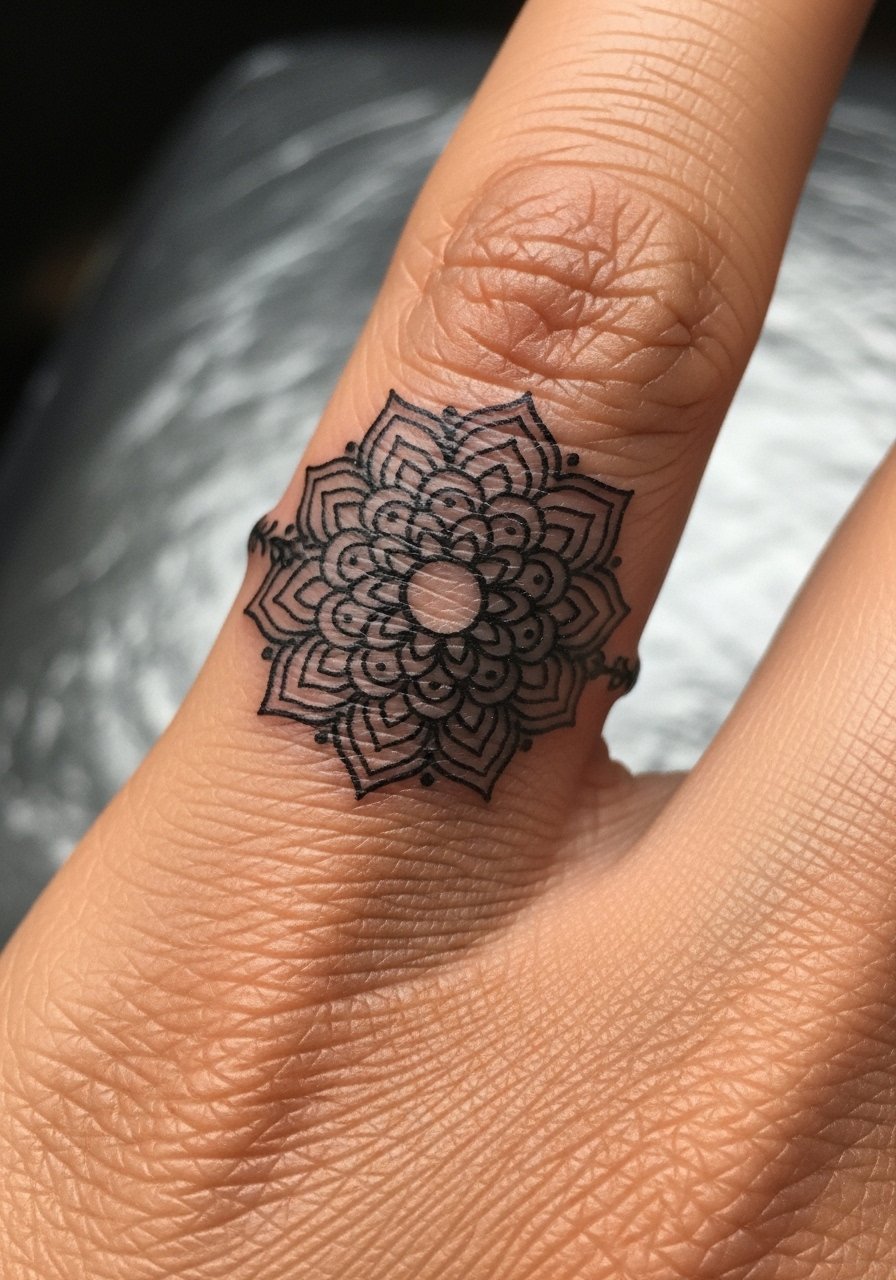
This one reads like jewelry and it behaves like jewelry because your hands meet so many surfaces. Lines should be extra fine and set shallow, since fingers experience the most friction. Expect faster fading and the need for touch-ups, especially if you wash hands a lot. For short sessions and low cost, it's a high-style pick for someone who wants a discreet geometric accent. I pack a mild, fragrance-free soap for initial cleaning, like fragrance-free tattoo soap.
Style/Technique: Wrap-around ring mandala, single-needle detail
Pain Level: 5/10
Session Time: 30 minutes to 1 hour
Best For: Finger placement, jewelry-look seekers
Mistake to Avoid: Expecting finger tattoos to last like forearm work, without planning for touch-ups.
4. Negative-Space Ankle Compass
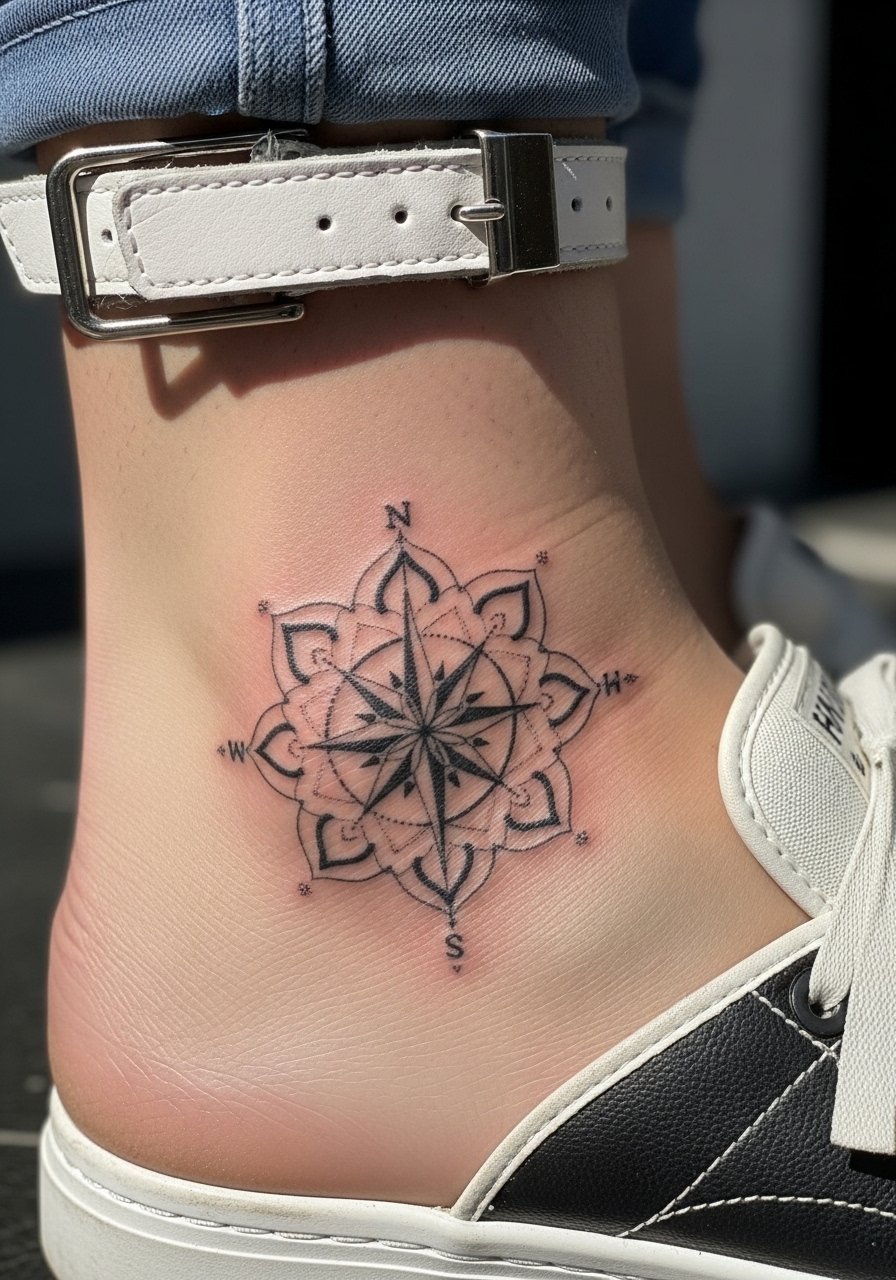
Using negative space inside a mandala keeps the tattoo airy and helps it age gracefully where skin flexes. A common ratio I recommend is leaving at least 30 percent of the design as un-inked skin, which prevents the piece from looking saturated later. Ankle placement is perfect for sandals and seasonal visibility. For aftercare on this placement I like an easily absorbed ointment; try a lightweight healing ointment.
Style/Technique: Negative-space geometry, fine-line spacing
Pain Level: 4/10
Session Time: 45 minutes to 1.5 hours
Best For: Ankle, seasonal visibility, those who want a breathable look
Mistake to Avoid: Filling every gap with ink, which makes the design look heavy and speeds fading on joints.
5. Black Line with White-ink Highlights
White-ink accents can lift a black-line mandala and give the illusion of depth without color. Use caution here, because white ink behaves differently on different skin tones and can yellow or fade in sun. If your design references mandala forms from specific cultures, ask your artist about meaning and permission; cultural-sensitivity matters with sacred symbols. A small tube of sterile single-needle cartridges helps the artist maintain crispness, examples like single-needle tattoo cartridges are what shops use for consistent line weights.
Style/Technique: Black fine-line with white highlights
Pain Level: 4/10
Session Time: 1 to 2 hours
Best For: Forearm, upper arm, those who want subtle dimensionality
Mistake to Avoid: Assuming white ink behaves like black; placement and skin tone change final look.
6. Geometric Band Half-Sleeve Edge
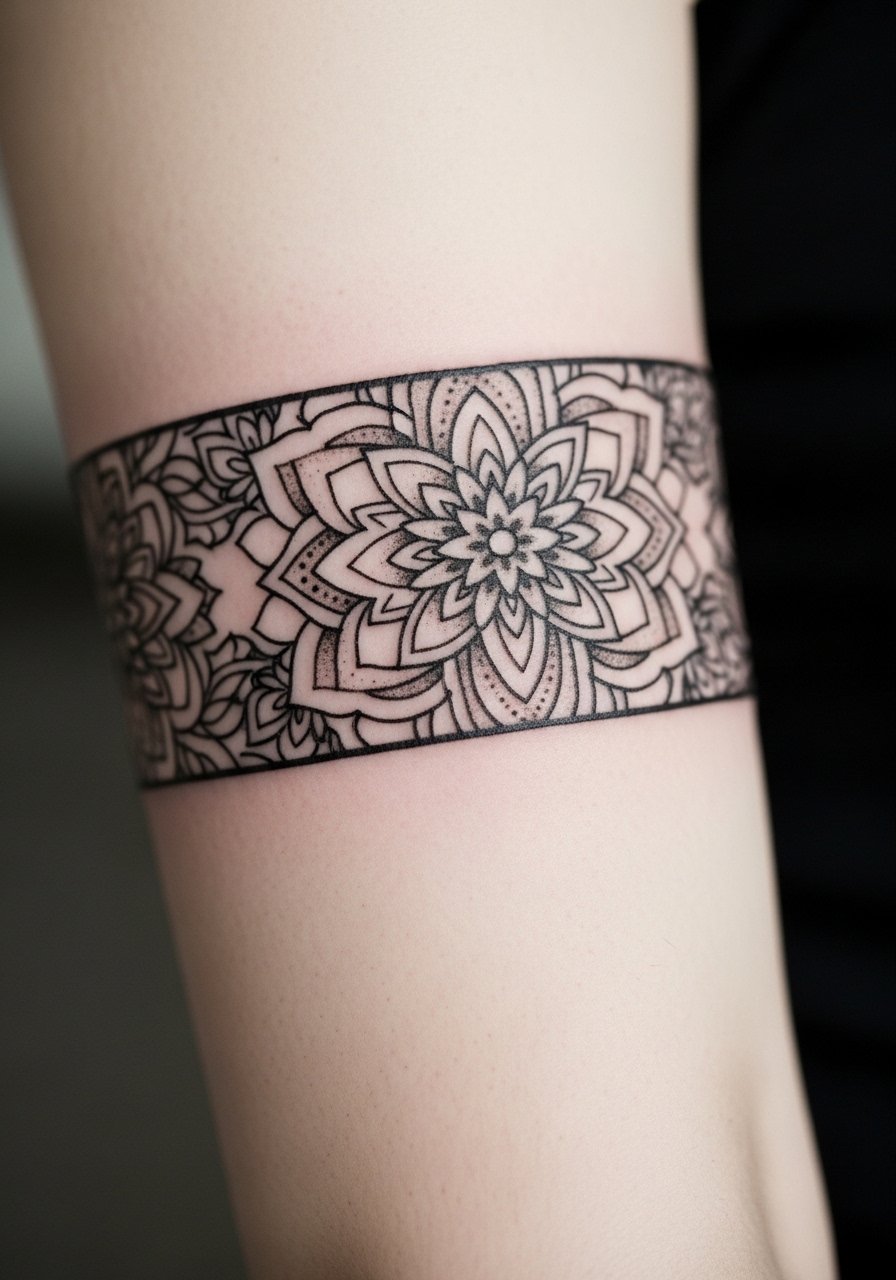
If you want a mandala that reads as part of a larger composition, make it a border band with repeating geometry and consistent 1:2 line-to-space ratio. That keeps the band legible as sleeve work is added later. This is a good pick for someone slowly building a sleeve over a few sessions. For stencil accuracy I often recommend artists use transfer paper and a steady hand, and I carry spare stencil transfer paper when I get custom work.
Style/Technique: Repeating geometric band, modular design
Pain Level: 5/10
Session Time: 1 to 2 hours per segment
Best For: Outer arm, sleeve starters
Mistake to Avoid: Skipping consistent spacing, which makes the band look mismatched when more work is added.
7. Ribcage Single-Needle Mandala
Rib work is sensitive and breath-controlled. Precision here matters because the skin stretches with breathing. Single-needle 0.35 mm work reads crisp but needs slow, steady sessions, and planning for a two-hour block is realistic. This placement is best for someone comfortable with higher pain and who wants a piece that is easy to conceal under clothing. Pack a healing ointment for nights and a soft, breathable top to avoid rubbing. For calm during the session some people use numbing options discussed with their artist.
Style/Technique: Single-needle sternum/rib mandala
Pain Level: 7/10
Session Time: 1 to 2 hours
Best For: Sternum, people prepared for higher pain and covered placements
Mistake to Avoid: Trying to rush rib sessions into very short appointments, which leads to inconsistent line depth.
If any of these ideas have you bookmarking, here are the things I actually reach for when getting and caring for fine-line mandalas.
Fine-Line Mandala Kit Essentials
Aftercare:
- Fragrance-free tattoo soap (~$8-15), gentle cleansing without stripping.
- A gentle tattoo aftercare balm (~$10-18), for nightly moisture.
Stencil & Needles:
- Stencil transfer paper (~$12-20), for crisp placement.
- Single-needle tattoo cartridges (~$15-30), what pro artists use for clean lines.
Session Comfort:
- Disposable bandage wrap (~$7-12), for travel home.
- Lightweight healing ointment (~$6-12), for the first few nights.
8. Behind-the-Ear Mini Mandala
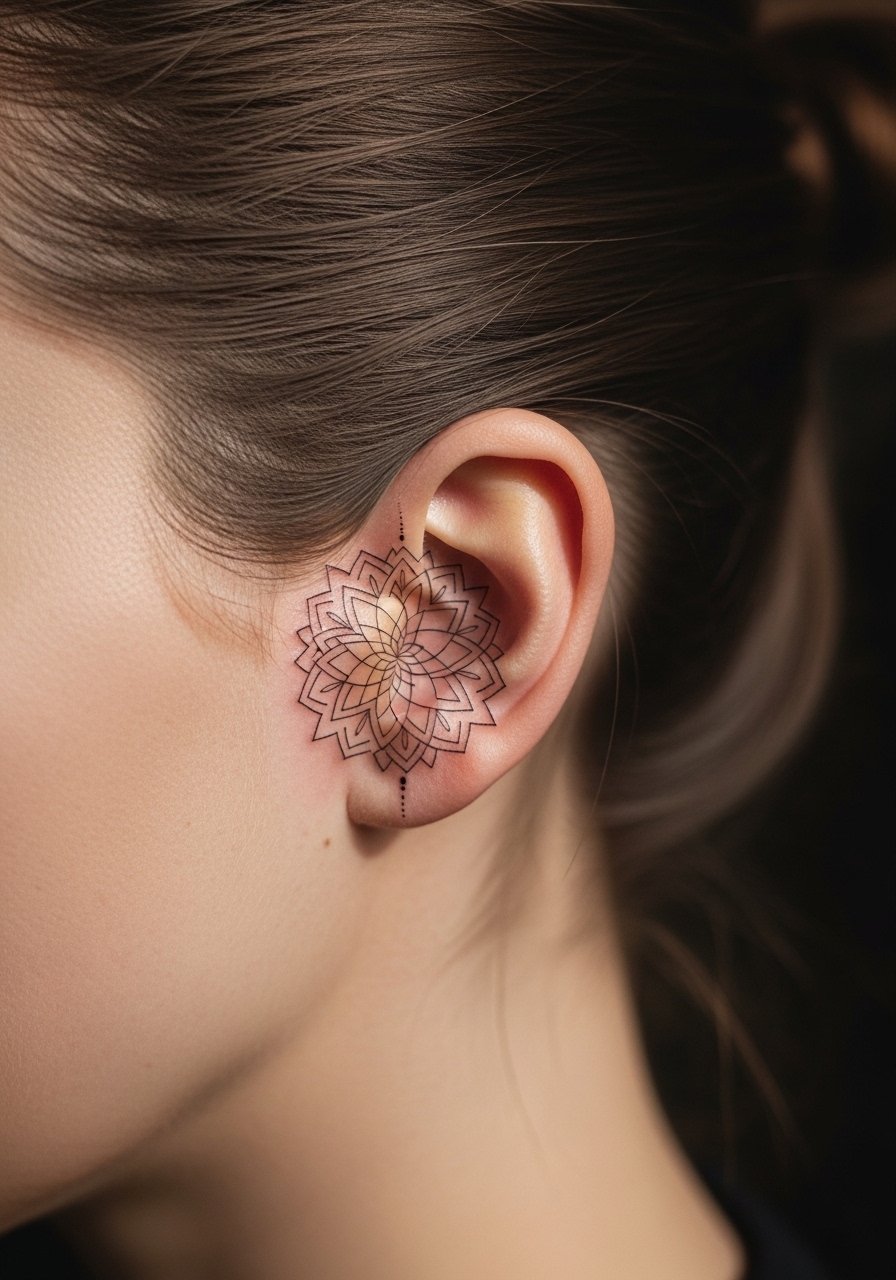
Behind-the-ear mandalas read like a hidden detail and are very easy to cover. The small scale requires a steady single-needle approach and shallow lines since the skin there is thin. This is a low-visibility option that suits workplaces requiring discretion. Sessions are short, and healing looks different because of hair oils and movement, so I recommend a thin layer of balm at night and gentle daily cleansing. For discreet packing bring a small tube of aftercare balm such as a gentle tattoo aftercare balm.
Style/Technique: Mini hidden mandala, single-needle
Pain Level: 3/10
Session Time: 20 to 45 minutes
Best For: Behind the ear, coverable placements, salon workers
Mistake to Avoid: Letting hair oils sit on the fresh tattoo, which can trap bacteria and slow healing.
9. Sternum Centered Geometric Mandala
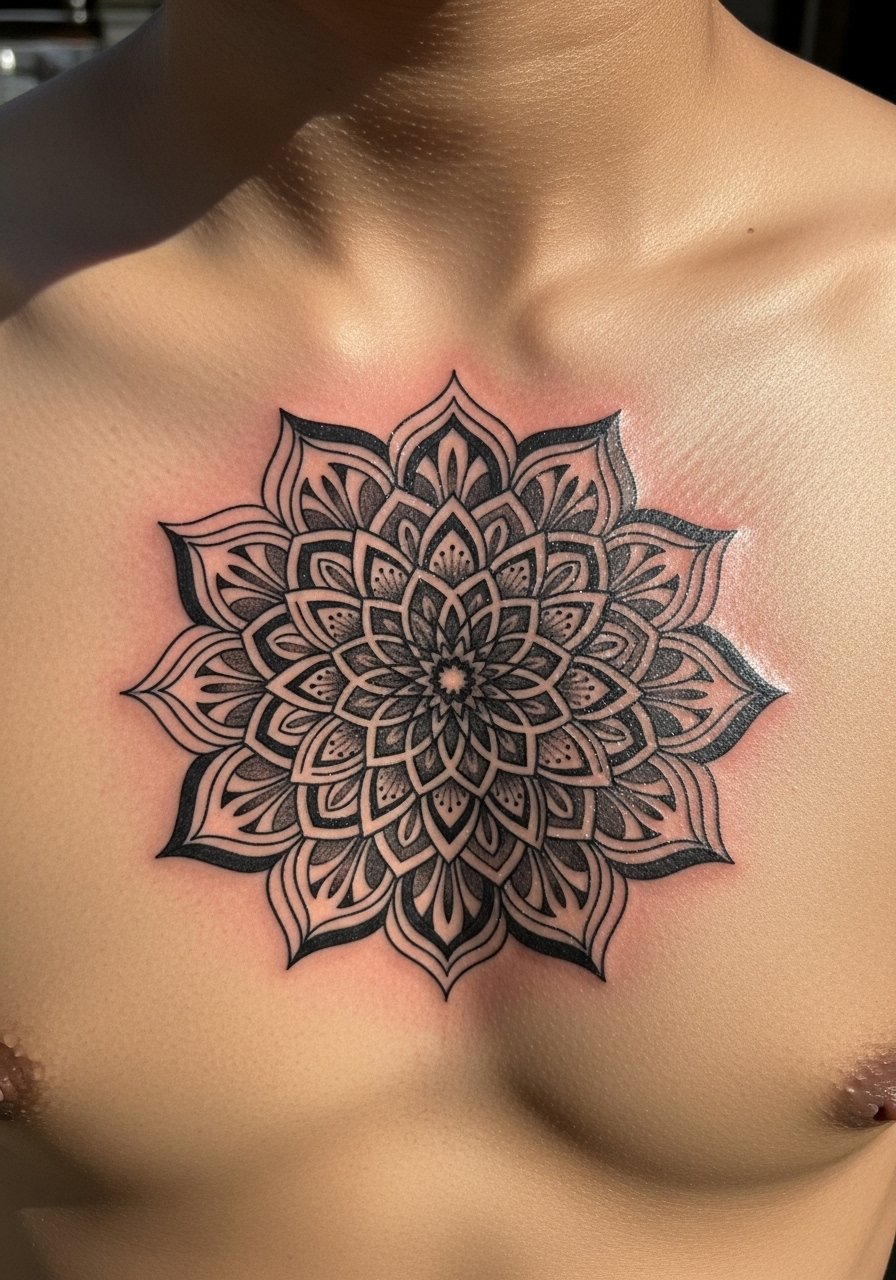
A centered sternum mandala makes a statement and needs design breathing room. I recommend keeping a 2 to 3 centimeter clear margin around the outer ring to allow for natural chest expansion and skin movement. This piece often requires two sessions, one for the outline and one for very fine fill. It ages well if kept out of heavy sun and if you plan a touch-up around year two. I also bring a lightweight healing ointment like lightweight healing ointment for overnight care.
Style/Technique: Centered sternum mandala, staged sessions
Pain Level: 6/10
Session Time: 1 to 3 hours total across sessions
Best For: Sternum, statement chest pieces, those planning multi-session work
Mistake to Avoid: Crowding the center with too many small details, which merge as the skin settles.
Small Habits For Fine-Line Care
Keep touch-ups in mind from the start. Ask your artist about a one-year check-in, and book that window. A small maintenance session keeps single-needle 0.35 mm lines crisp.
Grab fragrance-free tattoo soap. Gentle cleansing twice a day prevents scab hardening without over-drying.
Most people ignore sunscreen. A mineral SPF and a thin layer each morning protect line clarity. Try mineral sunscreen stick for spots.
If you sleep on your fresh work, use a soft cotton tee and a disposable wrap. Disposable bandage wrap keeps sheets clean and reduces friction.
