
I kept tracing tiny ancient symbols onto my arm and leaving them muddled, like wet pencil smudges, until one artist told me to treat the design like handwriting, not a stamp. That change, slowing down and widening spacing just a hair, made the lines hold instead of bleeding into one another. After that, my fine-line pieces finally read like drawings, not a blur of ink.
These picks are not full sleeves or exact cultural reproductions. They are pared-back linework inspired by ancient motifs, meant for people who want subtle history on a small scale. Most are single-session or two-session ideas, budget-friendly compared with large custom pieces. I learned these approaches across five shops I have visited and by paying attention to how tiny line spacing ages on different skin tones.
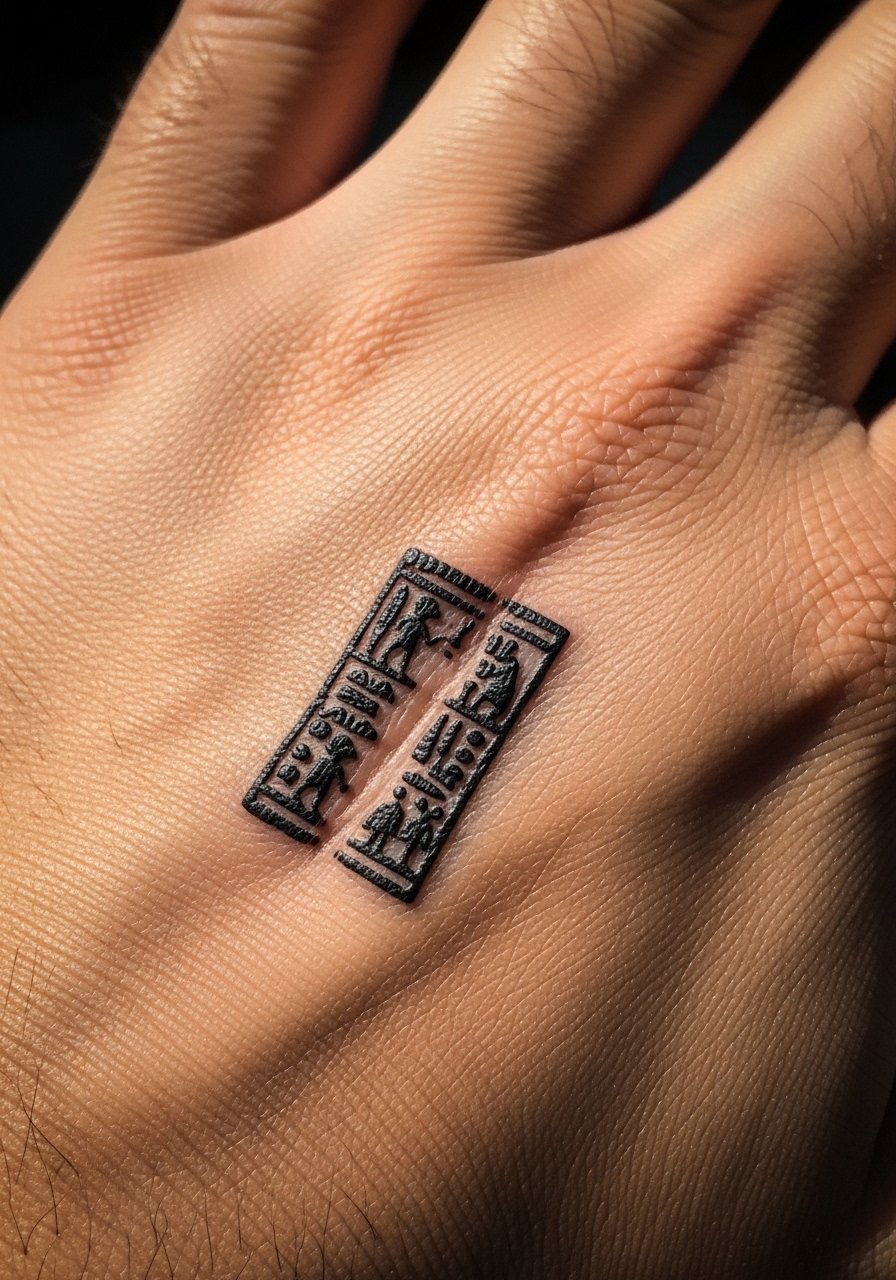
1. Egyptian Hieroglyph Band, Thin Script

The visual trick here is rhythm. A band of simplified hieroglyphs, each sign spaced about 3 to 4 millimeters apart, reads like a sentence without crowding. It feels graphic and wearable, fitting a forearm or calf, and sits well with short sessions under two hours. For technique, single-needle linework or a 3RL at low pressure creates those crisp 0.2 to 0.4 millimeter strokes. Add a light wash of micro-dot shading under one or two symbols to anchor the band. Healing looks slightly raised for a week, then the lines settle to a soft, inked hairline.
Style/Technique: Fine-line script
Pain Level: 3/10
Session Time: 0.5 to 2 hours
Best For: Forearm, calf, anyone wanting readable small text
Mistake to Avoid: Crowding every symbol together so the negative space disappears and the band reads like a solid bar.
2. Greek Vase Figure, Continuous Line

A single unbroken line that suggests a seated or walking figure gives an ancient feel without copying any one piece. It works visually because the eye fills in missing bits, and that makes the piece look intentional, even when small. This style fits a shoulder or rib spot and is beginner-friendly for artists who practice steady hand speed. Use a single-needle setup and keep the line weight even, about 0.3 millimeter. Budget-wise this is a quick session. Expect the contour to look darker the first week, then soften into crisp, hairline strokes.
Style/Technique: Continuous single-line figure
Pain Level: 4/10
Session Time: 0.5 to 1.5 hours
Best For: Shoulder, upper arm, people who like minimal figurative work
Mistake to Avoid: Trying to add tiny interior detail, which turns the clean line into a cluttered sketch.
3. Miniature Celtic Knot, Negative Space
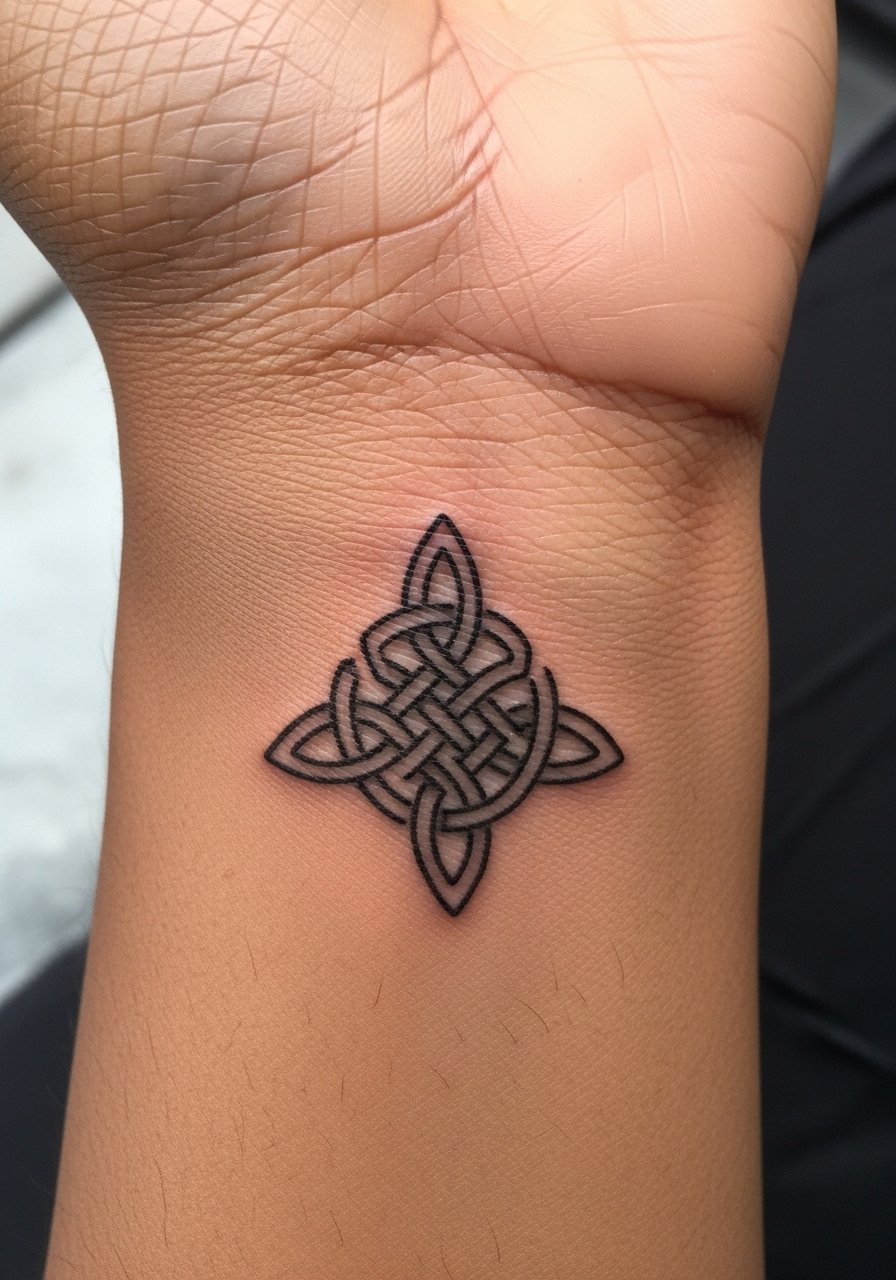
Celtic knots translate to fine-line work when you let negative space carry the weave. Draw the knot larger than you think, with 1.5 to 2 millimeter gaps where the skin shows through. The result feels both ancient and modern, like a little talisman, and it sits best on hands, wrists, or behind the ear. Techniques mix single-needle lines with tiny negative-space cuts to keep the weave readable over years. On darker skin tones the lines need slightly more contrast at first, so expect the piece to look bolder for the first month.
Style/Technique: Negative-space knotwork
Pain Level: 5/10
Session Time: 0.5 to 1 hour
Best For: Wrist, behind ear, anyone wanting a small symbolic piece
Mistake to Avoid: Scaling the knot down too far so the crossings lose separation and blur together as it heals.
4. Sumerian Seal Mark, Micro Dot Accent
A compact seal glyph works as a palm or hand accent when you keep line weight minimal and add micro-dot accents to suggest texture. The dotting should be spaced about 2 millimeters apart and done with a tight needle grouping. This creates depth without heavy shading, and it reads like an artifact rather than modern tattoo art. Healing for hand pieces is slower; expect two to three weeks before fine details settle. Also consider cultural-sensitivity, keeping the design generalized rather than copying sacred inscriptions.
Style/Technique: Micro-dot accent with fine lines
Pain Level: 6/10
Session Time: 0.5 to 1.5 hours
Best For: Hands, fingers, small surface areas, collectors of micro work
Mistake to Avoid: Over-dotting the interior so the glyph fills in and loses its seal-like clarity.
5. Linear Mayan Glyph Fragment, Asymmetric Layout

Instead of a full panel, take one glyph element and place it off-center on the ribs or side torso. The asymmetry makes it feel like a preserved fragment, which is visually more intriguing than a perfect rectangle. Use a 3RL for the main strokes and 1RL for hairlines, keeping line distance at least 2.5 millimeters where possible. This is a slightly longer session if you want crisp edges, and ribs are sensitive, so plan pain and session time accordingly. Add a cultural-sensitivity note when sourcing reference so motifs are respectful.
Style/Technique: Fragmentary linear glyph
Pain Level: 6/10
Session Time: 1 to 2 hours
Best For: Ribcage, side torso, people who prefer offbeat placements
Mistake to Avoid: Reproducing complex sacred panels without context, which can feel appropriative and muddled.
6. Petroglyph Line Study, Weathered Edge
Petroglyphs read well when you mimic stone wear, by softening line endings and leaving tiny irregularities. A slightly thinner start and feathered finish on each stroke makes the piece look aged, like an actual carving. For the effect, alternate single-needle with minute stippling around the edges. This is a great option for sleeve starters or standalone arm pieces. Budget-friendly, often one session under two hours. Include a cultural note in the consult and avoid using motifs clearly tied to living traditions without permission.
Style/Technique: Weathered linework with stippling
Pain Level: 4/10
Session Time: 0.5 to 2 hours
Best For: Outer bicep, sleeve accents, people who want a worn look
Mistake to Avoid: Trying to make every edge perfectly even, which removes the weathered character and flattens the design.
7. Bronze-Age Spiral, Tiny Concentric Lines
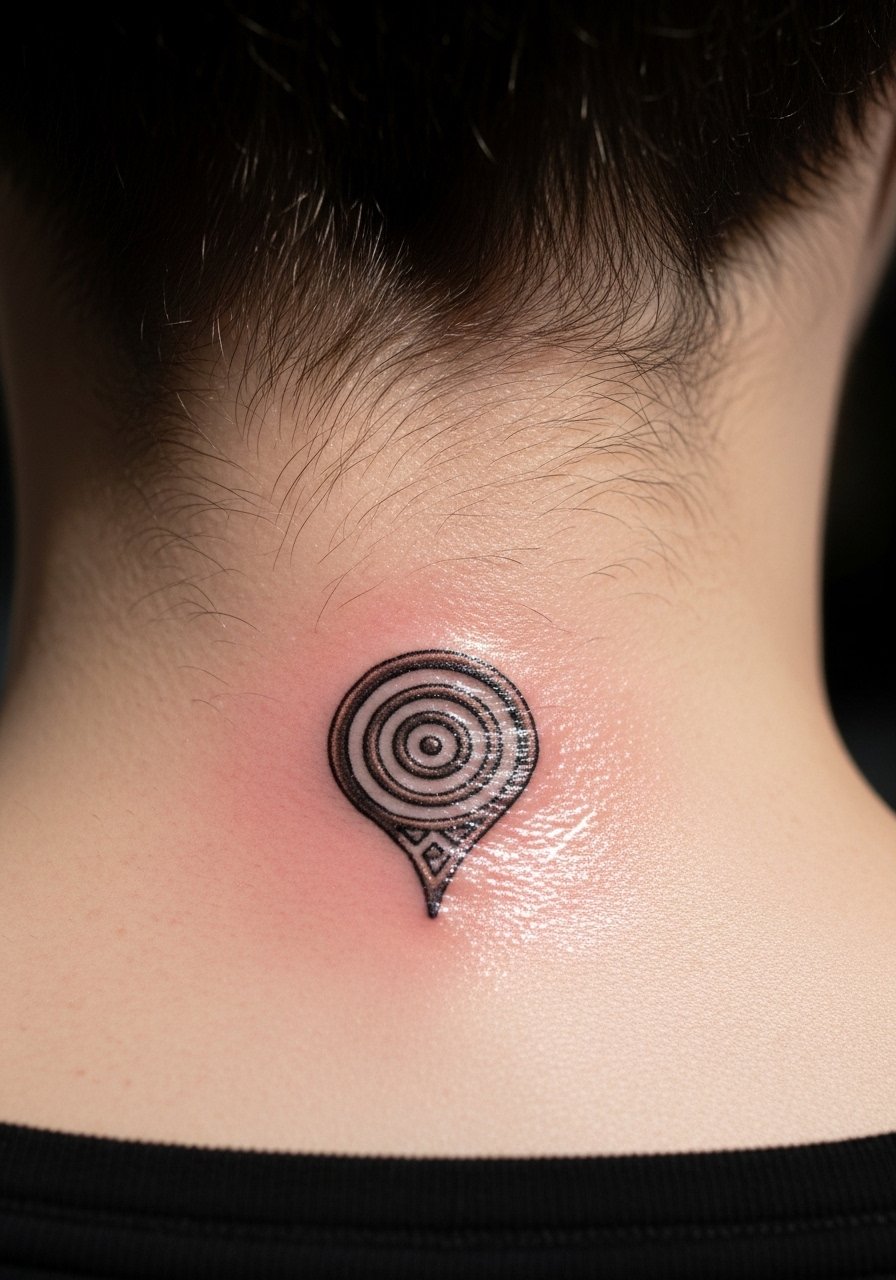
A spiral made of concentric hairlines becomes a quiet symbol when each ring sits about 1 to 2 millimeters apart. The optical effect makes the center read slightly darker without heavy ink. It feels intimate on the nape or behind the ear and is ideal for people who want discrete placements. Single-needle precision and steady hand speed are key. Healing shows the rings more as little lines than filled bands. This is a quick, low-budget option but needs a steady artist for crisp concentricity.
Style/Technique: Concentric fine-line spiral
Pain Level: 3/10
Session Time: 0.5 to 1 hour
Best For: Nape, behind ear, discreet spots
Mistake to Avoid: Making the spiral too tight so the inner rings merge as they heal.
If any of these ideas are making you bookmark the page, here are the actual things I reach for when I get the work done.
Fine-Line Aftercare & Prep Picks
Skin Prep:
- Fragrance-free-face-and-body-soap (~$6-12), gentle cleansing before appointments.
- Disposable-razors (~$5-10), for clean shave where needed.
Aftercare Basics:
- Tattoo-aftercare-salve (~$10-18), light balm used sparingly for the first five days.
- Medical-grade-tape-non-adhesive (~$8-15), for protecting palms or hands while healing.
Sun Protection & Long-Term:
- Tinted-spf-stick (~$12-20), daily sun protection after the tattoo fully heals.
- Silicone-healing-sheets (~$10-25), for smoothing raised scar tissue later if needed.
Fine-Line Healing Habits
Thin coats beat one thick coat every time. When you apply balm, a fingertip amount spread in a thin layer keeps lines crisp and avoids smothering the area. I use tattoo-aftercare-salve for this.
Grab fragrance-free-face-and-body-soap. Short, cool showers and gentle lathering around the tattoo prevent scabs from hardening and pulling ink.
Most people try to rush sun protection until later. Keep a tinted-spf-stick in your bag from day one after full healing. UV is the fastest way fine lines lose contrast.
Don’t wrap the spot for longer than the artist recommends. Over-occlusion raises moisture and makes the lines spread. If in doubt, ask your artist and follow a simple schedule of cleaning twice a day and thin balm thereafter.
Mistake to Avoid: Using heavy lotions that sit on top of the skin and blur hairline details over months.
