
I kept asking artists for the tiniest, pencil-thin roses and leaving the shop with something heavier than I wanted. It took three touch-ups and a tattoo artist saying the right needle would fix it for me to stop pinching the reference photo and start asking about technique instead.
These are small, fine line February flower ideas for anyone who wants delicate ink that reads like a sketch, not a sticker. They are mostly coverable, modest session times, and friendly to first-timers and people who work in visible jobs. I learned a lot across five shops I have visited about needle choice, spacing, and aftercare, so each pick notes who it fits and what to expect for pain, healing, and touch-ups.
1. Single-Stem Anemone On The Inner Wrist
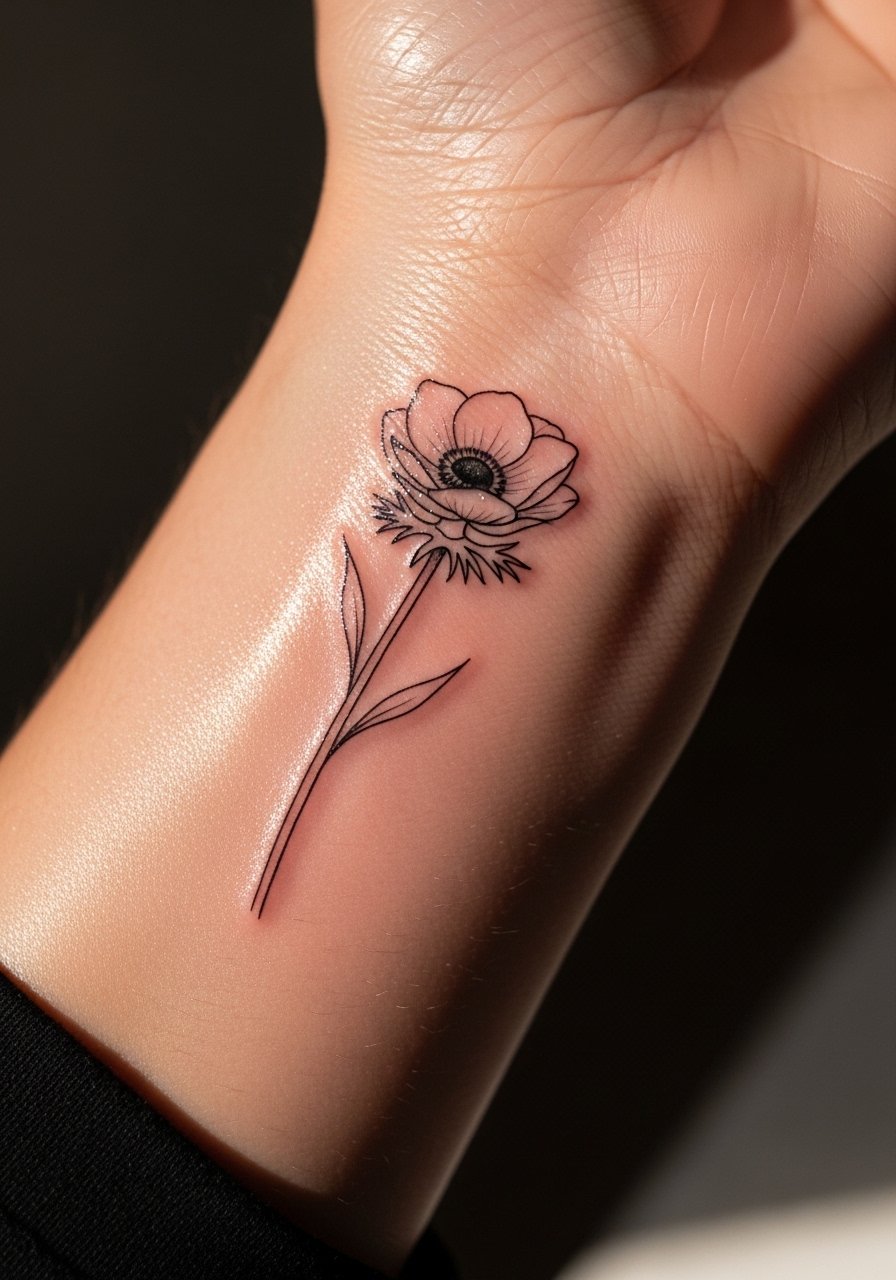
A tall, single-stem anemone works because the negative space around thin petals makes the linework read cleaner at a distance. The visual is airy and intentional, good for people who want a visible but subtle daily reminder. Ask for a 3RL or single-needle for petal edges, and expect the center to be slightly stippled rather than solid black. Budget wise, this is usually a one-hour session and easy to touch up in a short follow-up appointment. Pair with a vegan ink like a neutral black for softer aging, and plan two weeks of gentle cleansing while it scabs.
Style/Technique: Fine single-needle botanical
Pain Level: 2/10
Session Time: 0.5 to 1 hour
Best For: Inner wrist / visible but coverable placement
Mistake to Avoid: Asking for ultra-black fill in the first session, which makes the lines look heavy as it heals.
2. Tiny Violet Cluster Behind The Ear
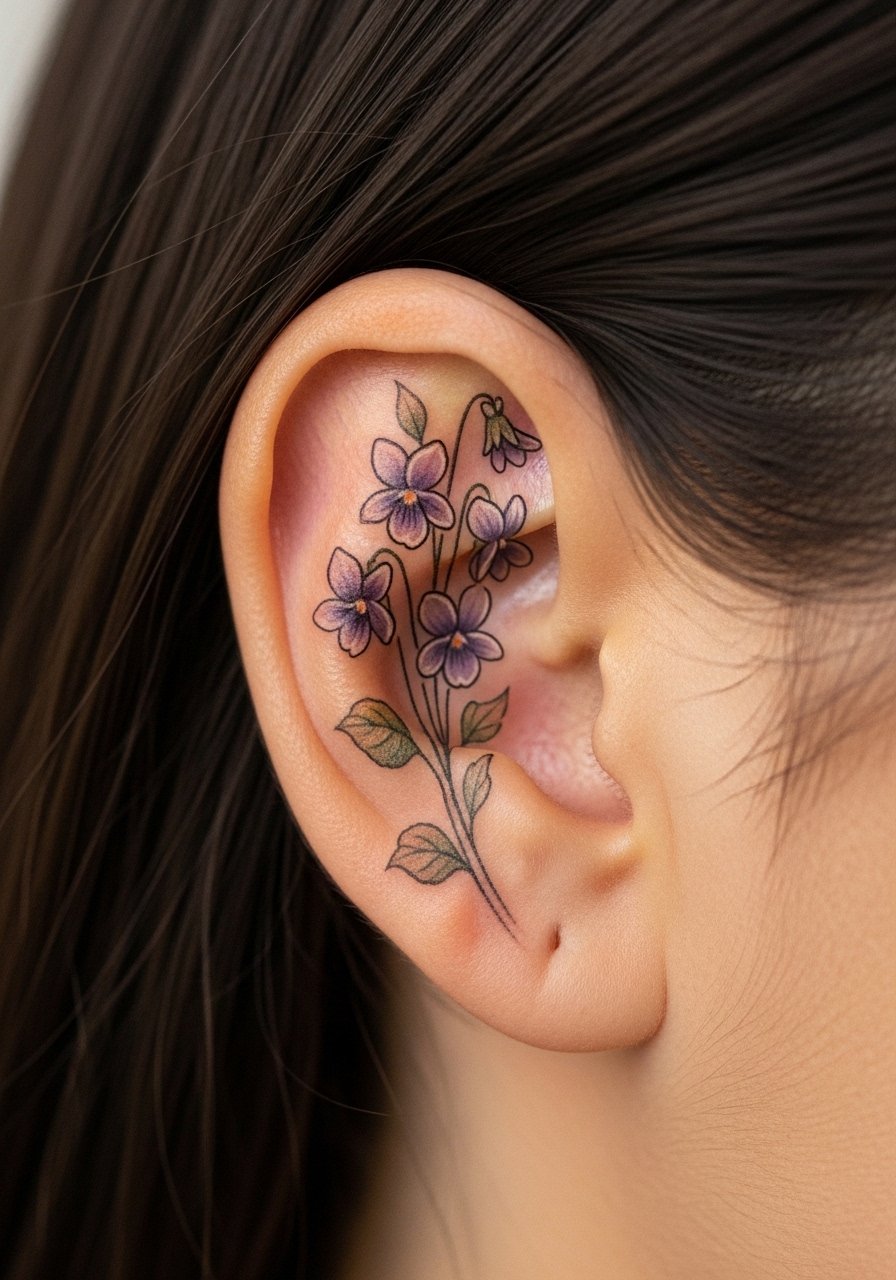
This placement looks like a playful pin tucked under hair, and the small cluster reads as a texture rather than a distinct motif from across a room. The idea works visually because the thin stems wrap the ear curve, creating motion. It is a low-session-time choice, beginner-friendly, and a good option if you work in a conservative office. Bring a reference that shows scale. Ask the artist to use single-needle work for the tiny petals and light dotwork for centers. You will need minimal aftercare and can expect the lines to soften slightly by three months.
Style/Technique: Micro botanical cluster
Pain Level: 3/10
Session Time: 0.25 to 0.75 hours
Best For: Behind-ear / discreet placement
Mistake to Avoid: Bringing a large, detailed photo and expecting it to translate at this tiny scale.
3. Snowdrop Outline On The Rib Cage
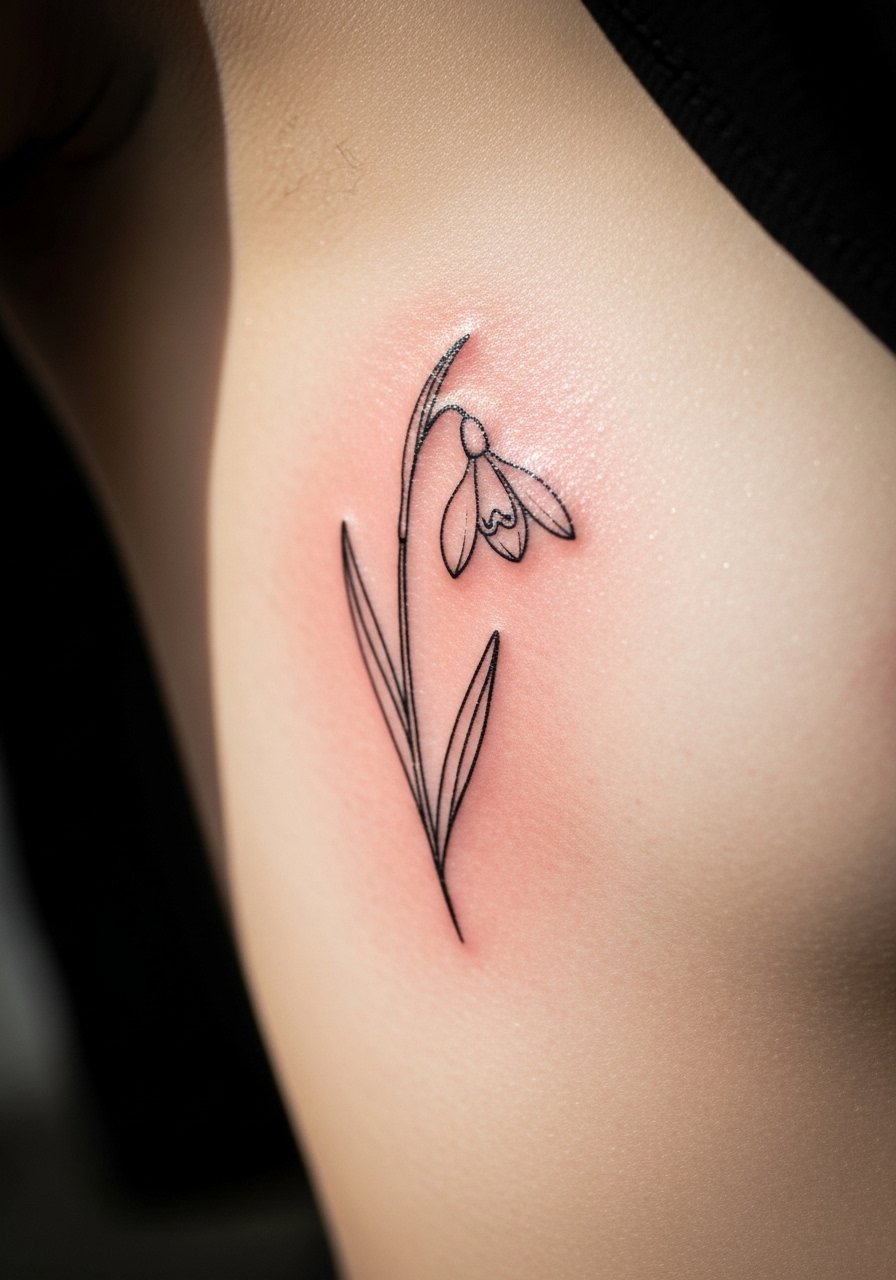
Rib placements let fine lines breathe across flat skin, which keeps the outcome looking like a drawn study rather than a compact emblem. Snowdrops are a February birth flower and the long droop of the bloom suits the rib because it follows the torso curve. This is a slightly higher pain area, and session time can be longer if you add light shading. Ask for spacing between lines to be at least 0.5 millimeters to avoid ink migration. If budget is tight, do the outline first and add shading in a follow-up session.
Style/Technique: Delicate contour outline
Pain Level: 5/10
Session Time: 1 to 2 hours
Best For: Ribcage / people comfortable with moderate pain
Mistake to Avoid: Crowding too many tiny details into a small rib piece, which blurs with time.
4. Minimal Tulip Outline On The Ankle
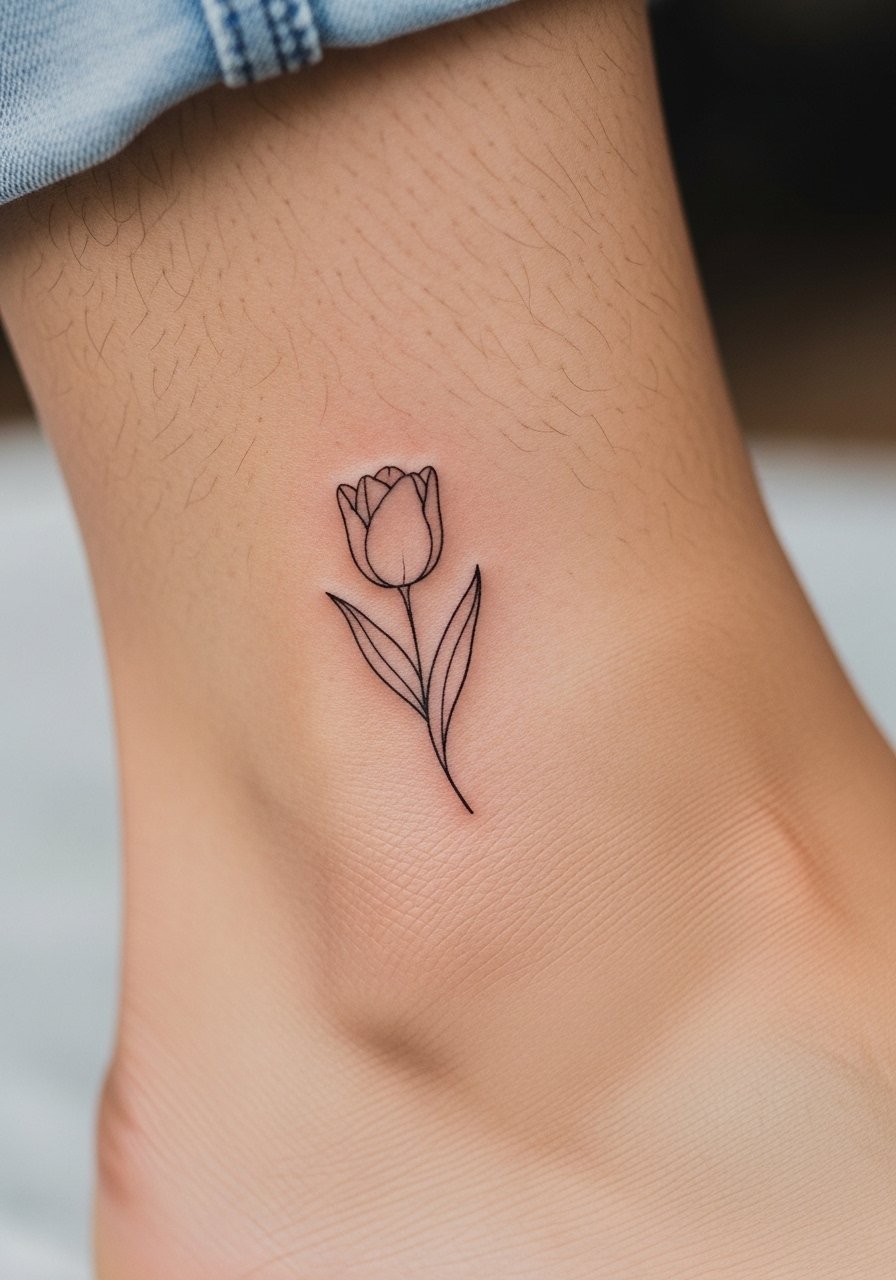
Ankle tattoos have the advantage of being easy to cover when needed and simple to show off when you want. The tulip’s simple silhouette is ideal for single-needle lines with a small gap for a highlight, which keeps the motif feeling modern. This is a quick session and budget friendly. If you want leaf texture, ask for a 3RL for the stem and single-needle for petals. Remember that the ankle can wear from socks and shoes, so plan clothing and aftercare accordingly during the first two weeks.
Style/Technique: Minimal silhouette linework
Pain Level: 3/10
Session Time: 0.5 to 1 hour
Best For: Ankle / first-timers wanting coverability
Mistake to Avoid: Wearing constricting shoes right after getting ink, which irritates healing lines.
5. Micro Bouquet On The Side Rib For Coverability
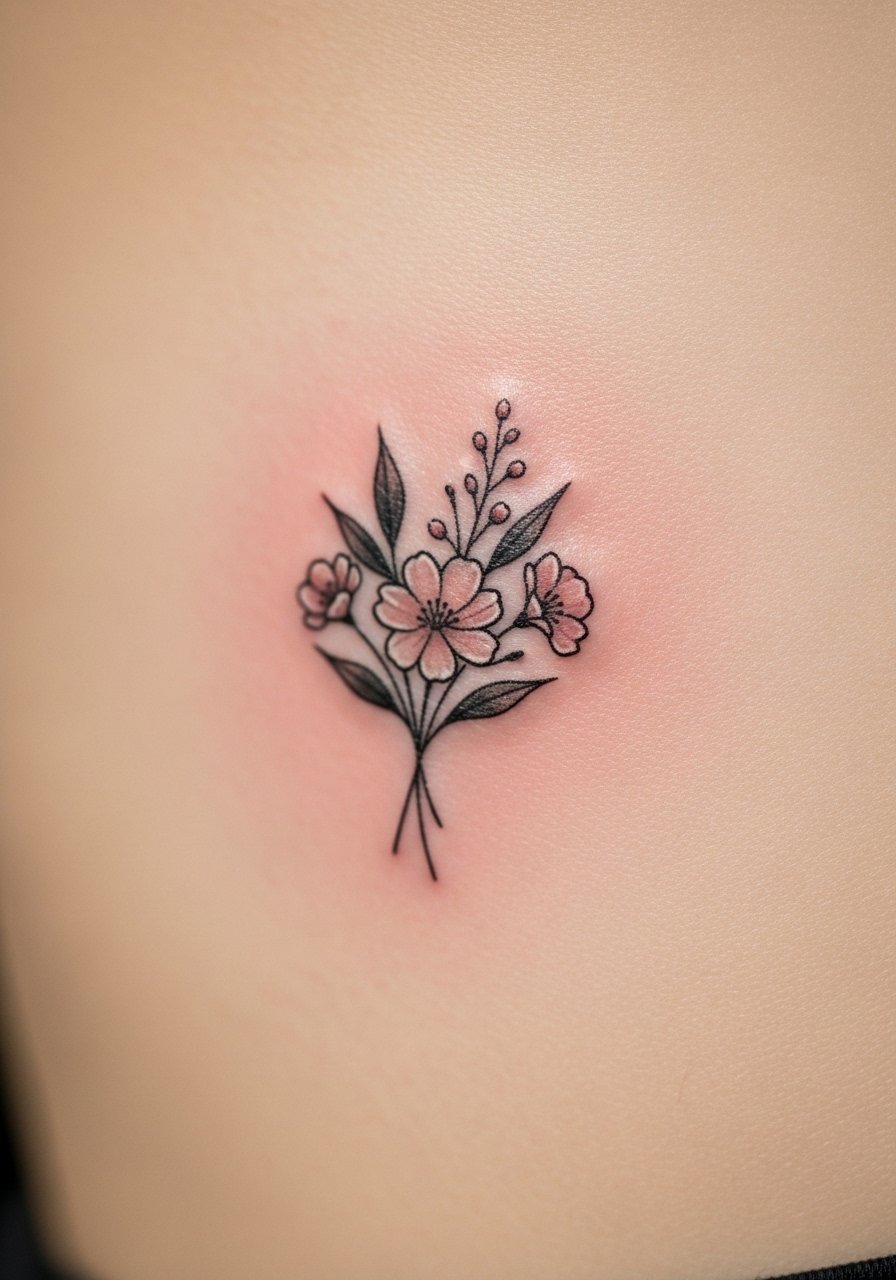
This is one of the smarter options competitors often miss, because a micro bouquet can be designed with a central stem long enough to allow future cover-ups or expansion into a larger piece. The idea reads like a small arrangement from a sketchbook, so the result feels personal and relaxed. Ask for needle groupings that keep stems thin and leave space between elements, about a 1 to 1.5 millimeter gap. This one is best if you want a slightly private placement that you can add to later.
Style/Technique: Small bouquet with expansion planning
Pain Level: 4/10
Session Time: 1 to 1.5 hours
Best For: Side rib / people planning future additions
Mistake to Avoid: Not telling the artist you might expand later, which can make future integration harder.
6. Birth-Flower Ring On A Finger Band
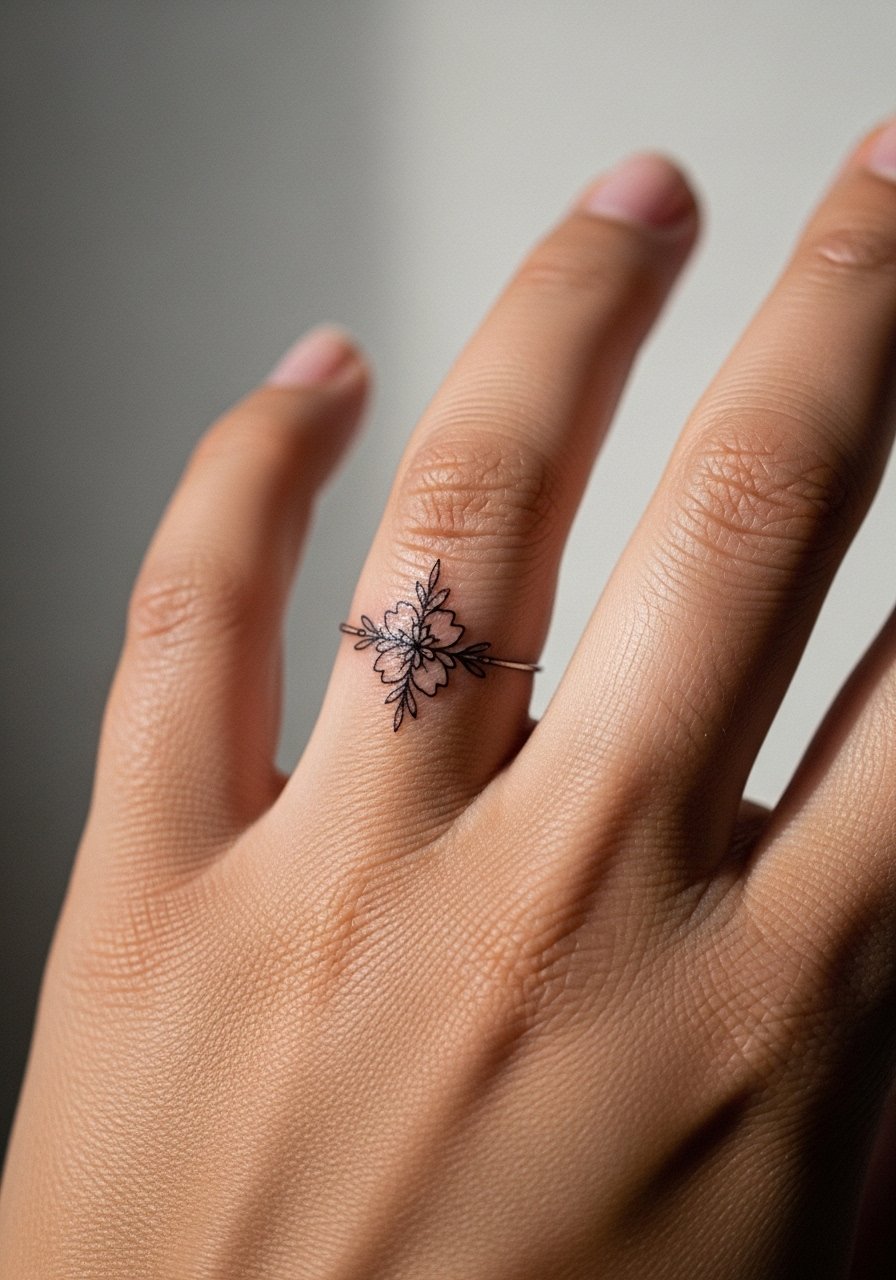
A ring of tiny February flowers around a finger is delicate and wearable, but fine line finger work needs planning. Fingers fade faster due to movement and washing, so expect more frequent touch-ups. The visual effect is jewelry-like and very personal. Use waterproof but breathable aftercare in the initial week, and ask for slightly bolder stems so the motif lasts without looking blown out. This is a short session but high maintenance over years.
Style/Technique: Micro band with repeated motifs
Pain Level: 2/10
Session Time: 0.25 to 0.5 hours
Best For: Finger / people who expect annual touch-ups
Mistake to Avoid: Expecting finger tattoos to be truly permanent without periodic refreshes.
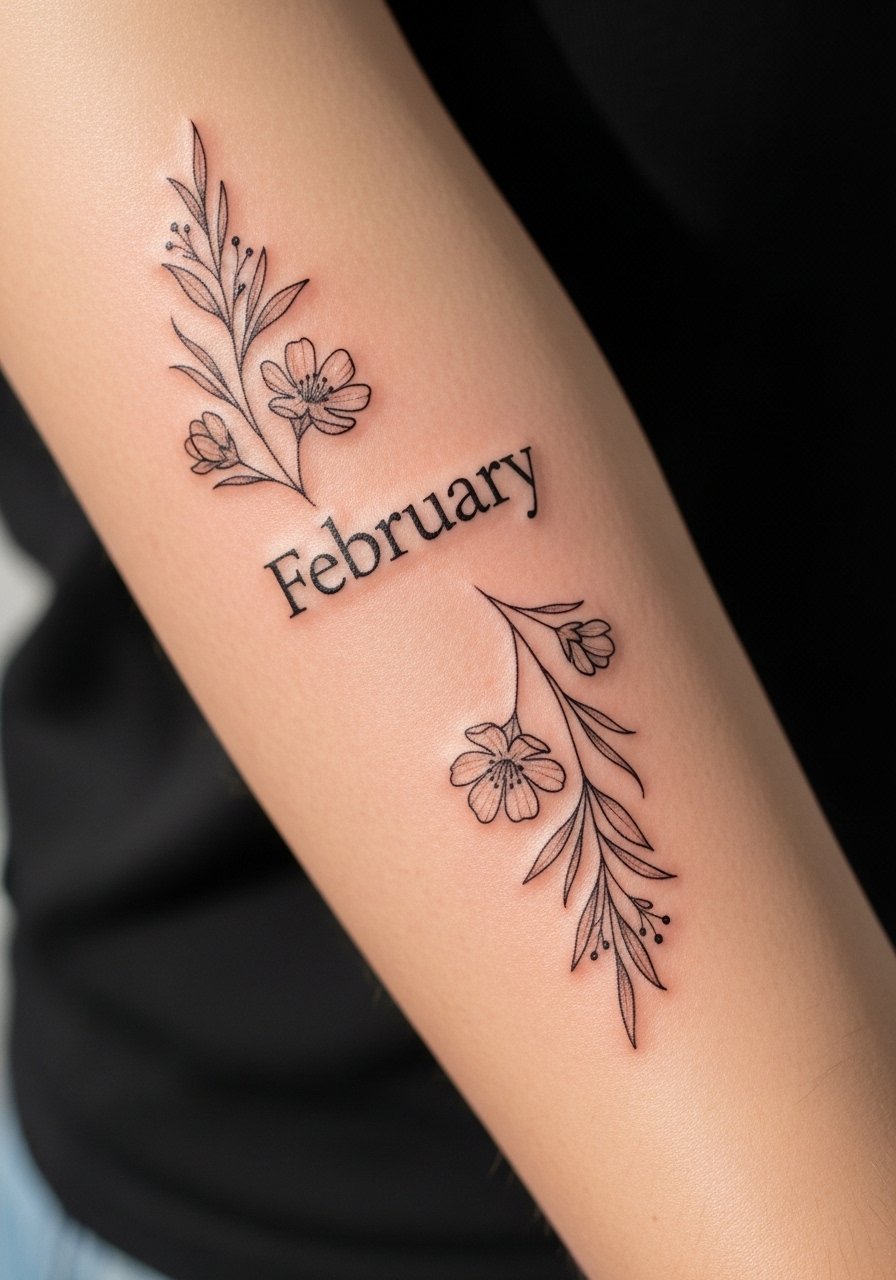
7. Forget-Me-Not Cuff On The Forearm
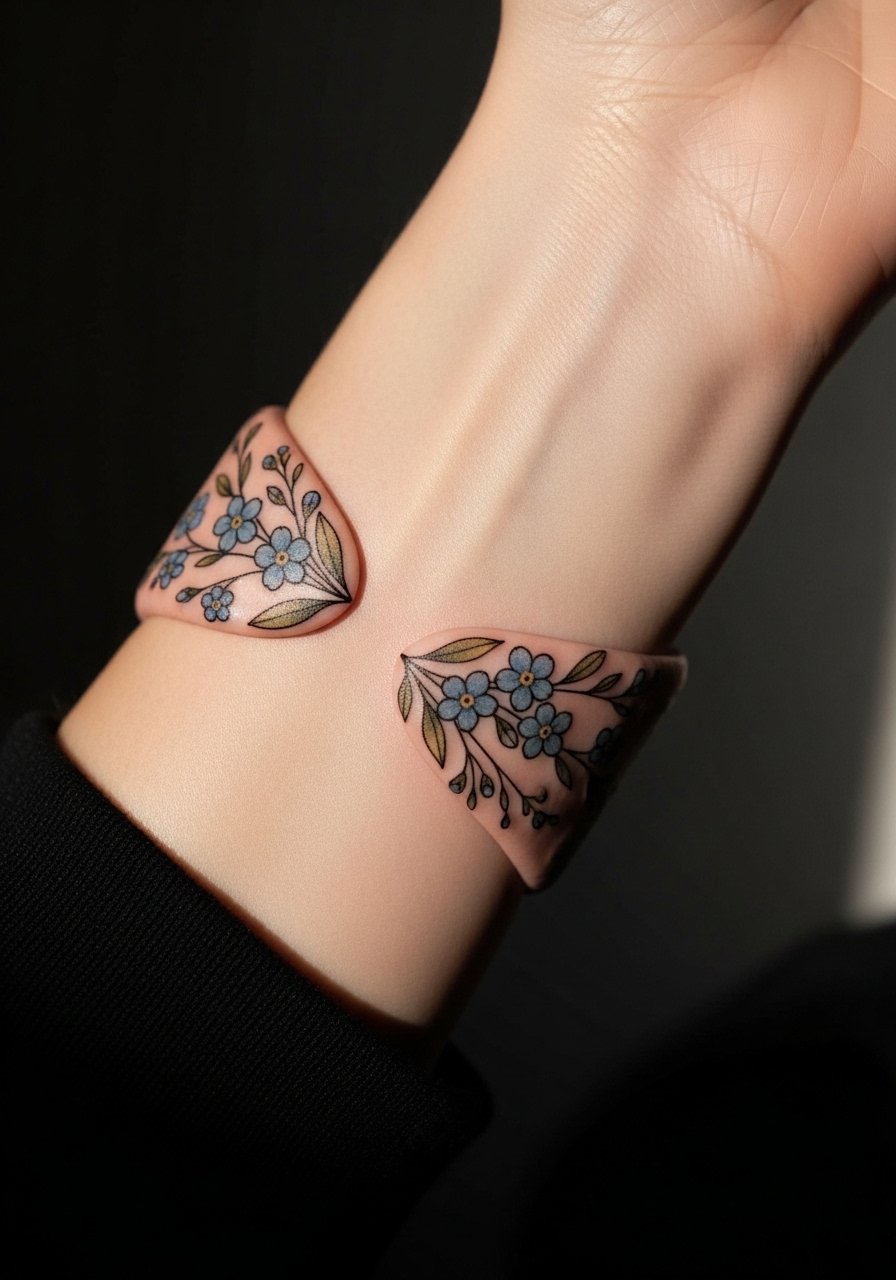
A cuff of forget-me-nots acts like a wrist accessory and looks intentional because of the repetition and rhythm. The visual works if the flowers are spaced so the eye moves around the arm. Request a mix of single-needle petals and tiny 3RL dots for centers to add depth without heavy fill. This is a moderate-time session but easy on budget for the effect. It is a good pick for people who want a visible piece that still reads light and minimal.
Style/Technique: Repeated motif cuff
Pain Level: 3/10
Session Time: 1 to 1.5 hours
Best For: Forearm / visible but tasteful pieces
Mistake to Avoid: Packing the cuff too tightly, which destroys the airy feel.
If any of these ideas have you ready to actually try something, here are the products I reach for and recommend.
Supplies For February Flower Tattoos
Basics:
- fragrance-free antibacterial soap (~$6-12), for gentle cleaning during the first two weeks.
- tattoo aftercare balm (~$8-20), use a thin layer only after the initial scab forms.
- medical-grade sterile bandages (~$10-18), for first-night protection on fresh work.
Tools & Artist Aids:
- thermal transfer stencil paper (~$12-25), useful if your artist offers custom stencils.
- single-needle cartridge set (~$15-40), for artists who do micro work and for learning about the gear.
- disposable razors (~$6-12), to prep small areas cleanly without irritation.
Comfort & Finish:
- alcohol-free numbing wipes (~$10-20), for low pain tolerance sessions.
- broad-spectrum SPF stick (~$8-16), essential to protect fine lines once healed.
8. Single Stem Rosebud Behind The Ear

A single rosebud sits small and sweet behind the ear, and because it follows the skull curve it reads like a natural accent. This placement is great for someone who wants a discreet February bloom. Use a single-needle for the bud outline and a soft 3RL for tiny shadow dots in the bud for texture. Expect about 30 to 45 minutes of work and be upfront if you need frequent breaks. This heals with minimal scabbing if you keep the area dry.
Style/Technique: Micro rosebud accent
Pain Level: 2/10
Session Time: 0.25 to 0.75 hours
Best For: Behind ear / discreet placement
Mistake to Avoid: Letting hair rub the fresh ink for the first few nights, which blurs lines.
9. Hellebore Single-Petal Collarbone Accent
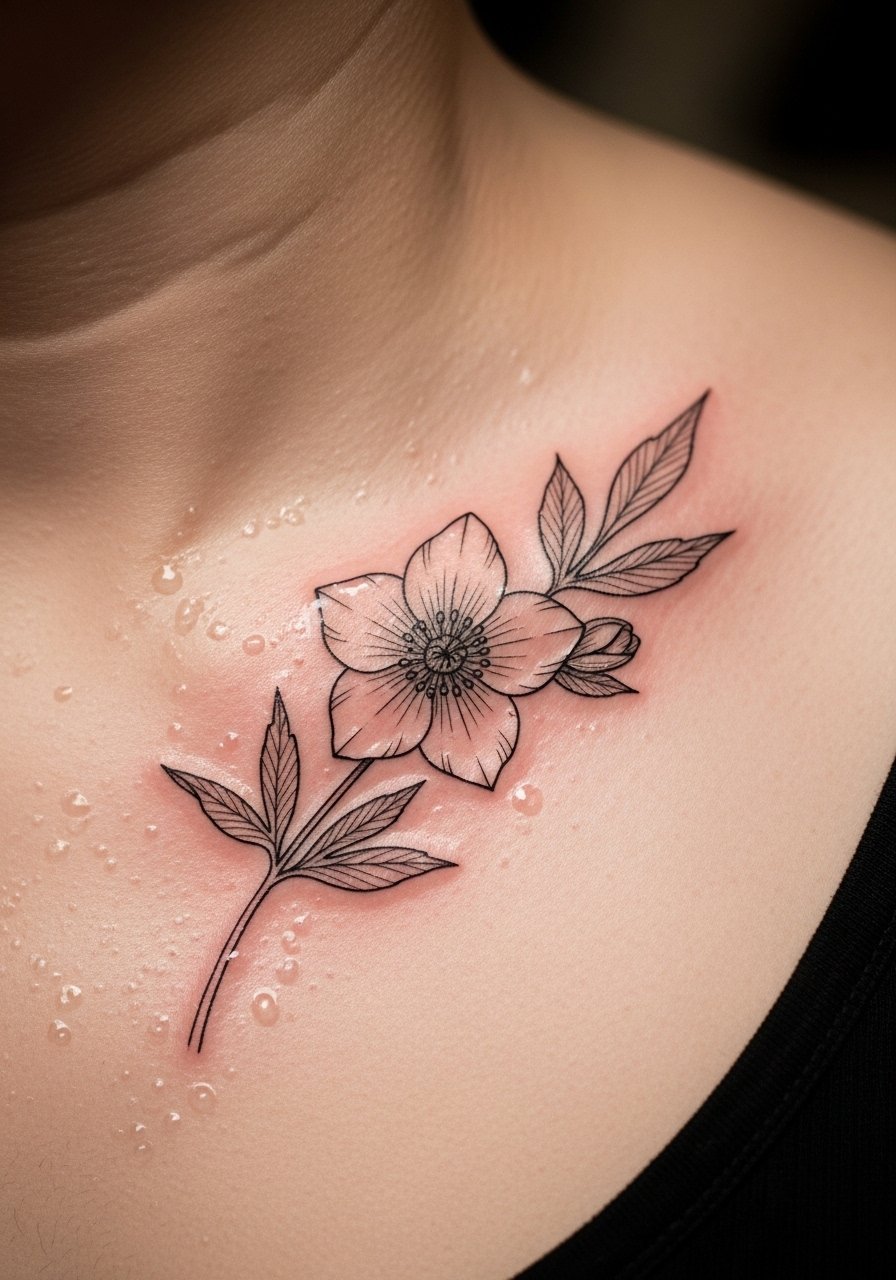
A single hellebore petal on the collarbone looks like it was placed there on purpose because of the way the collarbone catches light. This is a slightly dressy spot, visible in open necklines and easy to cover for work. Ask the artist to use slightly bolder stems where friction might occur, and keep petal edges spaced about 0.7 millimeters apart for longevity. This is a good mid-budget pick and ages with character if you protect it from sun.
Style/Technique: Single-petal accent
Pain Level: 3/10
Session Time: 0.5 to 1 hour
Best For: Collarbone / visible in certain outfits
Mistake to Avoid: Skipping SPF after healing, which accelerates line fading.
10. Camellia Collar Tattoo With Tiny Stems
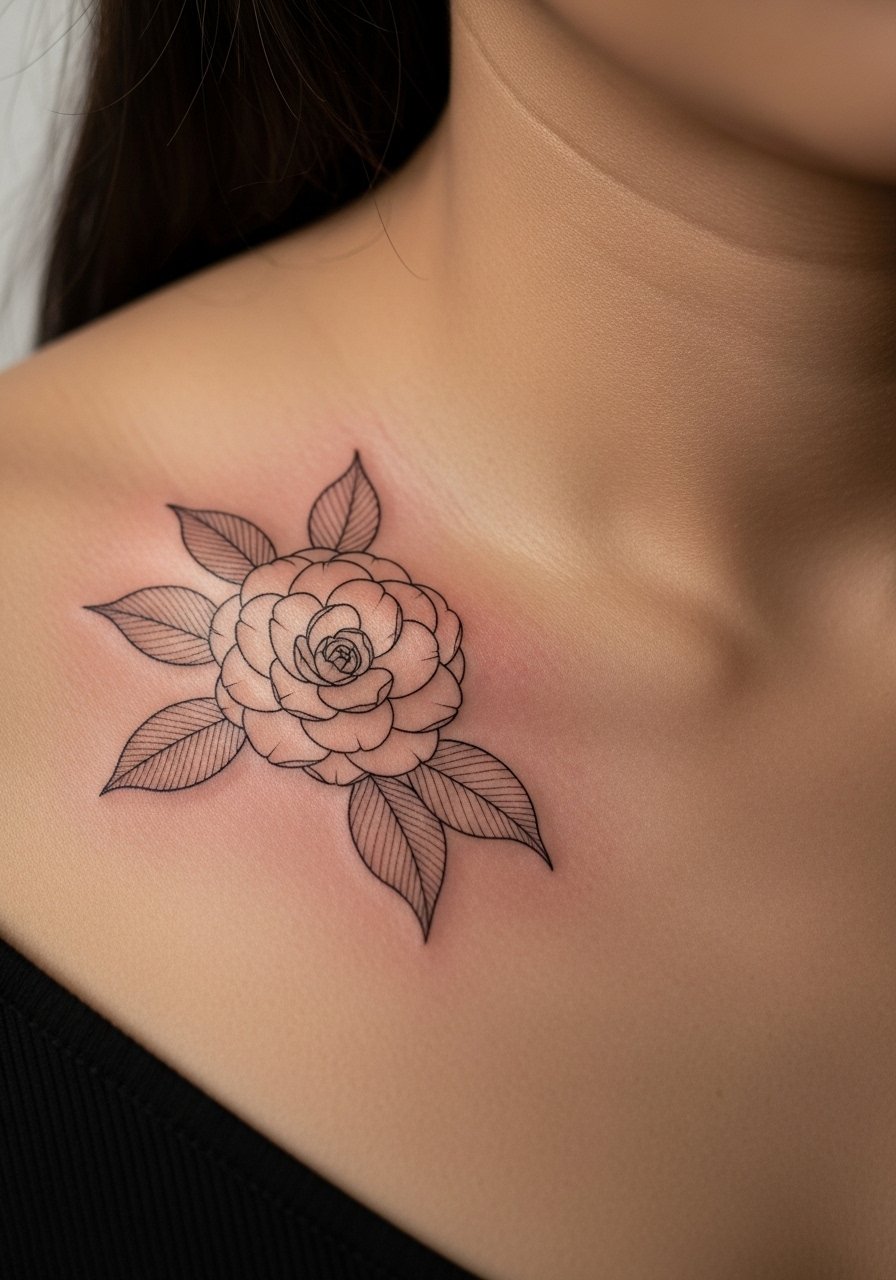
A camellia with tiny connecting stems looks like a vintage botanical sketch on the shoulder. The idea works because camellia petals are broad, so you can pair thin outlines with minimal dotwork for depth without filling. This placement is versatile and allows for future expansion into a shoulder piece. Ask about needle depth and avoid overworked shading. Expect a longer session if you want additional dot texture.
Style/Technique: Sketchbook-style camellia
Pain Level: 3/10
Session Time: 1 to 1.5 hours
Best For: Shoulder / people planning larger pieces
Mistake to Avoid: Demanding heavy shading at the first appointment, which can scar and blur the fine lines.
11. Hyacinth Ankle Sprig With Tiny Dots
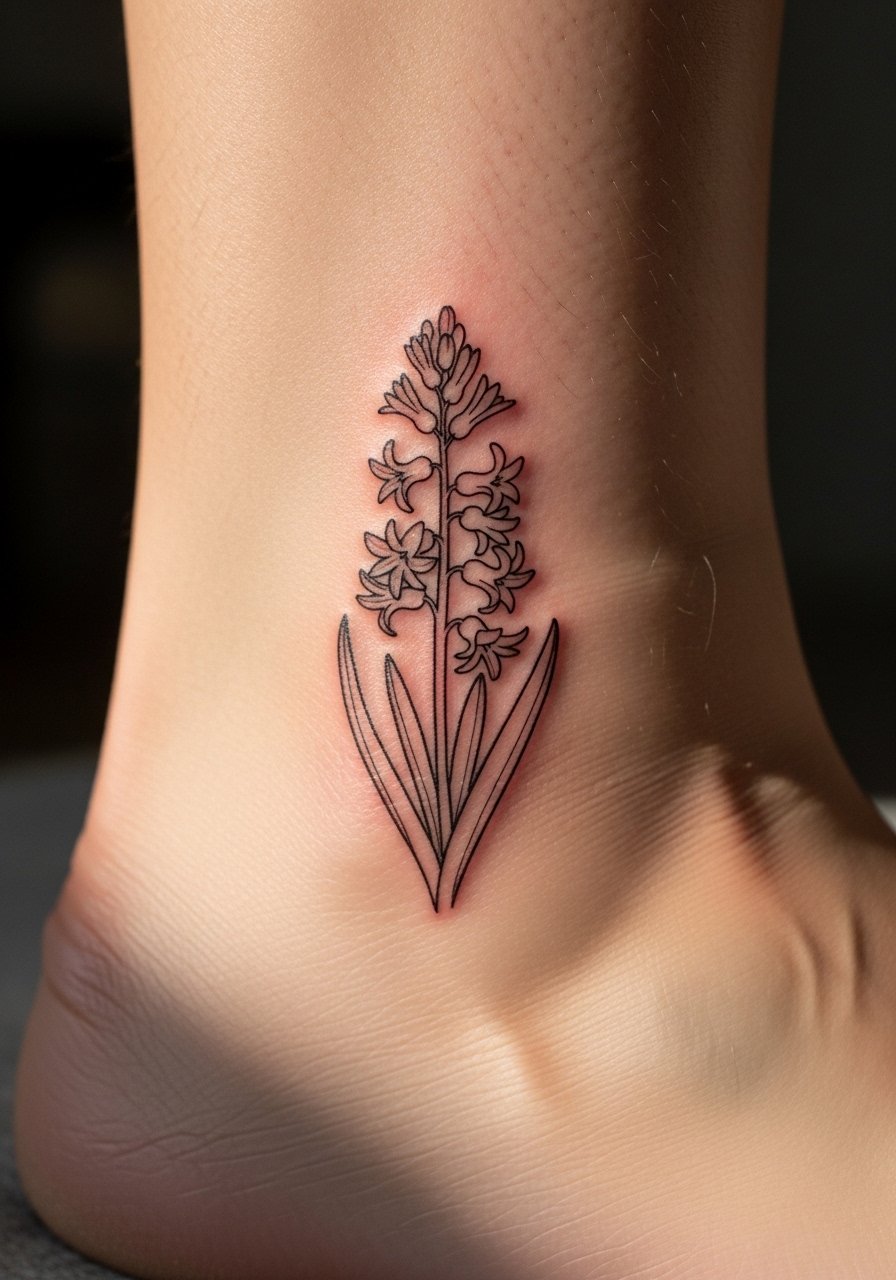
Hyacinth’s clustered flowers read well as a sprig along the ankle where the curve gives the design motion. Use dotwork for the flower clusters and single-needle lines for stems. This gives the piece a soft texture that ages gracefully, and it is a low-cost choice with about a 45-minute session time. If you have active ankles or play sports, consider placement slightly higher to avoid constant abrasion.
Style/Technique: Clustered dotwork sprig
Pain Level: 2/10
Session Time: 0.5 to 1 hour
Best For: Ankle / active people who can modify footwear while healing
Mistake to Avoid: Choosing the exact spot inside shoe rub paths, which causes premature fading.
12. Ranunculus On The Shoulder Blade With Light Stippling

Ranunculus has layered petals that translate into light stippling rather than heavy shading for a fine-line approach. Shoulder blades are forgiving because the skin is flat and movement is moderate. Ask the artist for stippling centered only in petal overlap zones, and keep the outer edges crisp. This is slightly more advanced technique and may run longer in time, but it creates a soft, hand-drawn result that dresses up with sleeveless tops.
Style/Technique: Stippled petal layering
Pain Level: 3/10
Session Time: 1 to 2 hours
Best For: Shoulder blade / people who want a softer look
Mistake to Avoid: Requesting dense shading everywhere, which defeats the fine-line aesthetic.
13. Tiny Flower Chain Across Knuckles
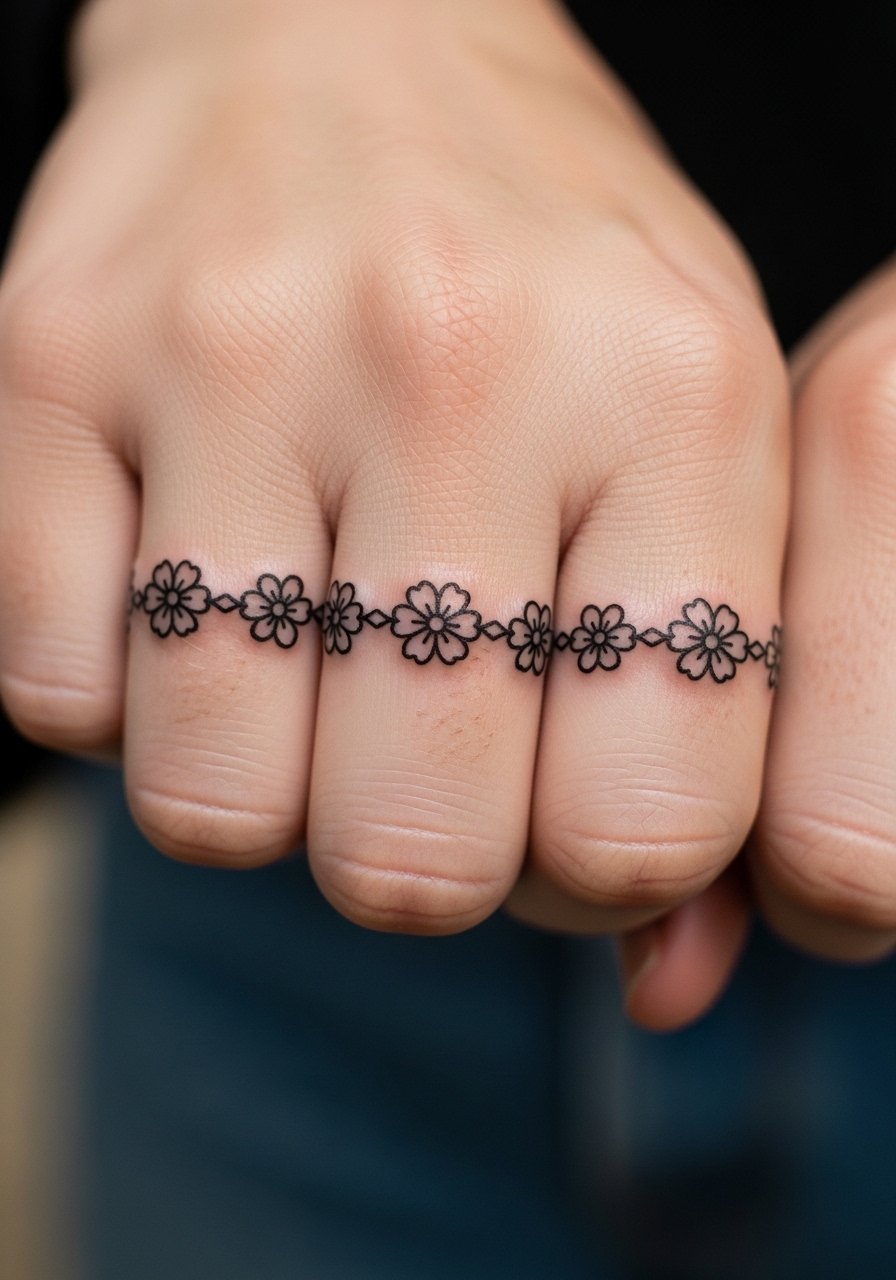
A knuckle chain reads like jewelry and works when each flower is slightly offset so movement does not collapse the design. This is a high-maintenance area and often needs touch-ups sooner. Use a 3RL for the small stems and single-needle for petals, and plan touch-ups every 1 to 3 years depending on hand usage. Keep expectations realistic and enjoy the daily jewelry effect until the first fade prompts a refresh.
Style/Technique: Knuckle chain micro tattoos
Pain Level: 2/10
Session Time: 0.25 to 0.75 hours
Best For: Knuckles / hands-on people who accept maintenance
Mistake to Avoid: Expecting knuckle work to last as long as arm or back pieces without periodic care.
14. Zodiac Flower Composite On The Inner Bicep
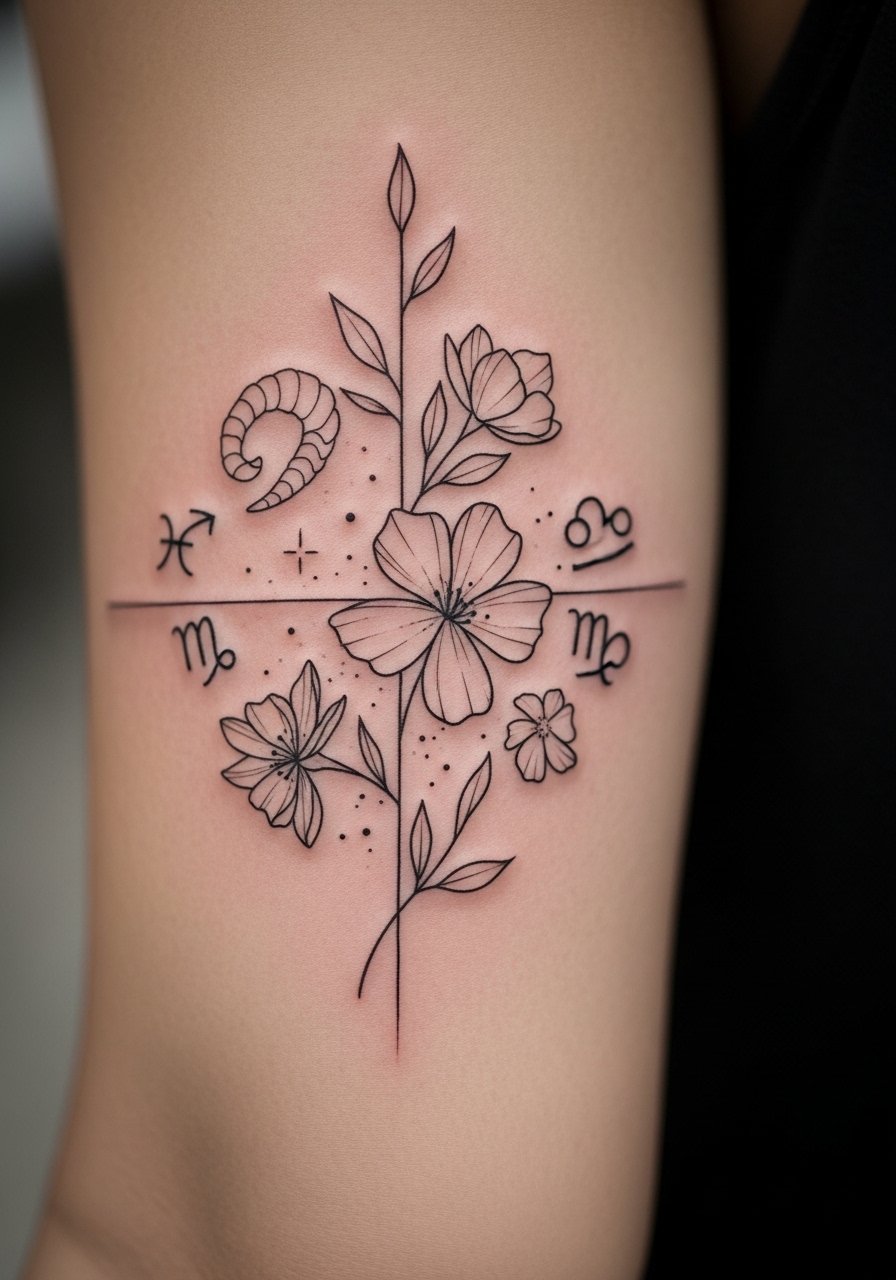
Combine a small February flower with a subtle zodiac glyph for a personal composite that remains delicate. The inner bicep lets the ink live close to you and stay private if needed. This is a strong competitor gap I kept noticing missing in other roundups, because it balances symbolism and botanical imagery without copying cultural motifs. Ask the artist to keep glyph lines single-needle and the flower slightly larger for readability. This is a mid-length session that suits someone who wants meaning without heaviness.
Style/Technique: Symbolic botanical composite
Pain Level: 3/10
Session Time: 1 to 1.5 hours
Best For: Inner bicep / people who want symbolism plus floral form
Mistake to Avoid: Mixing culturally specific symbols without asking about meaning, which can create awkward combinations.
15. Botanical Sleeve Starter With Tiny February Blooms
If you want to grow a sleeve over time, start with a series of small February blooms placed with breathing space. This approach solves the common problem of trying to force a full sleeve from a single visit. Ask the artist for mapping first, and keep each motif sized so future shading or background can be added without losing the fine lines. This is a multi-session plan, but initial costs are manageable and each session stays under two hours for comfort.
Style/Technique: Modular sleeve planning
Pain Level: 4/10
Session Time: 1 to 2 hours per session
Best For: Outer forearm / people planning long-term work
Mistake to Avoid: Getting too many overlapping elements in the first session, which limits future options.
Fine Line Tattoo Care Moves
Thin layers work best. Three thin applications of tattoo aftercare balm keep the area moist without suffocating the scab, which helps lines settle cleaner than one heavy layer.
Grab fragrance-free antibacterial soap. Gentle cleansing twice a day for the first week prevents crust build-up that can pull on fine lines.
Cover fresh work for the first night with a medical-grade sterile bandage, then air the area during the day to avoid trapped moisture.
If your hands are involved in the piece, swap to loose-fitting clothing and use a broad-spectrum SPF stick once healed to slow line fading.
Most artists I trust recommend waiting at least six weeks before a swim or hot tub, because prolonged soaking weakens the scab and can blur fine work.
