
I kept choosing clever places and then wondering why the line scabbed into a blotch, until one artist told me I was treating tiny tattoos like big ones. I learned the hard way that small designs need smaller expectations and finer handling, not louder ink. After a few ruined scripts and a knuckle that never smoothed out, I started sketching with the goal of clean healing first, visual drama second.
These are small, low-fuss designs meant to heal cleanly even if you sleep on them or wear jeans that brush your ankle. They are for people who want discreet marks, low-session time, and easy aftercare. Many of these can be done in a single short session and cost less because they use one needle grouping and minimal shading. Across five shops I have visited, artists advised the same thing, keep lines sparse and spacing at least 1 to 2 millimeters so scabbing does not merge. I wrote each idea from the perspective of visibility at work, simple aftercare steps, and what to expect week to week.
1. Tiny Crescent On Inner Wrist
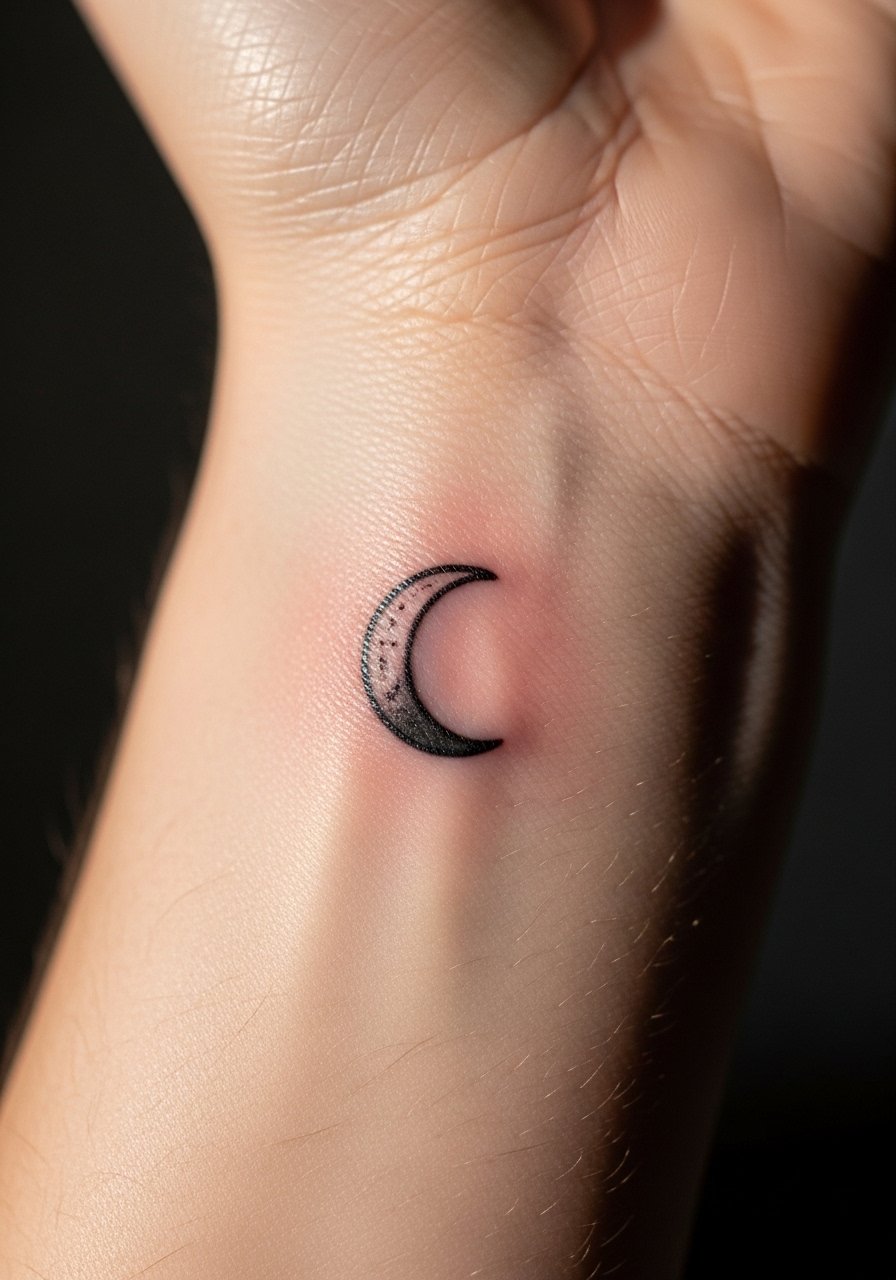
Style/Technique: Fine-line minimal
Pain Level: 2/10
Session Time: 15 to 30 minutes
Best For: Visible, easy-to-cover placement, first-timers
A single crescent reads modern and ages predictably because it is just one clean curve. Visually it works because the negative space around it keeps the eye from demanding more detail. This fits people who want a visible but subtle piece and prefer a one-visit appointment. For aftercare I used a pea-sized amount of organic tattoo balm twice a day for the first ten days, rubbing gently along the line not across it. A useful detail most guides skip is to press rather than rub your cloth when drying, so you are not dragging a tiny flake of scab off mid-heal.
Mistake to Avoid: Applying too much ointment and smothering the line, which can soften scabs and cause ink spread.
2. Single Dot Behind the Ear
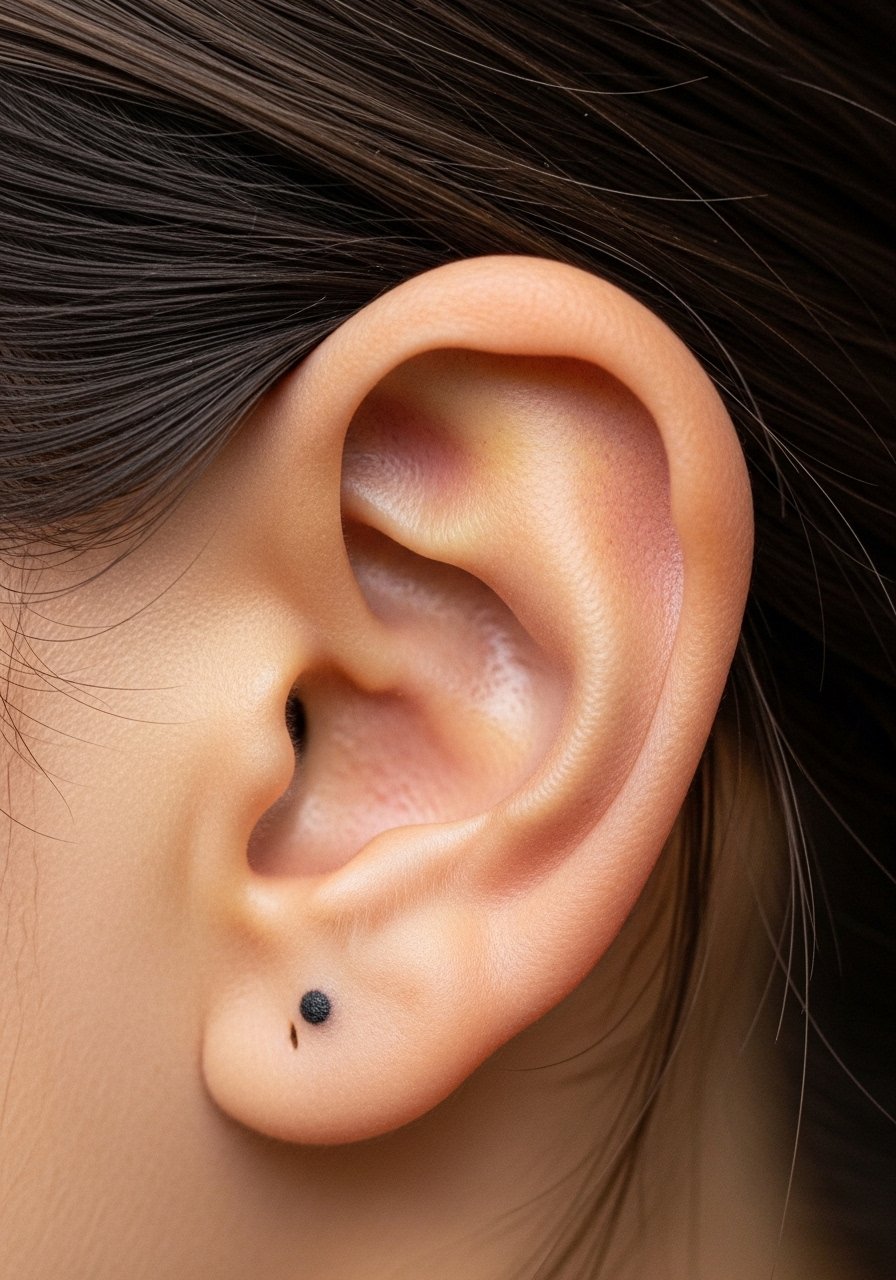
Style/Technique: Micro-dot single-point
Pain Level: 1/10
Session Time: 10 to 20 minutes
Best For: Hidden placement, low-visibility workplaces
A single dot behind the ear is nearly foolproof. It is small, sits on an angle that rarely rubs, and heals with very little scabbing when you follow a 2x-day wash routine. It creates a quiet punctuation mark, and it is budget-friendly for first-timers or people who want a tiny accent. I asked my artist to keep the needle depth consistent across that 1mm area so the pigment does not pool, a detail that saves you from touch-ups later. Pack a travel-size fragrance-free cleanser for after gym sessions.
Mistake to Avoid: Picking at the tiny scab because one small dot looks like nothing, which pulls pigment and leaves a white spot.
3. Minimal Wave At Ankle
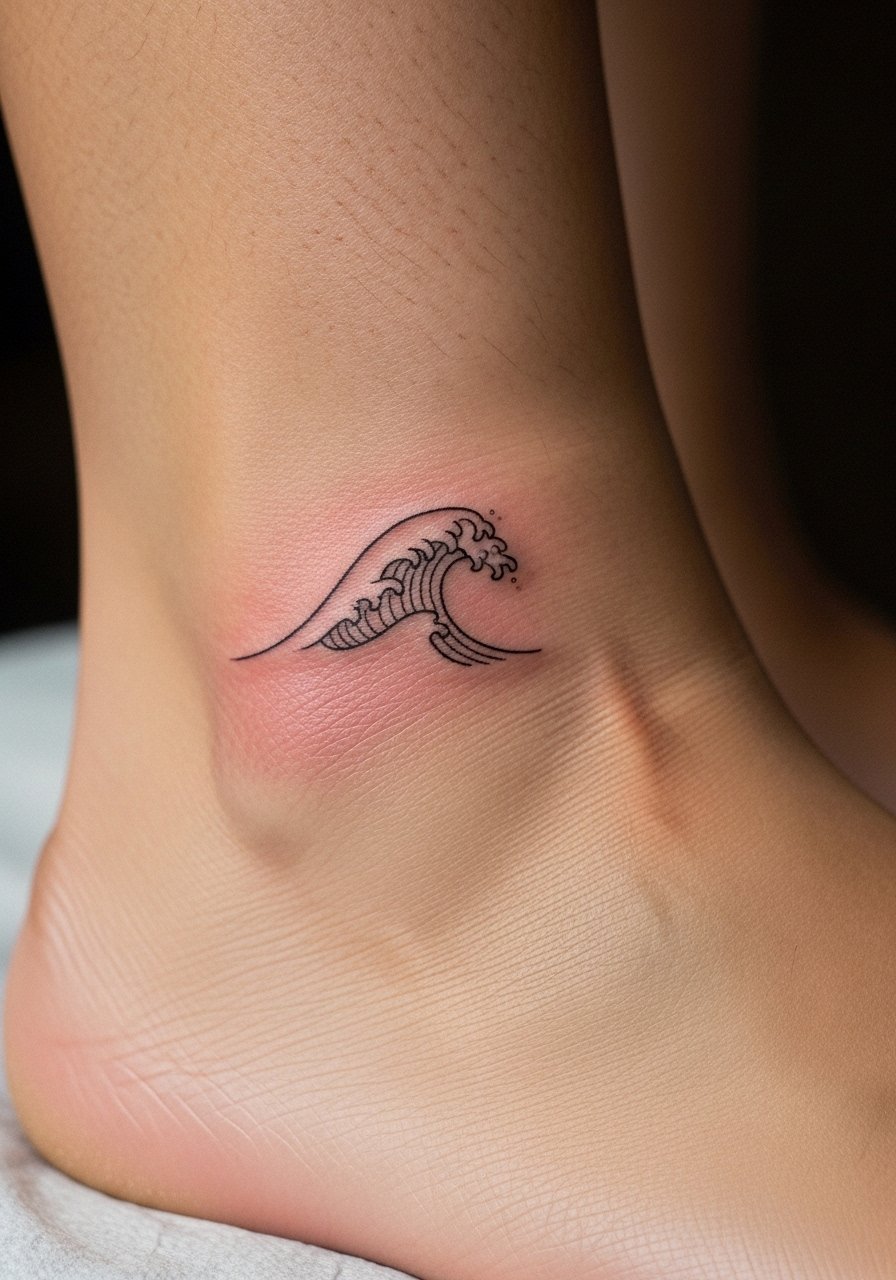
Style/Technique: Single-line curve
Pain Level: 3/10
Session Time: 20 to 35 minutes
Best For: Wearable with sandals, coverable with socks
An ankle wave is a classic small choice that plays well with footwear and shorts. It reads as motion without needing shading or color, so ink density stays low and heals more evenly. This is a good fit if you are active, because I recommend keeping footwear friction to a minimum for the first week. A practical tip I use is to sleep with a clean thin sock over the ankle if your sheets tend to rub. For protection on day one I applied a thin medical-grade waterproof bandage for two hours only, then started regular cleansing.
Mistake to Avoid: Leaving shoes tied too tight around a new ankle tattoo, which causes scabs to harden and crack.
4. Micro Script On Rib Cage
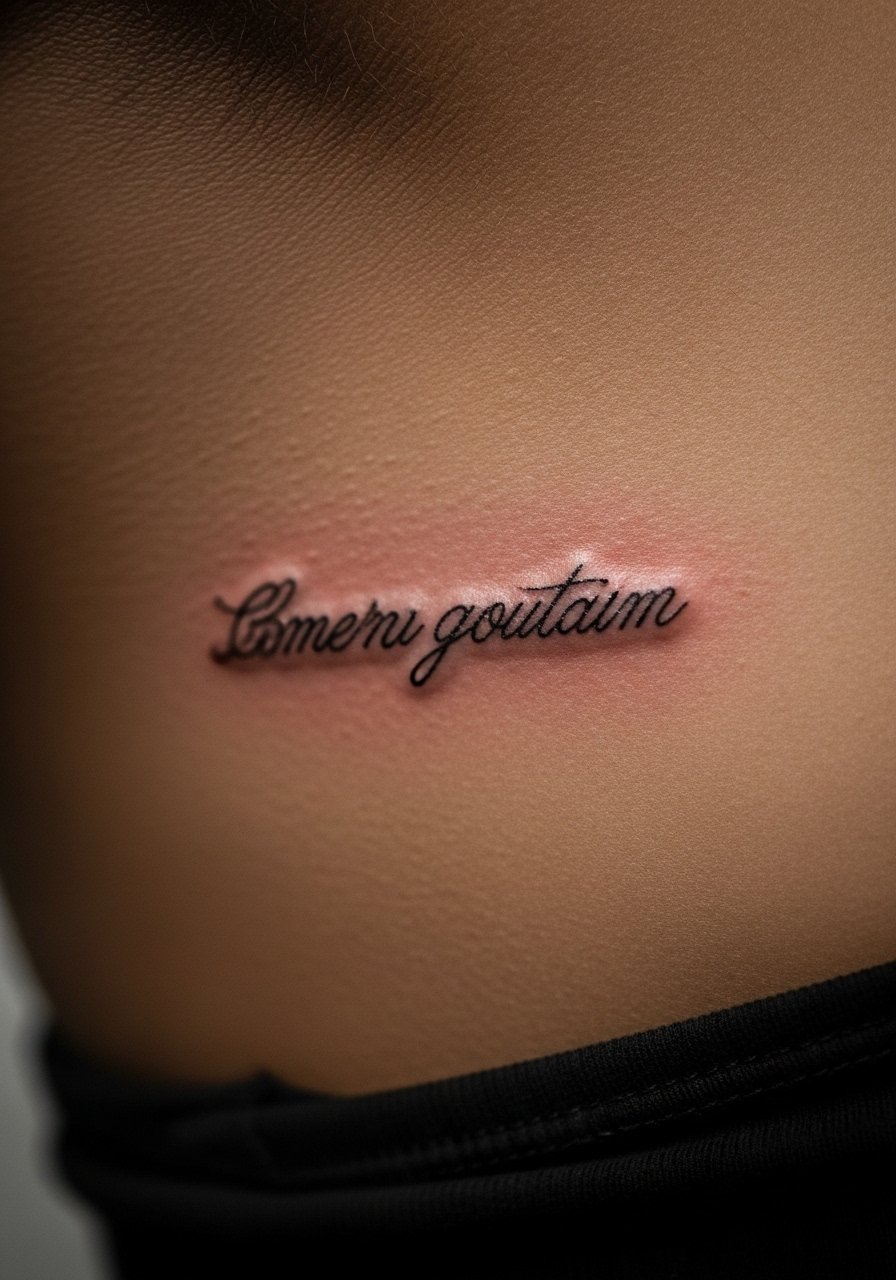
Style/Technique: Fine script lettering
Pain Level: 5/10
Session Time: 30 to 45 minutes
Best For: Coverable, intimate placement
Micro script on the ribs looks personal and ages well if letter spacing is kept open. The rib flesh moves a lot, so the trick is to ask for slightly thicker hairlines than you think you want, because thin hairlines on a high-motion area can blur. I told my artist to space letters at roughly 1.5 millimeters to avoid merge during healing. Because it is a larger skin-moving zone, expect a touch of extra tenderness. Use a breathable cotton shirt for the first week and pat dry after washing. A small jar of unscented healing ointment kept irritation down.
Mistake to Avoid: Picking placement by mirror only, without testing stretch, which makes letters warp when you move.
5. Tiny Sunflower Behind Collarbone
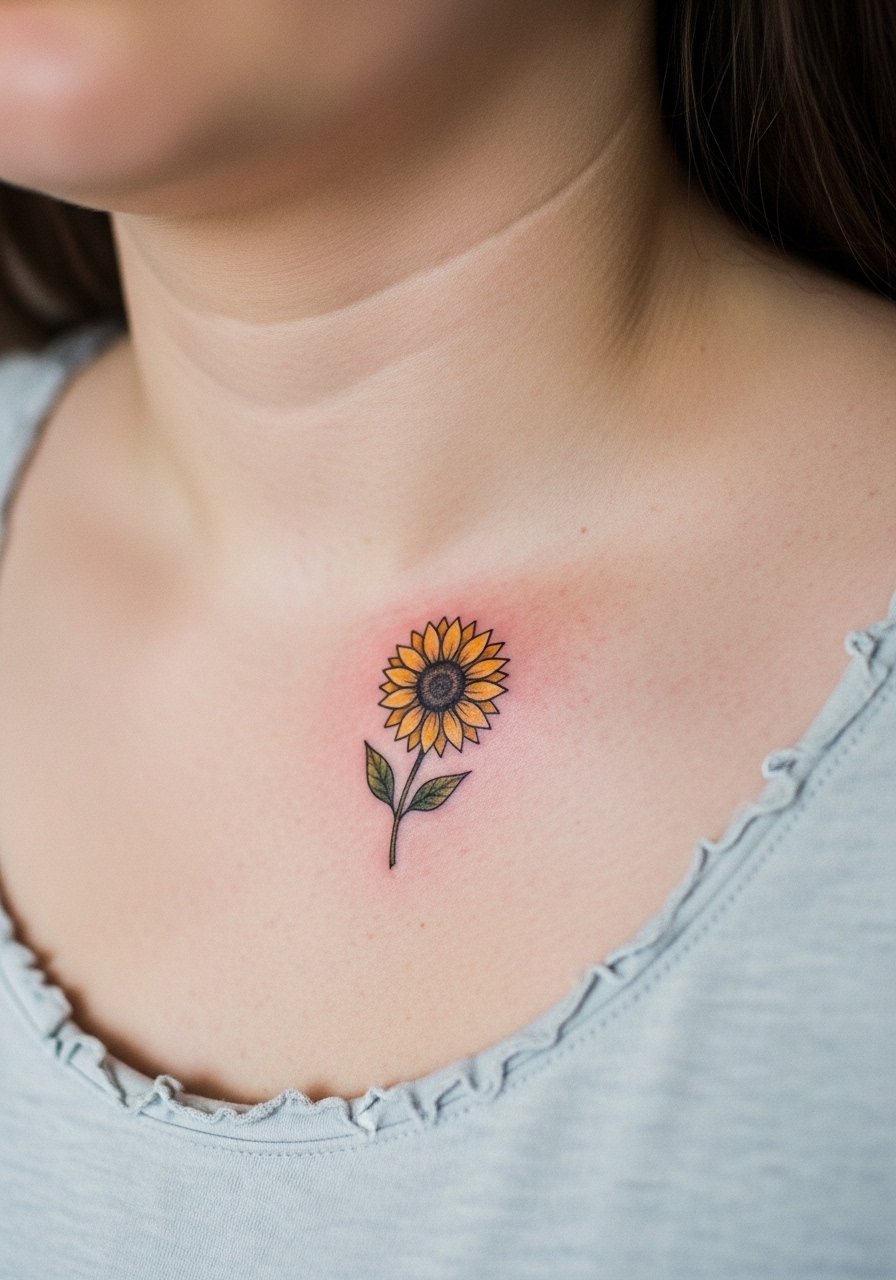
Style/Technique: Minimal botanical dot-work
Pain Level: 4/10
Session Time: 20 to 40 minutes
Best For: Feminine placement, slightly visible with tops
A small sunflower uses dot-work and very small lines, so it avoids dense black fills that can heal patchy. It reads warm and intentional while still being low maintenance. Keep dots at least 1 mm apart and the center tiny so scabbing does not turn solid. This placement can catch straps, so I swapped necklaces for soft chains during the first two weeks. To help pet owners, I slept with a clean pillowcase and used a satin pillowcase for the first five nights to cut friction.
Mistake to Avoid: Wearing rough fabrics that brush the area constantly, which drags scabs and flattens the detail.
6. Micro Constellation On Side Finger

Style/Technique: Tiny dot constellation
Pain Level: 3/10
Session Time: 15 to 25 minutes
Best For: Subtle hand accent, partial workplace visibility
Finger tattoos age harsher than other spots but a side placement increases longevity because it avoids top-of-finger wash wear. The gap competitors miss is sizing down the dots and spacing them along the side where soap and rings do not sit. Keep each dot under 1.5 millimeters and stagger placement to avoid a straight line of scabbing. For aftercare I used a thin swipe of tattoo-specific healing cream and avoided hand creams with fragrances for three weeks.
Mistake to Avoid: Putting a ring back on while the tattoo is still shedding, which can smudge fresh pigment and cause patchy healing.
7. Single-Line Minimal Mountain On Calf

Style/Technique: Single continuous line
Pain Level: 2/10
Session Time: 20 to 30 minutes
Best For: Visible with shorts, easy to hide with pants
A small mountain done as one unbroken line looks clean and travels well as the leg changes during activity. The key is to ensure the line weight is consistent so it does not feather during healing. I asked for a 0.3 millimeter thicker line than I thought necessary and it kept clarity after a month. This suits people who run or bike because it avoids dense fills that trap sweat. For the first 48 hours, alternate cool compresses after washing to reduce swelling. A tube of gentle antiseptic soap will help clear bacteria without drying the skin.
Mistake to Avoid: Choosing a too-fine line for high-motion legs, which disappears or blurs quickly.
If any of these ideas have you ready to actually try something, here are the products worth grabbing before you go.
Small Tattoo Healing Kit Picks
Aftercare Essentials:
- Honestly the best staple I use. Organic tattoo balm (~$8-18). Keeps scabs supple and reduces itch.
- For cleaning, a reliable go-to is this fragrance-free cleanser (~$6-12). Gentle and prevents over-drying.
Protection & Sleep:
- Found this while resetting my routine. Waterproof adhesive bandage (~$6-10) for that first short cover.
- If you sleep on your side, a satin pillowcase (~$12-20) cuts friction and keeps borders neat.
Prep & Touch-Ups:
- Numbing if you are nervous, try a light topical numbing cream (~$10-20), use cautiously.
- For small touch-ups later, a fine tattoo aftercare pen (~$8-15) helps keep lines crisp between artist visits.
Tiny Tattoo Healing Habits
Bold start: Use thin layers, always. A thin smear of organic tattoo balm beaten in until barely visible prevents smothering the scab and keeps flakes from sticking.
Grab fragrance-free cleanser for about $8. Wash with lukewarm water twice a day and pat dry with a clean towel, do not rub.
I learned the hard way that friction kills detail. Sleep on a satin pillowcase and if your piece is on the ankle or rib, slip on a soft sock or loose tee while the scab phase is active. A satin pillowcase costs about $15 and is the easiest prevention.
Most people reach for thick creams. Skip heavy lotions for the first two weeks and use a light healing cream instead, applied in a pea-sized amount two times daily.
If you have a small, high-motion placement like fingers, plan to revisit your artist for a touch-up after three months if needed. Keep a small aftercare pen in your kit for travel and quick maintenance.
